Olympus m.Zuiko 45mm f1.2 Pro Lens


As usual there is a video for those that prefer or the full written piece is below.


The Olympus m.Zuiko 45mm f1.2 PRO lens mounted on an EM1 mk ii.

The Olympus m.Zuiko 45mm f1.2 Pro Lens was announced in by Olympus back in October 2017 as one of their trio of f1.2 lenses. The others being the 17mm and 25mm. According to Olympus they were designed to “have beautiful defocusing effects” and “beautiful feathered bokeh to make your image stand out” (https://shop.olympus.com.au/m-zuiko-ed-45mm-f1-2-pro). In the case of the 45mm (and I suspect the other two) the lens is designed so that spherical aberration is not fully corrected. This means that as light rays enter the lens only those that pass through the centre of the lens are made to come together at the focus point. The rays at the edges focus slightly in front of that point and this causes the bokeh to have a gentle roll off – the so-called “feathered bokeh”. Olympus themselves claim this matches “classic” older lens designs. At this point it should be noted that spherical aberration and chromatic aberration are different. Spherical aberration occurs when a single wavelength of light or colour cannot be focused whereas chromatic aberration occurs when a lens cannot focus the red, green, and blue wavelengths on a single point. Although Olympus claims to match the performance of older classic lenses they have chosen a lens design that is very different from them.


Lens Construction and Build Quality

Olympus 45mm f1.2 lens has 14 elements in 10 groups with one ED element, four HR element, and one aspherical element.


Focal Length 45mm (90mm in full frame equvalence)
Angle of view 27º
Minimum focusing distance 50cm
Maximum magnification 0.1 X
Lens construction 14 elements in 10 groups with one ED element, four HR element, and one aspherical element
Maximum aperture F1.2
Minimum aperture f16
Diaphragm 9 curved blades
Focusing Auto focus – yes, MSC mechanism making fast and silent AF possible in video mode.

Manual focusing – the focusing ring can be pulled back to engage a clutch mechanism with hard stops at each end.

Filter size 62mm
Dimensions 85mm (h) x 70mm ⌀
Weight 410g
Other features Hermetic sealing making the lens dust proof, splash proof, and freeze proof. 60529 IPX1 IP rating.


The lens mount of the Olympus 45mm f1.2 lens. The mount has an ‘o’ ring that contributes to its 60529 IPX1 IP rating.


To see how this differs from an older classic design lets compare it to Olympus OM Zuiko 50mm f1.4 which was first produced in 1971 and remained in production until 1984. 


Olympus OM Zuiko MC 50mm f1.4


Focal length 50mm 
Angle of view On 35mm 43º, on micro four thirds 21º
Minimum focusing distance 45cm
Maximum magnification 0.15 X
Lens construction 7 elements in 6 groups
Maximum aperture f1.4
Minimum aperture f16
Diaphragm 8 curved blades
Focusing Manual focus with a straight helicoid
Filter size 49mm
Dimensions 36mm (h) x 60mm ⌀
Weight 230g


The 45mm f1.2 dwarves the f1.8 version.


Comparing the Olympus 45mm f1.2 to the Canon EF 50mm f1.8. On their respective bodies they both offer a similar field of view.


The 45mm f1.2 mounted on an Olympus EM1 mk i compared to the Voigtänder 75mm f2.5 Color-Heliar mounted on a Sony A7r. Both a ideal focal lengths for portraiture.

Physically this is a large lens. It dwarfs my Olympus 50mm f1.4, my Canon EF 50mm f1.8 and my Sony FE 50mm f1.8. It is a smidge larger than the Olympus m.Zuiko 12-40 f2.8 Pro and 27g heavier. The 45mm f1.2 follows the look of the other lenses in the Pro line and it also has a L-Fn button which can be programmed to various functions on Olympus cameras. In the hand the lens is reassuringly solid, it has that dense feeling that quality optics have. The focusing ring is nice and large and has the same ribbing that all the other lenses have in the Pro line. Like the other Pro lenses the 45mm f1.2 enables manual focusing by pulling back the focusing ring to engage a clutch to give a nice smooth focus throw of about 110º that has hard stops at either end. Combined with focus peaking this makes for manual focusing nirvana. As to what the lens is made out of this is hard to say, the lens mount is chrome plated brass, parts of the lens barrel have a metallic feel, and other parts feel plastic. Is this a problem? I don’t think so. For certain applications metals can be a poor choice and high quality engineering plastics such as ABS make better sense. In fact Sigma makes a big deal out of the use of their Thermally Stable Composite (TSC) which is substantially stronger than conventional polycarbonates while having similar thermal expansion properties to aluminium. Bottom line the 45mm f1.2 feels nice in the hand and is easy on the eye.


Optical Performance


The Olympus m.Zuiko 45mm f1.2 PRO lens is sharp wide open.


Lens sharpness test at f1.2 and f4. Click on the image to see it larger.

Image sharpness in the centre of the frame wide open is good and reaches its best at f4. The corners wide open are less sharp than the centre, however, by f2.8 the sharpness and contrast improves considerably and the lens reaches optimum sharpness at f4. By f8 the image starts to soften due to diffraction. Vignetting is also present wide open but this disappears at f4. There is a minute amount of pincushion distortion present, but unless you are shooting very demanding architectural work then it is largely unnoticeable. Chromatic aberration is present on high contrast edges, but it is very slight and easily removed in post. Longitudinal chromatic aberration is also present, but it too is very slight and not painfully obvious which is good as it is quite difficult to get rid of in post. All this is managed using firmware corrections. I like to turn these off using RAWTherapee to see how much correction is going on beneath the hood so to speak. The amount of vignetting is greater than the corrected images but it still clears up by f4. The pincushion distortion is also more evident. All in all the firmware corrections plus topnotch lens design make a lens that performs very well.


Chromatic aberration is well controlled and what little there is is easily fixed in post.


Longitudinal Chromatic aberration.


With regard to resistance to lens flare pointing the 45mm f1.2 at a very point light source shows it is quite prone to ghosting flare – images of the lens diaphragm as colourful bright spots. This is more evident on lenses with complex constructions with lots of lens elements. The red blobs in the photo are not lens defects. They are caused by light being reflected  off of the sensor surface back onto the rear element. As each pixel is reflected it causes a grid pattern. Unfortunately the smaller lens flange distances on mirrorless cameras means this phenomena is more apparent than on a DSLR with their great lens flange distance.


The Olympus 45mm f1.2 is quite prone to flare so it is advisable to use the included lens hood.


The Olympus 45mm f1.2 is quite prone to flare so it is advisable to use the included lens hood. At f16 the sun stars are quite pronounced.


f1.2 bokeh balls test. In the centre of the frame nice round and smooth bokeh balls with no evidence of any onion rings. At the edgeges you can see cats eye shapped balls. Click on the image to see it larger.

Olympus make great claims about the bokeh, or more importantly the feathered bokeh of this lens. Up until the announcement of this line of lenses I’d never heard the term feather bokeh before and to be honest I’m not all that sure about what it is and how that you quantify it. I guess in simple terms Olympus means that edges of the bokeh balls are not harsh and to quantify how feathered they are we’ll have to make some comparisons. At f1.2 the centre of the frame has nice round bokeh balls with no evidence of any onion rings. Onion rings occur with the use of ground aspheric lens elements. Basically the grinding process leaves a series of ridges which can be seen with a defocused point source. The biggest problem with them is that for most people they go unseen, but once seen they can’t be unseen. At the edges of the frame there is cats eye shaped bokeh – this is caused by mechanical vignetting from the lens barrel.  At f5.6 I was quite surprised to see star burst effects forming around specular highlights, I was expecting them to start appearing at the f11 mark. By f16 the bokeh balls in the corners have become spherical.

So the question is what to compare the Olympus 45mm f1.2 to? The most obvious contender is the 45mm f1.8. In their advertising blurb for the f1.2 Olympus compare the lens on an Old EM1 mk ii to a full frame DSLR with 85mm lens. Interestingly having made such a bid deal about the bokeh the only comparison is made with weight so I’ve decided to make the comparison using weight and bokeh quality with the Canon EF 50mm f1.8 on a Canon EOS550d. The 50mm lens has an equivalent focal length of 80mm in full frame terms. The nearest full frame equivalent I’ve got on hand is the Cosina Voigtländer 75mm f2.5 Color-Heliar on a Sony A7r2. Finally as I’ve already talked about the Olympus OM Zuiko 50mm f1.4 I’ll add it to the list with it mounted to the Olympus EM 1 mk ii. The older Olympus and the Canon and Voigtländer are also considered classic lens designs.

Olympus OMD EM1 mk ii with Olympus 45mm f1.2 Pro lens 984g
Olympus OMD EM1 mk ii with Olympus 45mm f1.8 737g
Canon EOS550d with Canon EF 50mm f1.8 mk ii 601g
Sony A7r2 with Voigtländer 75mm f2.5 Color-Heliar 932g
Olympus OMD EM1 mk ii with Olympus OM Zuiko 50mm f1.4 980g

So the Olympus 45mm f1.2 combo is the heaviest. Lets look at the bokeh. With the three Olympus lenses I’ll just compare the lenses at widest aperture of the slowest lens. With the other two I’m going take equivalency into account so 45mm f1.2 on the Olympus is roughly equivalent to 50mm f1.8 on the APSC sensor and the Olympus’ f1.2 is equivalent to f2.5 on the full frame sensor. 


Bokeh comparison between Olympus 45mm f1.2 and the Olympus 45mm f1.8. Click on the image to see it larger.


First cab off the rank is the Olympus m.Zuiko 45mm f1.8 lens. It has an optical construction of 9 elements in 8 groups, weighs in at 116g and has a 37mm filter thread. This little lens is an absolute gem and I use it a lot to do both stills and video product shots. It currently retails for $1300 AUD less than the f1.2. Wide open at f1.8 there is vey little to distinguish it from the more expensive lens at f1.8. So I would have to say unless you absolutely need an aperture of f1.2 then save your money.


Bokeh comparison between the Olympus 45mm f1.2 and the Olympus OM 50mm f1.4 at f1.4. Click on the image to see it larger.


The Olympus OM Zuiko 50mm f1.4 was introduced way back in 1972 with the original OM1. The lens used here is the revamped version with improved coatings that came out in 1984.  The lens construction is very simple with 7 elements in 6 groups and no fancy glass. Wide open it is not the sharpest lens and the bokeh balls are irregularly shaped, but stop it down to f2 and the bokeh is just as good as the 45mm f1.2 at f2. It’s possible to pick this lens up for about $100 on eBay and for $150 you can get it with a film SLR such as an OM1 or 2.


Bokeh comparison between the Olympus 45mm f1.2 at f1.2 and the Canon EF 50mm f1.8 at f1.8. Click on the image to see it larger.


When you put the Canon EF 50mm f1.8 on an APS-C camera such as my EOS550d it has a focal length that is equivalent to 80mm on full frame. It has a simple double-gauss design of 6 elements in 5 groups. This model is the mk ii version which was introduced in 1991 and is sometimes called the “plastic fantastic” because of its plastic body and lens mount. At the edges and in the corners of the frame the Canon has more pronounced cats eye bokeh, but at the centre it is nice and round. Thanks to only having a diaphragm consisting of 5 blades the bokeh becomes polygonal as it is stopped down. No longer in production it can be picked up for around $60 on eBay or you could really push the boat and buy the latest version which retails for $200 AUD. 


Bokeh comparison between the Olympus 45mm f1.2 at f1.2 and the Voigtländer 75mm f2.5 Color-Heliar at f2.5. Click on the image to see it larger.


The last lens is the Voigtländer 75mm f2.5 Color-Heliar mounted on a full frame body.The original Heliar design was developed in 1900 by Dr. Hans Harting as a symmetrical 5-element variant of the simple anastigmatic and well colour-corrected Cooke triplet. In 1902 the design was revised correcting astigmatism, curvature and coma better than the original design. That new design was asymmetrical six elements in five groups. In 1950 Dr. A.W. Tronnier refined the design even further to produce the Color-Heliar. When Cosina revitalised and relaunched the Voigtländer line they revived the Heliar concept with the 75mm f2.5 Color-Heliar. Cosina wanted to recreate the German optical aesthetic and engineering quality from the 1950s. The lens construction by modern standards is pretty basic with 6 elements in 5 groups and the 10 aperture blades bodes well for nice bokeh. Wide open at f2.5 it has the same depth of field characteristics as the Olympus at f1.2. It is not as sharp as the Olympus wide open but the tonal transitions are very smooth. The bokeh balls are nice and round at the centre, but at the edges and corners they take on the elliptical cats eye shape. This lens is longer in production and for a while it was possible to pick one up for around the $300 mark second hand, but the interest in adapting classic lens to mirrorless cameras has seen prices rise to almost $700.


Auto Focus Performance


the reluctant bull terrier test


Shooting stills the AF is very quick and accurate. Using the reluctant bull terrier test I shot a sequence of 25 frames using continuous autofocus  at 10 frames per second with an EM1 mk i which does not have the latest iteration of Olympus’ on sensor phase detection AF. At f4 all the shots were in focus. Switching out the mk i for the mk ii with its better AF systemI shot a 71 frame sequence at f2 at 10 frames a second and only 6 frames were slightly soft.

Shooting video on the Olympus EM 1 mk ii using face tracking the camera and lens responds quickly and smoothly without hesitation. Many m4/3 users shoot video using Panasonics cameras so I put the 45mm f1.2 on my G85 and set it it use face tracking. The results were dismal. There was a lot of hunting, and if and when the camera acquired focus it would quickly drift off. Having had good success with the EM1 I can only put this down to Panasonic’s use of DFD contrast based autofocus and not the lens.


Conclusion


The fantastic  little 45mm f1.8 is only $500 new and is just as sharp. The only place where it is found wanting is the maximum aperture.


There is no doubt that the Olympus m.Zuiko 45mm f1.2 PRO lens is a very good lens. It is well built and optically performs very well. The only thing that counts against it is its price when compared to other options. In the last quarter of 2020 Olympus ran a promotion in many parts of the world enabling purchasers of the EM1 to claim a free lens from the f1.2 trinity. If you were one of those and chose the 45mm then you got a great lens and I hope that you really enjoy it. If you are a committed Micro Four Thirds user and were wanting to purchase this lens today at the street price of $1800 I would suggest that your money could be better spent. The fantastic  little 45mm f1.8 is only $500 new and is just as sharp. The only place where it is found wanting is the maximum aperture. If you are not so wedded to the idea of 45mm but just wanted a fast short telephoto then I’d seriously consider the Sigma 56mm f1.4 which at $750 is great value and a seriously good performer.

If you are just getting into photography and want a camera and lens combo that gives enormous creative control over depth of field then you’ve got to look at full frame cameras ($1800 will get you a new one less if second hand) and pick up an 85mm f1.8 where Canon, Sony and Nikon all have offerings between $600-900 new. 

For video the 45mm f1.2 is a nice option as on the right camera it can autofocus extremely well and the the provision of a manual focus clutch that gives hard stops makes it very useful for manual focus pulls. If autofocus isn’t important to you then there are a huge number of older classic f1.2 and f1.4 lenses that can be picked up very cheaply.


Example Images


Wide open the Olympus m.Zuiko 45mm f1.2 PRO lens gives a nice please rendition with gentle tonal transitions.


The close focusing capabilities of the Olympus 45mm f1.2 are impressive and couple this with pleasing bokeh it makes for a very nice lens with which to do product photography or still life.


The Olympus 45mm f1.2 also makes for a good lens for equine portraits.


Frida at 45mm f1.2.


Taken at the minimum focusing distance of 50cm.

Get A Grip

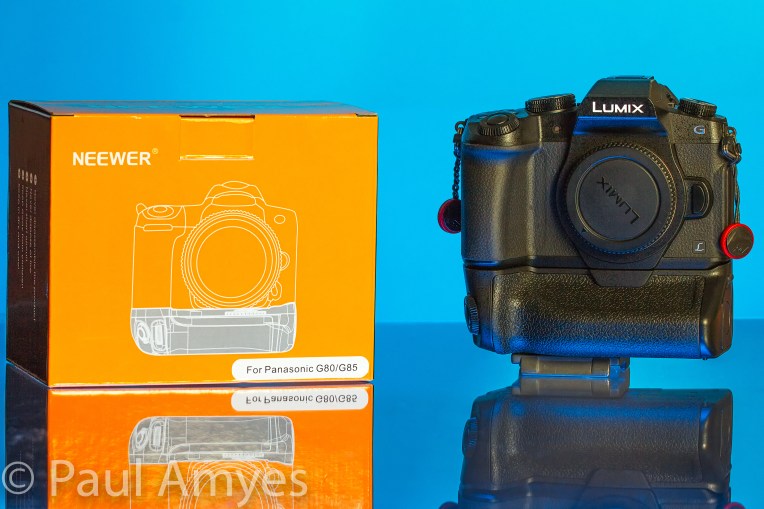
The Neewer DMW-BGG1 battery grip for the Panasonic Lumix G85.


There’s no doubt about it that micro four thirds cameras offer superb performance in a compact body. My favourite cameras have been the EM10 Mki and the EP-5 equipped with one of the excellent prime lenses such as the 25mm f1.8 or the 45mm f1.8. Trouble arises when you slap a bigger lens on such as the truly excellent Olympus M.Zuiko 40-150mm f2.8. It’s possible to use them but it feels unwieldy and uncomfortable for long periods. So the solution was to buy a bigger bodied camera such as the EM1 Mki. I was lucky that I managed to blag a good deal and it included HLD-7 battery grip. In day-to-day usage that grip has never left the camera. When I got the Panasonic Leica 100-400 I started using it primarily on the EM1 and it felt well-balanced, but I wasn’t getting the use of the 5 axis dual image stabilisation. So I thought I’d slap it on front of the G85 that I bought for video. Problem solved for the image stabilisation, but then I felt I needed a bit more real estate for the hands. 


The Neewer DMW-BGG1 battery grip for the Panasonic Lumix G85.


Looking online I saw the Panasonic BGG1 Battery Grip was $362 AUD. Now I don’t know about you but lately I think the camera manufacturers have been having a lend of us with camera grips. The new Canon EOS R’s grip retails for $599 AUD and the Fuji X-H1’s is $499 AUD. This is why there is a thriving market in cheap Chinese knock offs, but these tend to be for the best-selling cameras from Canon and Nikon. A lot of people regard these as crap, but back in 2010 I’d bought a Canon 550d and wanted a grip and I ended up buying one by Aputure from eBay for a whopping $40. It is still going strong, in fact it is in better nick than the camera body which I’ve had to superglue together on a couple of occasions. So I was definitely open to the idea of an after market grip, but I was under the impression that there wouldn’t be one as Panasonic don’t command a big enough market share. The other week I was trawling the internet looking for some batteries for my G85 and I found on Amazon Australia for the grand price of $61 AUD the battery grip DMW-BGG1 Battery Grip. So I took the plunge.


The Neewer DMW-BGG1 battery grip for the Panasonic Lumix G85.


The Neewer DMW-BGG1 battery grip for the Panasonic Lumix G85.


Ok first impressions. It’s made of plastic, but so is the body of the G85. It seems to be a pretty faithful copy of the Panasonic version right down to the recessed area for holding the rubber cover for the electrical contacts from the camera. The buttons and dials don’t feel as nice as those on the camera but they work well. The only downsides are that the tripod mount is not under the axis of the lens and it is obviously not weather sealed. For me these weren’t a big deal. In use the grip is comfortable and fits the contours of the camera body well. It helps provide a nice comfy grip, especially in the portrait orientation and the extra battery is a welcome addition when shooting video.I’ve been using it for a couple of months and it has been great. A good buy. 


The Neewer DMW-BGG1 battery grip for the Panasonic Lumix G85.


The Neewer DMW-BGG1 battery grip for the Panasonic Lumix G85.

Broadening My Horizons…


… with the Panasonic Leica DG Vario-Elmarit 8-18mm f2.8-4 micro four thirds lens which will be referred to hence forth as the 8-18 for brevity’s sake. For those who prefer video there is a video review at the bottom of the page.

The 8-18 was introduced as part of Panasonic’s Leica branded f2.8-4 lens range in April 2017. I was immediately interested as I wanted a wide-angle zoom in m4/3. I had discounted the existing Panasonic 7-14mm f4 and the Olympus 7-14mm f2.8 because they wouldn’t accept screw in filters and the Olympus 9-18mm f4-5.6 because the collapsible design means the lens is prone to failure due to the internal ribbon cables breaking. The new 8-18 presented itself with a high quality metal construction that was splash proof and a modest 67mm filter thread. I wanted to use the lens for video work and so the ability to take a variable neutral density filter was a must. So when the lens became available here in Australia I plonked my cash down and got one.


My first impression on opening the box was that it is a quality bit of kit – it feels nice in the hand with a cool metallic feel and satisfying density. The bulbous front element is well recessed and combined with the excellent locking lens hood means that it is protected from stray light and from being physically damaged. The lens barrel has two ring controls – the front being for focus and the rear for zoom – and a switch for selecting auto or manual focus.The focusing ring is of the fly-by-wire type that twiddles endlessly – I wish that Panasonic would follow Olympus’s lead and have the pull back clutch type focusing rings with hard stops. The zoom ring is nicely damped and travels in a smooth 90º rotation. Another gripe is that both Panasonic and Olympus are members of the m4/3 consortium so why oh why can’t they agree on which way the zoom ring turns? Both zoom and focus are internal which is nice as it does not affect the centre of balance while using a gimbal. The lens body is finished in a smooth black satin with the engravings done in the Leica font and colours. The lens mount is metal and looks to be chrome plated brass. So full marks to Panasonic for presentation.

Vital Statistics

lens mount m4/3
focal length 8-18mm (16-36mm 35mm full frame equivalent)
angle of view 62º – 107º
maximum aperture f2.8-4
minimum aperture f22
filter size 67mm
optical stabilisation no
internal focusing yes
internal zoom yes
minimum focusing distance 23cm
maximum magnification 0.12 x
number of lens elements 15
number of lens groups 10
weight 315g
length 88mm
diameter 73.4mm


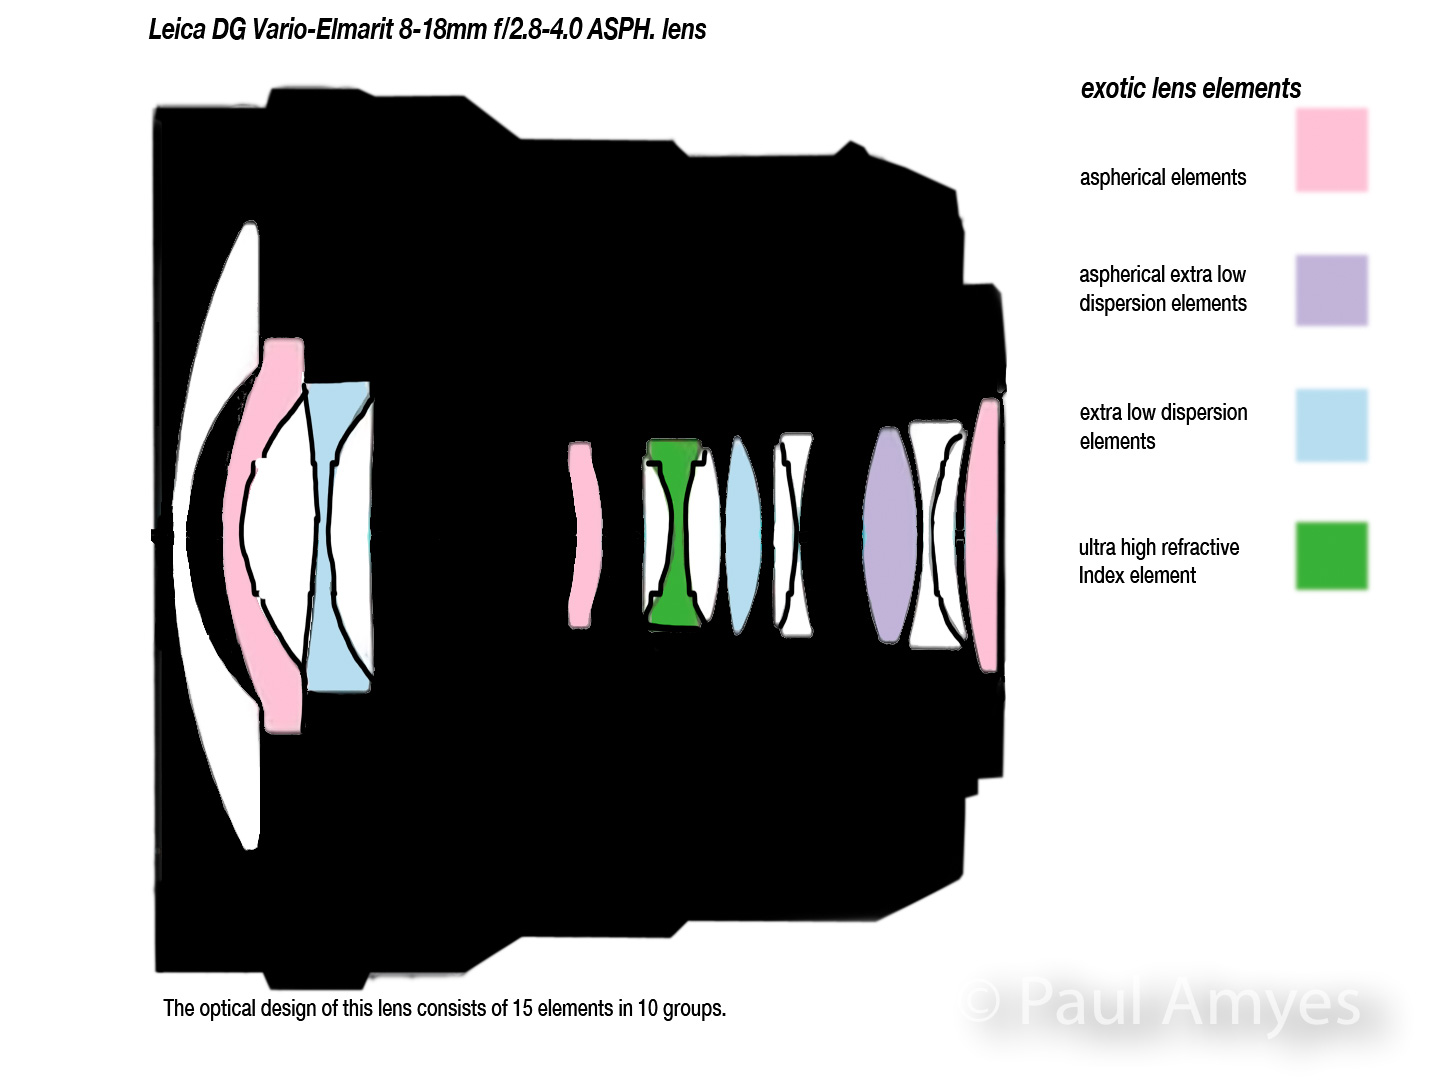
The lens construction is 15 elements in 10 groups with 1 aspherical extra low dispersion element, 2 extra low dispersion elements and 1 ultra high refractive index element. Combined with the nano coatings they should reduce internal flare, distortion and chromatic aberration. Control of distortion and chromatic aberration is also aided by an internal software profile that is baked into the image file. A lot of people don’t like this approach as they feel corrections should be made optically. The main criticism is that there is too much of an image quality hit in the corners with this approach. Hasselblad was the manufacturer to take this approach with their H3 camera and when that was introduced there were few complaints about image quality. The reality is that using lens profiles means lenses can be cheaper, smaller, and lighter than their optically optimised brethren.

The 8-18 has a variable aperture and unfortunately it quickly steps down as you zoom in as can be seen by the chart below.

8mm f2.8
9mm f3.1
10mm f3.2
12mm f3.4
14mm f3.6
18mm f4

Test Results

I’ve done my standard tests to look for distortion, chromatic aberration, and sharpness at 8mm, 12mm and 18mm to give an indication of how the lens does throughout its zoom range. I have just for interest sake posted images with no profile correction to give an idea of what the lens is actually doing. Click on the images to see them at full size.


8mm at f2.8 no lens profile applied


8mm at f2.8 with internal profile applied.

At 8mm without any inbuilt lens profile applied there is very obvious barrel distortion and vignetting at f2.8. With the profile applied there is still a very slight barrel distortion and the vignetting remains until f5.6. In terms of sharpness well at f2.8 the centre of the image is nicely sharp and contrasty and remain so until f16 when diffraction kicks in and softens the image. In the corners the story is different, at f2.8 the corners are significantly softer and less contrasty than the centre, they improve a little as you stop down reaching best performance at f5.6 and then get worse at f16 with diffraction. A small amount of chromatic aberration is present throughout the aperture range and is easily corrected in post.


12mm at f3.4 no lens profile applied


12mm at f3.4 with profile applied.

At 12mm we can see no distortion when the lens profile is applied and the vignetting is about 1/2 stop and is barely discernible. Wide open at f3.4 the centre of the image is sharp and contrasty and the best performance is at f5.6. In the corners the image is softer and has less contrast than the centre. The best performance is at f8. Diffraction starts to set in at f11.


18mm at f4 no lens profile


18mm at f4 with internal profile applied.

At 18mm there is some pincushion distortion in the profile corrected image. There is also a tiny bit of vignetting at f4 but this clears up at f5.6. Sharpness at f4 is very, very good in the centre throughout the aperture range only deteriorating at f16 due to diffraction.The corners are remarkably sharp at f4 but have slightly less contrast than the centre. Peak performance sets in at f5.6 and then again diffraction rears its ugly head at f16 and spoils the party. Chromatic aberration is very well controlled across the whole range and is very, very slight.

Like most ultra wide-angle zooms Panasonic’s 8-18mm f2.8-4 is prone to flare. The recessed front element and tulip lens hood do minimise this, but with the sun in the frame you will see veiling flare. When stopped down you can achieve nice sun stars.

Like most wide-angle zooms the 8-18 is prone to flare. In order to reduce this the engineers recessed the front lens element and then provided a decent lens hood. The Panasonic 7-14mm f4 caused purple blobs on Olympus cameras when there was a specular light source in the frame. Some people pointed the finger at the difference in UV coatings between Panasonic and Olympus cameras. Others said the thickness of the Olympus sensor stack caused the problem. Anyway the 8-18 is thankfully free of those artefacts. Shooting into the sun there is some veiling flare and ghosting.

Auto focus is done via a stepping motor and it is designed to work with Panasonic’s Depth From Defocus technology that is basically a contrast based auto focus system that is enhanced by software profiles for each Panasonic lens. Single point autofocus in single shot drive mode is incredibly fast and accurate. I decided to check the Continuous Auto Focus by continuous shooting at medium speed wide open on the Panasonic G85 with a person walking slowly towards the camera at focal lengths of 8mm and 18mm. All the shots were in focus. Then I tried to see how the lens would perform on a camera without DFD – in this case an Olympus OMD EM1 mk i. At 8mm and f2.8 all the images were in focus. At 18mm shooting a burst of 10 images the camera lost focus on the last 2 images of the burst. So this very limited test shows that the autofocus of the lens does perform better on Panasonic cameras with DFD.

Conclusions

The Panasonic Leica DG Vario-Elmarit 8-18mm f2.8-4 lens with Cokin P system wide-angle lens filter holder attached.

Ok I’ve had the lens a year now and I’ve used it for stills, time lapses and video shooting on the afore-mentioned EM1 and G85 along with an EP5 and EM10 so what can I say. The in camera lens profiles make a huge difference in terms of distortion, but most people won’t see this as they’ll see the corrected images. I did expect this to have some impact on sharpness in the corners but was pleasantly surprised to find that not the case at all. Most zooms perform best at the short end and become softer at the long end. With my copy of the 8-18 this lens is very good at the long end and it is a little softer at the short end. The ability to use filters is a boon for landscape photography and video. The 67mm filter size does not make filter purchases onerous and with the wide-angle filter holder you can use the Cokin P filter system with rectangular filter with an 85mm width. It is really nice not to use filters the size of dinner plates with this lens. I’ve been caught in a couple of downpours while using the 8-18 and have had no problems. I have found the lens immensely satisfying to use and have put it to more uses than I originally thought I would. In all I feel it is a very good lens if you can live without a fixed aperture. I would definitely recommend it.


This slideshow requires JavaScript.