Mid August. Get the orchid books out. Find the maps. Load the coordinates into the GPS. Dust off the macro lens. Kweda here I come!!!
It was a hair raising journey. After our heavy winter rains the dirt roads resembled cold lumpy gritty porridge and for the last 10km the car fish tailed along the road the tyres struggling to get a grip at times. It was a relief to stop and park up by the mobile phone tower which was the only bit of hard ground. Considering the conditions I was amazed that there were any orchids out as most species don’t like getting their feet wet at all.
Fringed Mantis Orchid or Green Spider Orchid (Caladenia falcata). Kweda, Western Australia.
Talbot's Spider Orchid, Caladenia pendens subsp talbotii. Kweda, Western Australia.
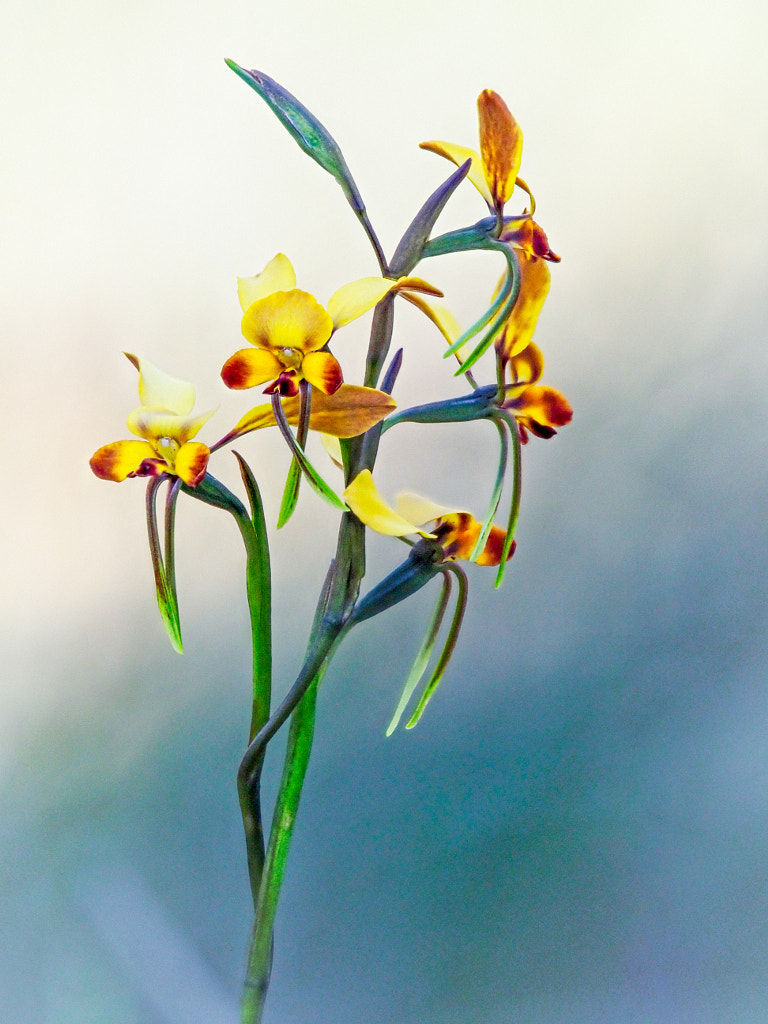
Winter Donkey Orchid, Diuris brumalis. Kweda, Western Australia.
Blue Fairy Orchid or Blue Beard (Pheladenia deformis). Kweda, Western Australia.
Early Wheatbelt Spider Orchid, Caladenia sp.’early wheatbelt’. Kweda, Western Australia.
I must say I’m really, really liking using the Olympus m.Zuiko 40-150mm f2.8 with the Olympus 1.4 Teleconverter MC-14 for focus stacking. It is a beautiful lens, probably the best one I’ve got.
The other week I had the privilege of being asked to judge one of Mundaring Camera Club’s monthly competitions. It was a great experience and I really enjoyed looking at all the wonderful photos that had been entered. At one point when looking a shot of a flower I made my oft said statement shoot photos of flowers like they are a portrait of a person. So what do I actually mean by that? After a couple of weeks thought – I’m not the quickest! – I’ve decided to actually write it down.
The following four shots are all photos of the same Winter Donkey Orchid – it’s nothing special it’s just a plant I found the other day. But they do illustrate how I approach each subject.
Winter donkey orchid, Diuris brumalis. Woottating, Western Australia.
The first is the establishing shot, an environmental portrait. It shows the plant in situ and how it relates to bush around it.
The first of the mid length portraits.
The second mid length shot done with the macro lens and flash. It creates a very different looking picture when compared with first one.
The next two are mid length shots. Two different techniques are used to try and produce the same effect. One is a single shot taken with a macro lens and flash, the other is done with a long telephoto lens as a focus stack. The aim is produce a shot with a nice clean back ground.
The tight “head” shot.
The fourth shot is a close up portrait – a head and shoulders if you like – to reveal some of the characteristics of the flower.
It is how I work the subject. Unlike Austin Powers I’m not asking the flower to be a tiger, but, what I am doing is taking a series of photos from different angles to bring out the best in the subject.
As an aside the clip of Austin Powers is its self a parody of another famous screen photographer – the protagonist of Michelangelo Antonioni’s masterpiece ‘Blowup’. I certainly don’t behave like David Hemmings’ character did when photographing Veruschka von Lehndorff in the film. That would be a bit strange.
This shot of a Scented Sun Orchid was what I considered my first successful photo of an orchid. The subject is separated from the background making easy to see.
I took what I call my first proper shot of an orchid back in 2008. Back then my technique was very simple – handheld with a macro lens. The problem was that it was often very difficult to isolate the flower from the background while having sufficient depth of field and a low ISO. For every successful photo there were hundreds of duds.
This shot of a Butterfly Orchid is one of the hundreds of duds. The messy background threatens to overwhelm the subject.
After about a year of trial and error (mostly error) I decided to photograph the orchids in the same way I would take a portrait of a person. Get down at “eye” level, use an off axis flash to provide the key light and have the natural light as my fill light at -1 to -2 stops. This was a huge improvement, but I still wasn’t getting the clarity and sharpness in the images I desired.
My first flash rig for photographing orchids. Using a flash brake allowed me to get the flash off of the lens axis and get a more pleasing lighting effect.
The next attempt at better lighting was a heavy tripod and light stand. My back hurts just looking at this photo.
The next evolution was to mount the camera on a tripod and then mount the flash to one of the tripod legs via a “magic arm”. This allowed greater choice in the positioning of the flash and allowed me to use different flash modifiers such as soft boxes, grids and snoots. The arrival of affordable and reliable wireless flash triggersmeant I could use multiple speedlights for more sophisticated lighting. This came a tremendous cost. I have a chronically bad back and all that kit was heavy, the tripod and “magic arm weighed just under 6Kg. Then there was the futzing about setting everything up, taking the shot, breaking it all down, walking to the next subject and then repeating it all again. Suddenly it wasn’t fun anymore. Something had to give and it was my back.
The diminutive Olympus EP-2. Just what the orthopaedic surgeon ordered.
A size comparison of my DSLRs (Canon 5d and 550d) and the Olympus EP-2 which replaced them.
In 2013 I bought an Olympus EP-2 mainly for travel and street photography. It was a revelation – small size, In Body Image Stabilisation (IBIS), and excellent flash implementation. It quickly became my orchid camera of choice. I could chuck out the tripod and become more mobile. It wasn’t all beer and skittles though. The 12Mp sensor wasn’t the best in terms of high ISO performance and dynamic range, the lack of a viewfinder made usage in bright sunlight problematic (solved with the addition of the optional EVF) and the contrast based autofocus system was a bit on the temperamental side. But the positives were enough to keep me using it and when the EM10 came out with a built in EVF, a better IBIS system and an improved sensor then I knew that the system would be just about perfect for what I did. I could walk around in the bush for hours at a time without back pain which meant I could explore further afield. This freedom allowed me to experiment a lot more.
Sigma’s 105mm f2.8 DG DN macro lens attached a Sony A7Rii.
The Tamron 35mm f2.8 lens has excellent macro capabilities.
Curly Locks, Thelymitra spiralis. Wandoo National Park, Western Australia. Sony A7r2 with Sigma 105mm f2.8 DG DN macro lens.
White Spider Orchid, Caladenia longicauda subsp longicauda. Wambyn, Western Australia. Sony A7r with Tamron 35mm f2.8 lens.
In 2021 I felt that I wanted more resolution than the 20Mp EM1 mk ii was giving me. So I tentatively dipped my toe into the world of full frame mirrorless and I went with a second hand Sony A7r2. The image files produced by the camera were absolutely gorgeous. Alongside my usual working method of using flash with macro lens I decided to experiment with environmental portraiture of orchids. For this I used a 35mm lens with a half size macro capability and the results were pleasing. The downsides were as follows. The rear LCD is hopeless in bright light and it has no touch control facility. The IBIS wasn’t as effective as that on my Olympus cameras and the sensor resolution emphasised very tiny camera shake. A tripod was the solution. The sensor is a dust magnet which means that changing lenses enables dust bunnies to proliferate. The answer was to have one camera with the 105mm macro and one camera with the 35mm. Arrrrrgh! I was back carrying a load of heavy equipment. So it was back to the Olympus kit.
This shot of a Lemon Scented Sun Orchid was made with the Olympus Em1 mk ii, Olympus 40-150mm f2.8 lens with 1.4 x teleconverter and the Olympus FL600R flash using the focus stacking function.
I’m still trying to evolve a style which produces a nice clean portrait of an orchid. One of the great benefits of Olympus’s cameras and lenses is that it allows very long telephoto lenses to have an almost macro capability. The use of such long lenses allows you to throw backgrounds well out of focus by dint of their increased magnification which reduces depth of field. The problem is that that decreased DOF means that it is hard to get your subject rendered sharp whilst retaining all that loverly bokeh. The counter to this is focus stacking which involves taking a series of pictures of the subject while moving the focus point and then blending the images in post. Olympus has a very neat feature that allows you to do this automatically in camera which is fantastic. Unfortunately the function limits your flash usage by restricting your maximum flash sync speed to 1/50th second and you have to manually set the flash exposure. I tried doing this for a while and it was a right royal pain. So now I don’t use the flash and just make the exposure using ambient light. The lens I’m using is the Olympus 40-150mm f2.8 with the the mc-14 1.4 x teleconverter. This gives me a 210mm f4 lens (420mm in full frame terms). Despite shooting wide open this invariably means shooting at a low shutter speed. So while the IBIS is fantastic on my EM1 mk ii using it with a long lens while focus bracketing wasn’t the best way to proceed. So it was back to a tripod. My aluminium Manfrotto 055 tripod is a good tripod but it is that heavy you could use it as a boat anchor. It was time to get a bit of fibre in my life – carbon fibre. So I bought a nice SiruiAM-254 carbon fibre tripod which weighs just a smidge over 1Kg. It doesn’t have a centre column and so a minimum working height of 7.8cm which means you can get down and close to the subject. The results have been excellent and now I feel that using both my normal macro lens and the telephoto zoom with converter I’m getting closer to what I have envisioned.
The Sirui AM 254 tripod in action.
So this has been my journey of finding what works for me. I’ve discovered that learning how your equipment works is just as an important step in developing vision and style as is technique. Continual learning and experimentation will help you develop as an artist and we shouldn’t be afraid to do so. A few times I’ve felt that I was going backwards, but it was worth persevering. I’ve still got a couple of things to sort out, but I feel now I’m on the right track.
The following shots were made this last week.
Common Bunny Orchid, Eriochilus dilatatus subsp. multifloris. Oswald Sargent Reserve, Western Australia.A focus stack using the Olympus EM1 mk ii with the Olympus 40-150mm f2.8 lens and 1.4 x teleconverter.
Hare Orchid or Fringed Hare Orchid (Leporella fimbriata). Oswald Sargent Reserve, Western Australia.





You must be logged in to post a comment.