Tamron 35mm f2.8 Di III Lens

After all that talk the other day about street photography lets talk about a focal length that is synonymous with the street photography genre – the 35mm. In particular the Tamron 35mm f2.8 Di III lens.

Tamron 35mm f2.8 Di III lens mounted to a Sony A7r.

TLDR


Introduction


The Tamron 35mm f2.8 lens for Sony E mount cameras was announced back in November 2019 as part of a trio of prime lenses which share the same exterior design, construction, size, filter diameter and f stop. The other lens being the 24 and 20 mm. As lenses are becoming ever faster and even larger with price tags to match it is nice to see Tamron do something significantly different. The modest apertures and price tags may put off lens snobs, but they have enabled Tamron to give good optical performance at very reasonable price of $450 AUD. To many f2.8 may be disappointing, but honestly apart from bragging rights about shallow DOF we do not honestly need ultra fast lenses as todays cameras have absolutely astounding high ISO performance. When I started photography you needed fast lenses because film speeds were slow. I regularly shot ISO 25, 50 and 64 film emulsions and I wanted to do it handheld not on a tripod. Now shooting full frame digital at ISO 6400 gives the same image quality as as shooting ISO 64 film stock.


Specifications
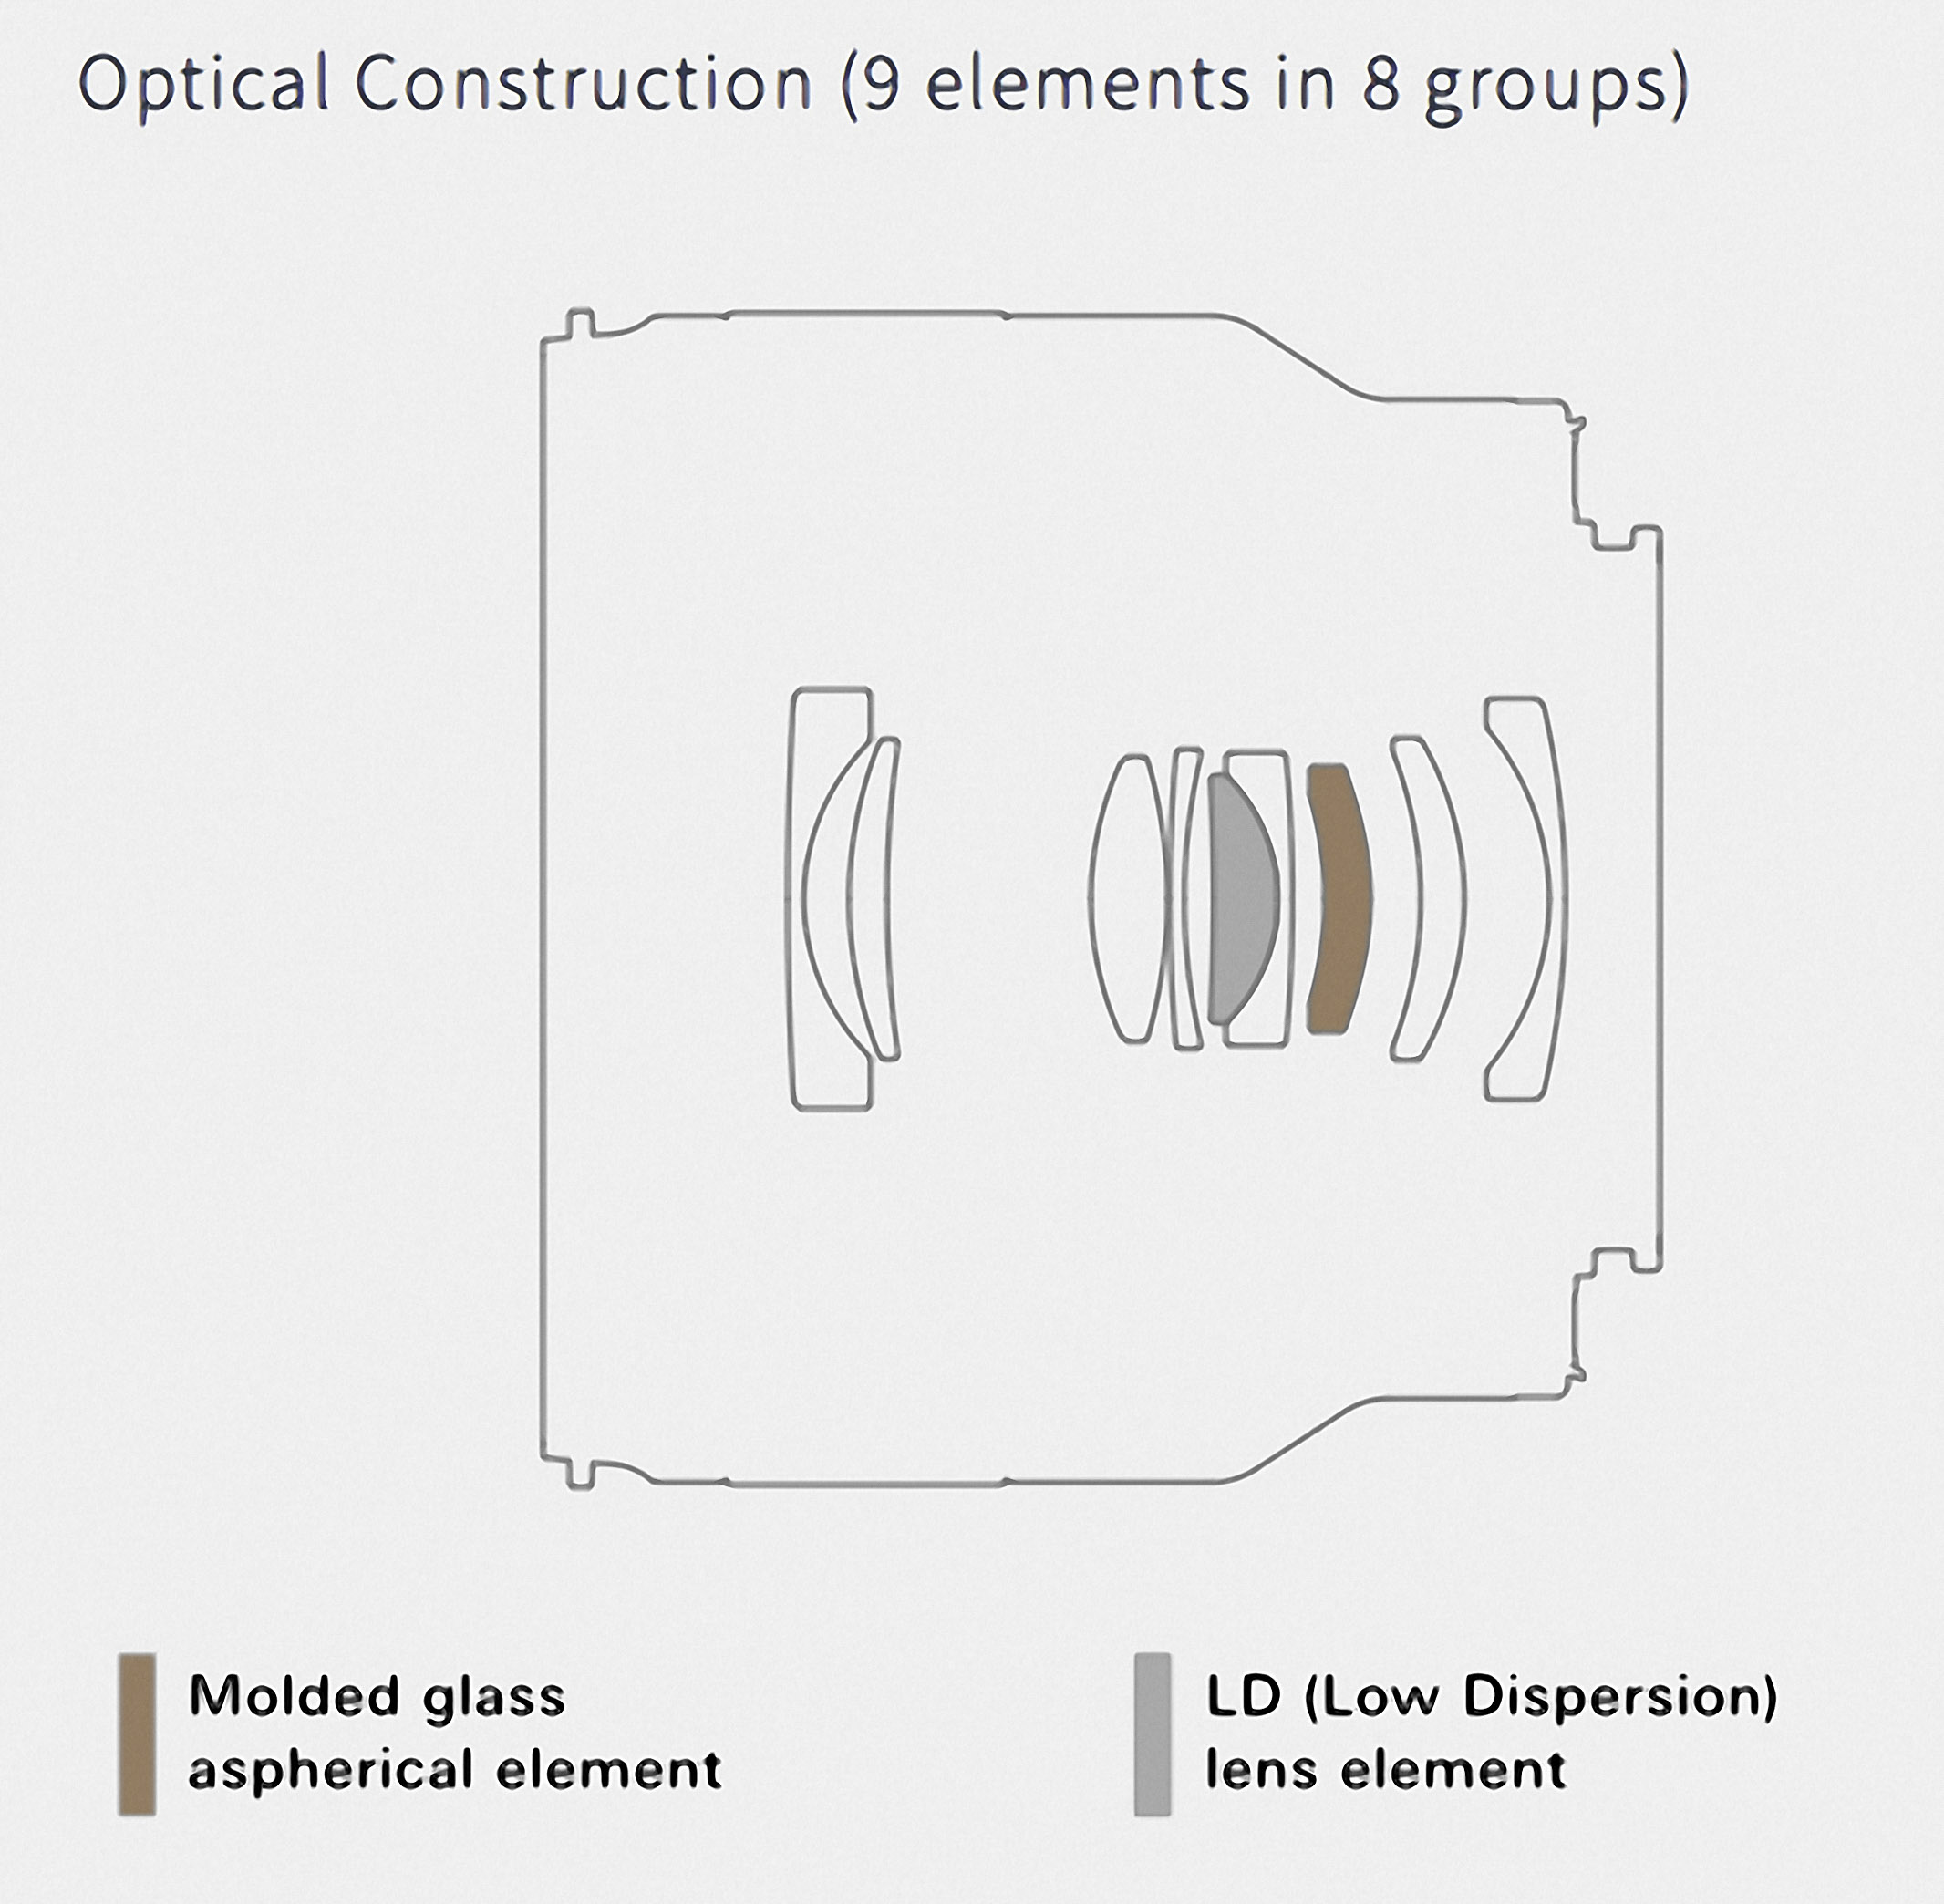
A schematic of the lens construction.


Focal Length 35mm
Maximum Aperture F/2.8
Angle of View (diagonal) 63° 26′ (for full-frame mirrorless format)
Optical Construction 9 elements in 8 groups with 1 low dispersion element and 1 moulded glass aspherical element
Minimum Object Distance 0.15m (5.9 in)
Maximum Magnification Ratio 1:2
Filter Size Φ67mm
Maximum Diameter Φ73mm
Length* 64mm (2.5 in)
Weight 210g (7.4 oz)
Diaphragm Blade Number 7 (circular diaphragm) The circular diaphragm stays almost perfectly circular up to two stops down from maximum aperture.
Minimum Aperture F/22
Standard Accessories Flower-shaped hood, Lens caps
Compatible Mounts Sony E-mount


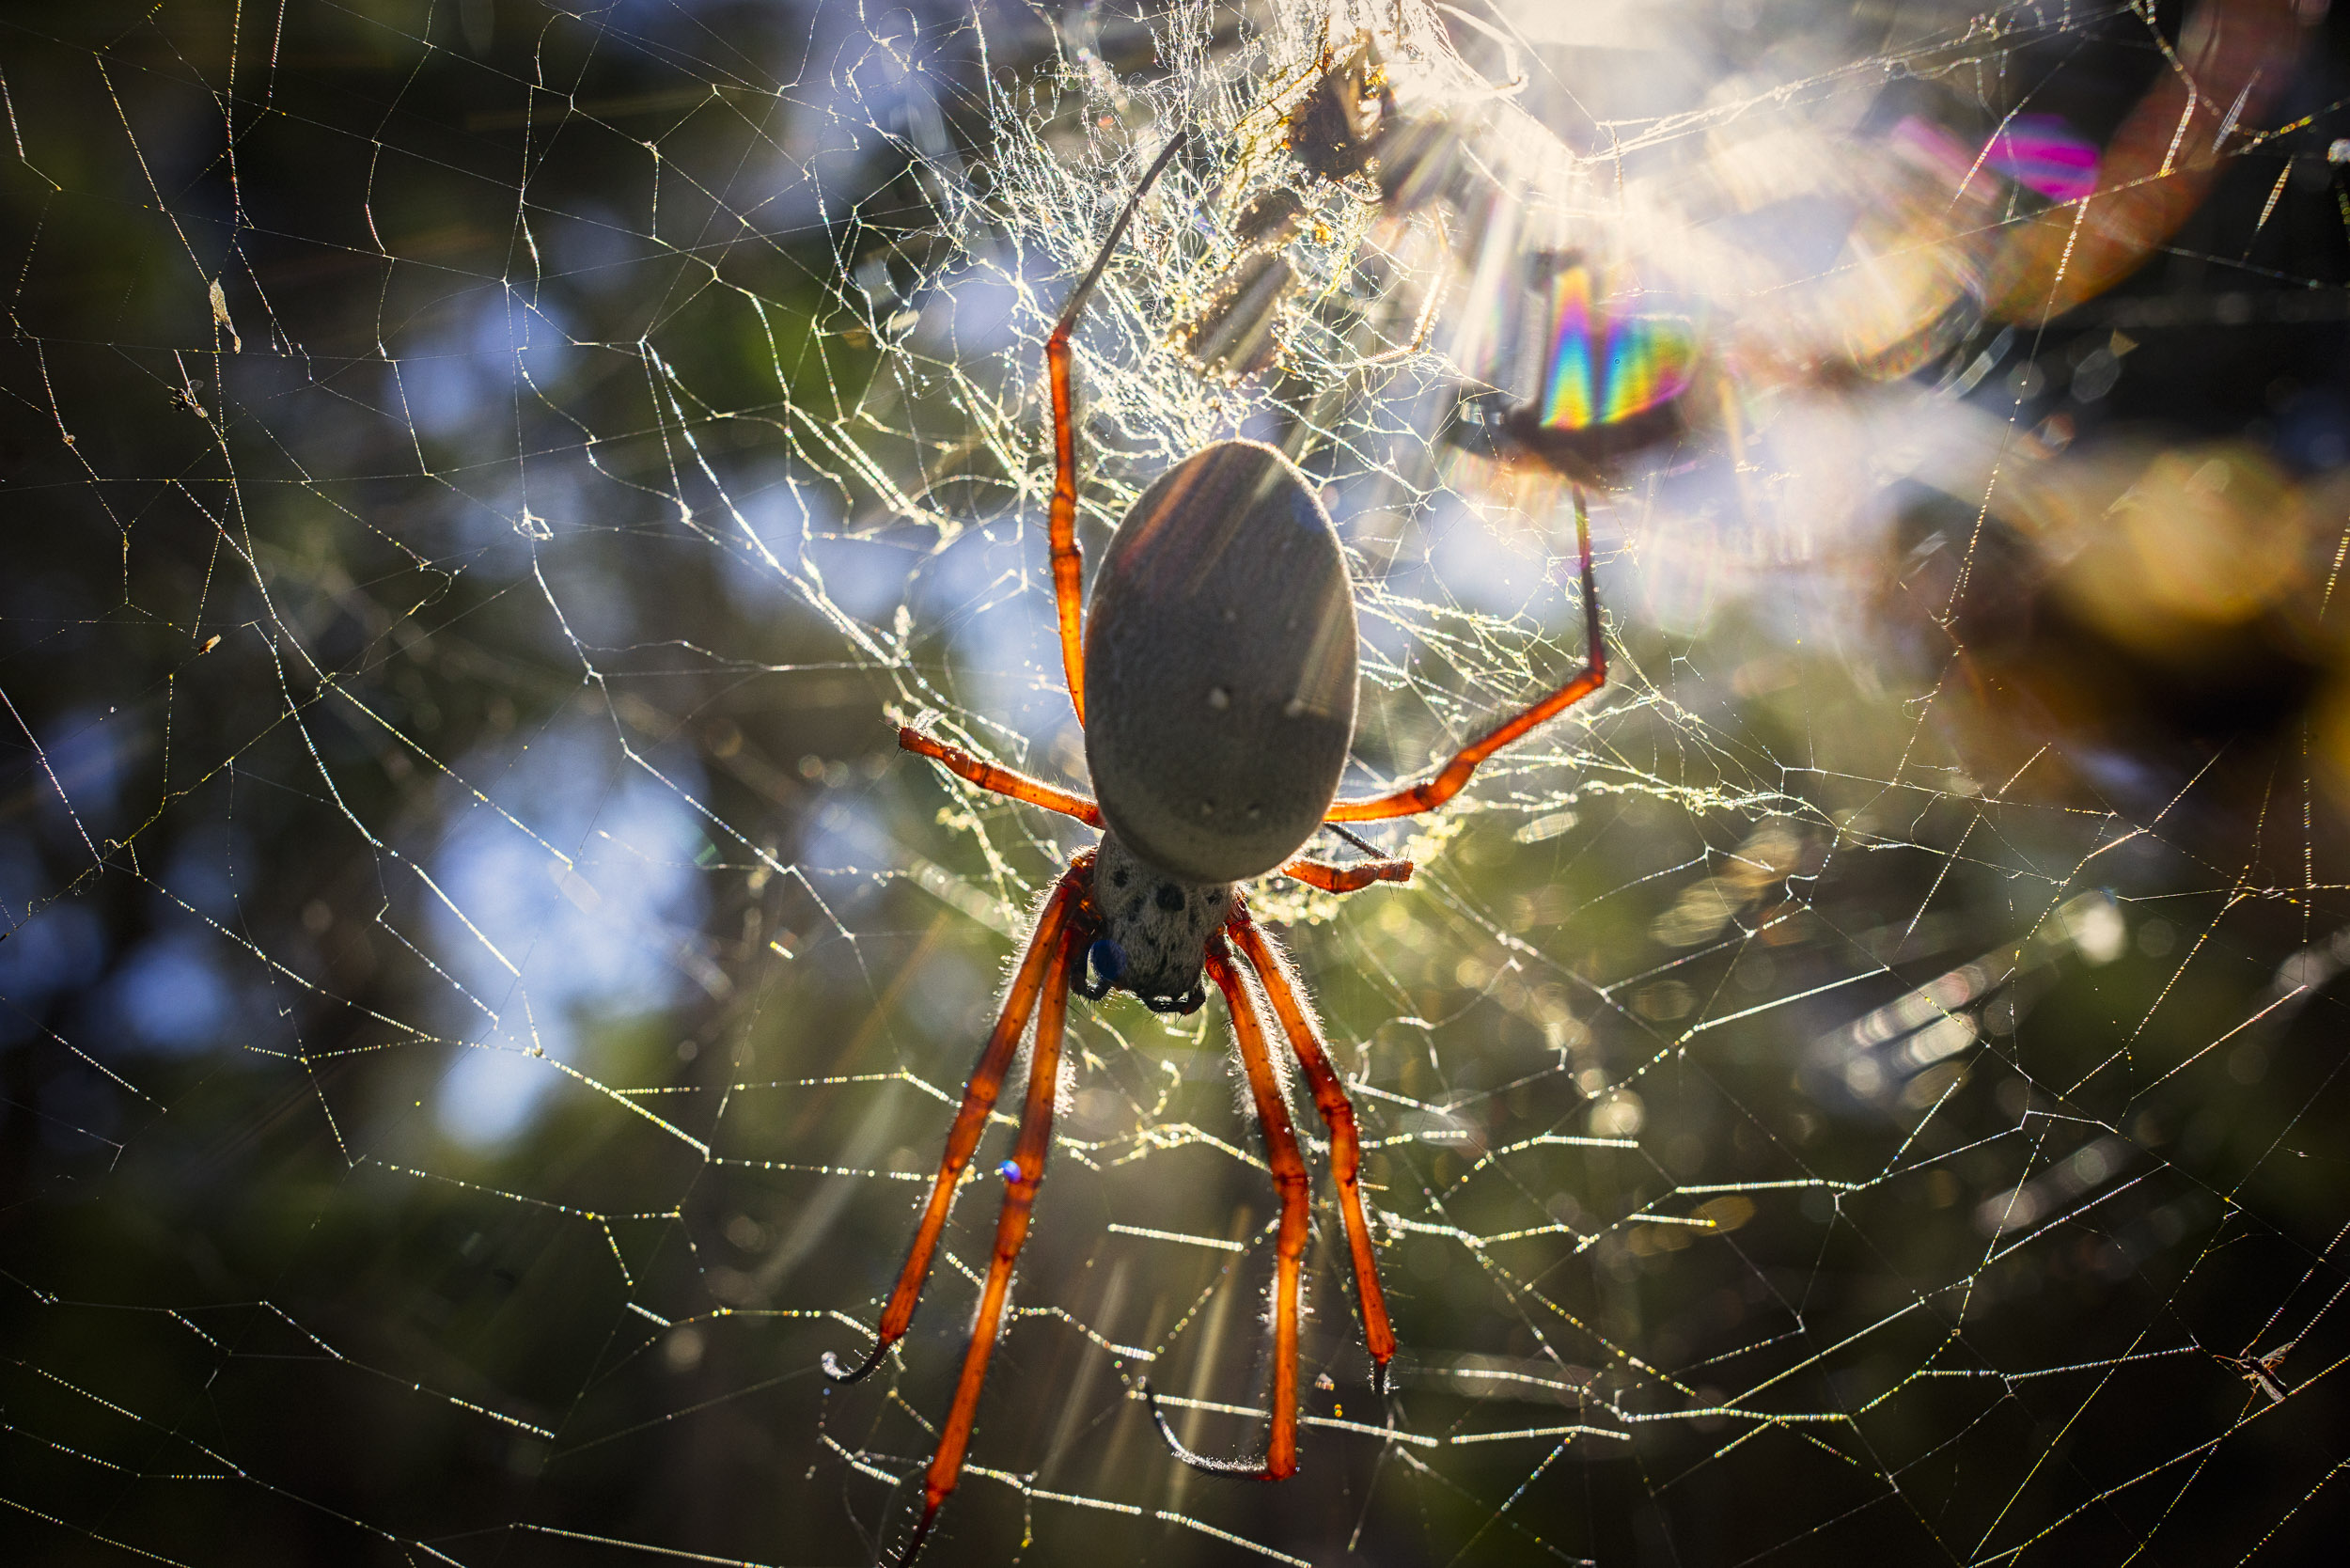
Golden Orb-Weaving Spider, Nephila edulis. Despite its size and their massive webs they are harmless to humans. Yellagonga Regional Park, Western Australia. The 1:2 magnification of the Tamron 35mm f2.8 makes this sort of photography a breeze.


For me the interesting aspect of this lens and indeed of its siblings is the cminimum focusing distance and it’s ability to shoot half life size. For me this makes them very suitable to creative macro and close up work. It’s not what you’d use to photography small critters as the lens has to be very close to the subject and will scare them off. For product shots, still life and another form of table shot photography it is a very interesting choice.
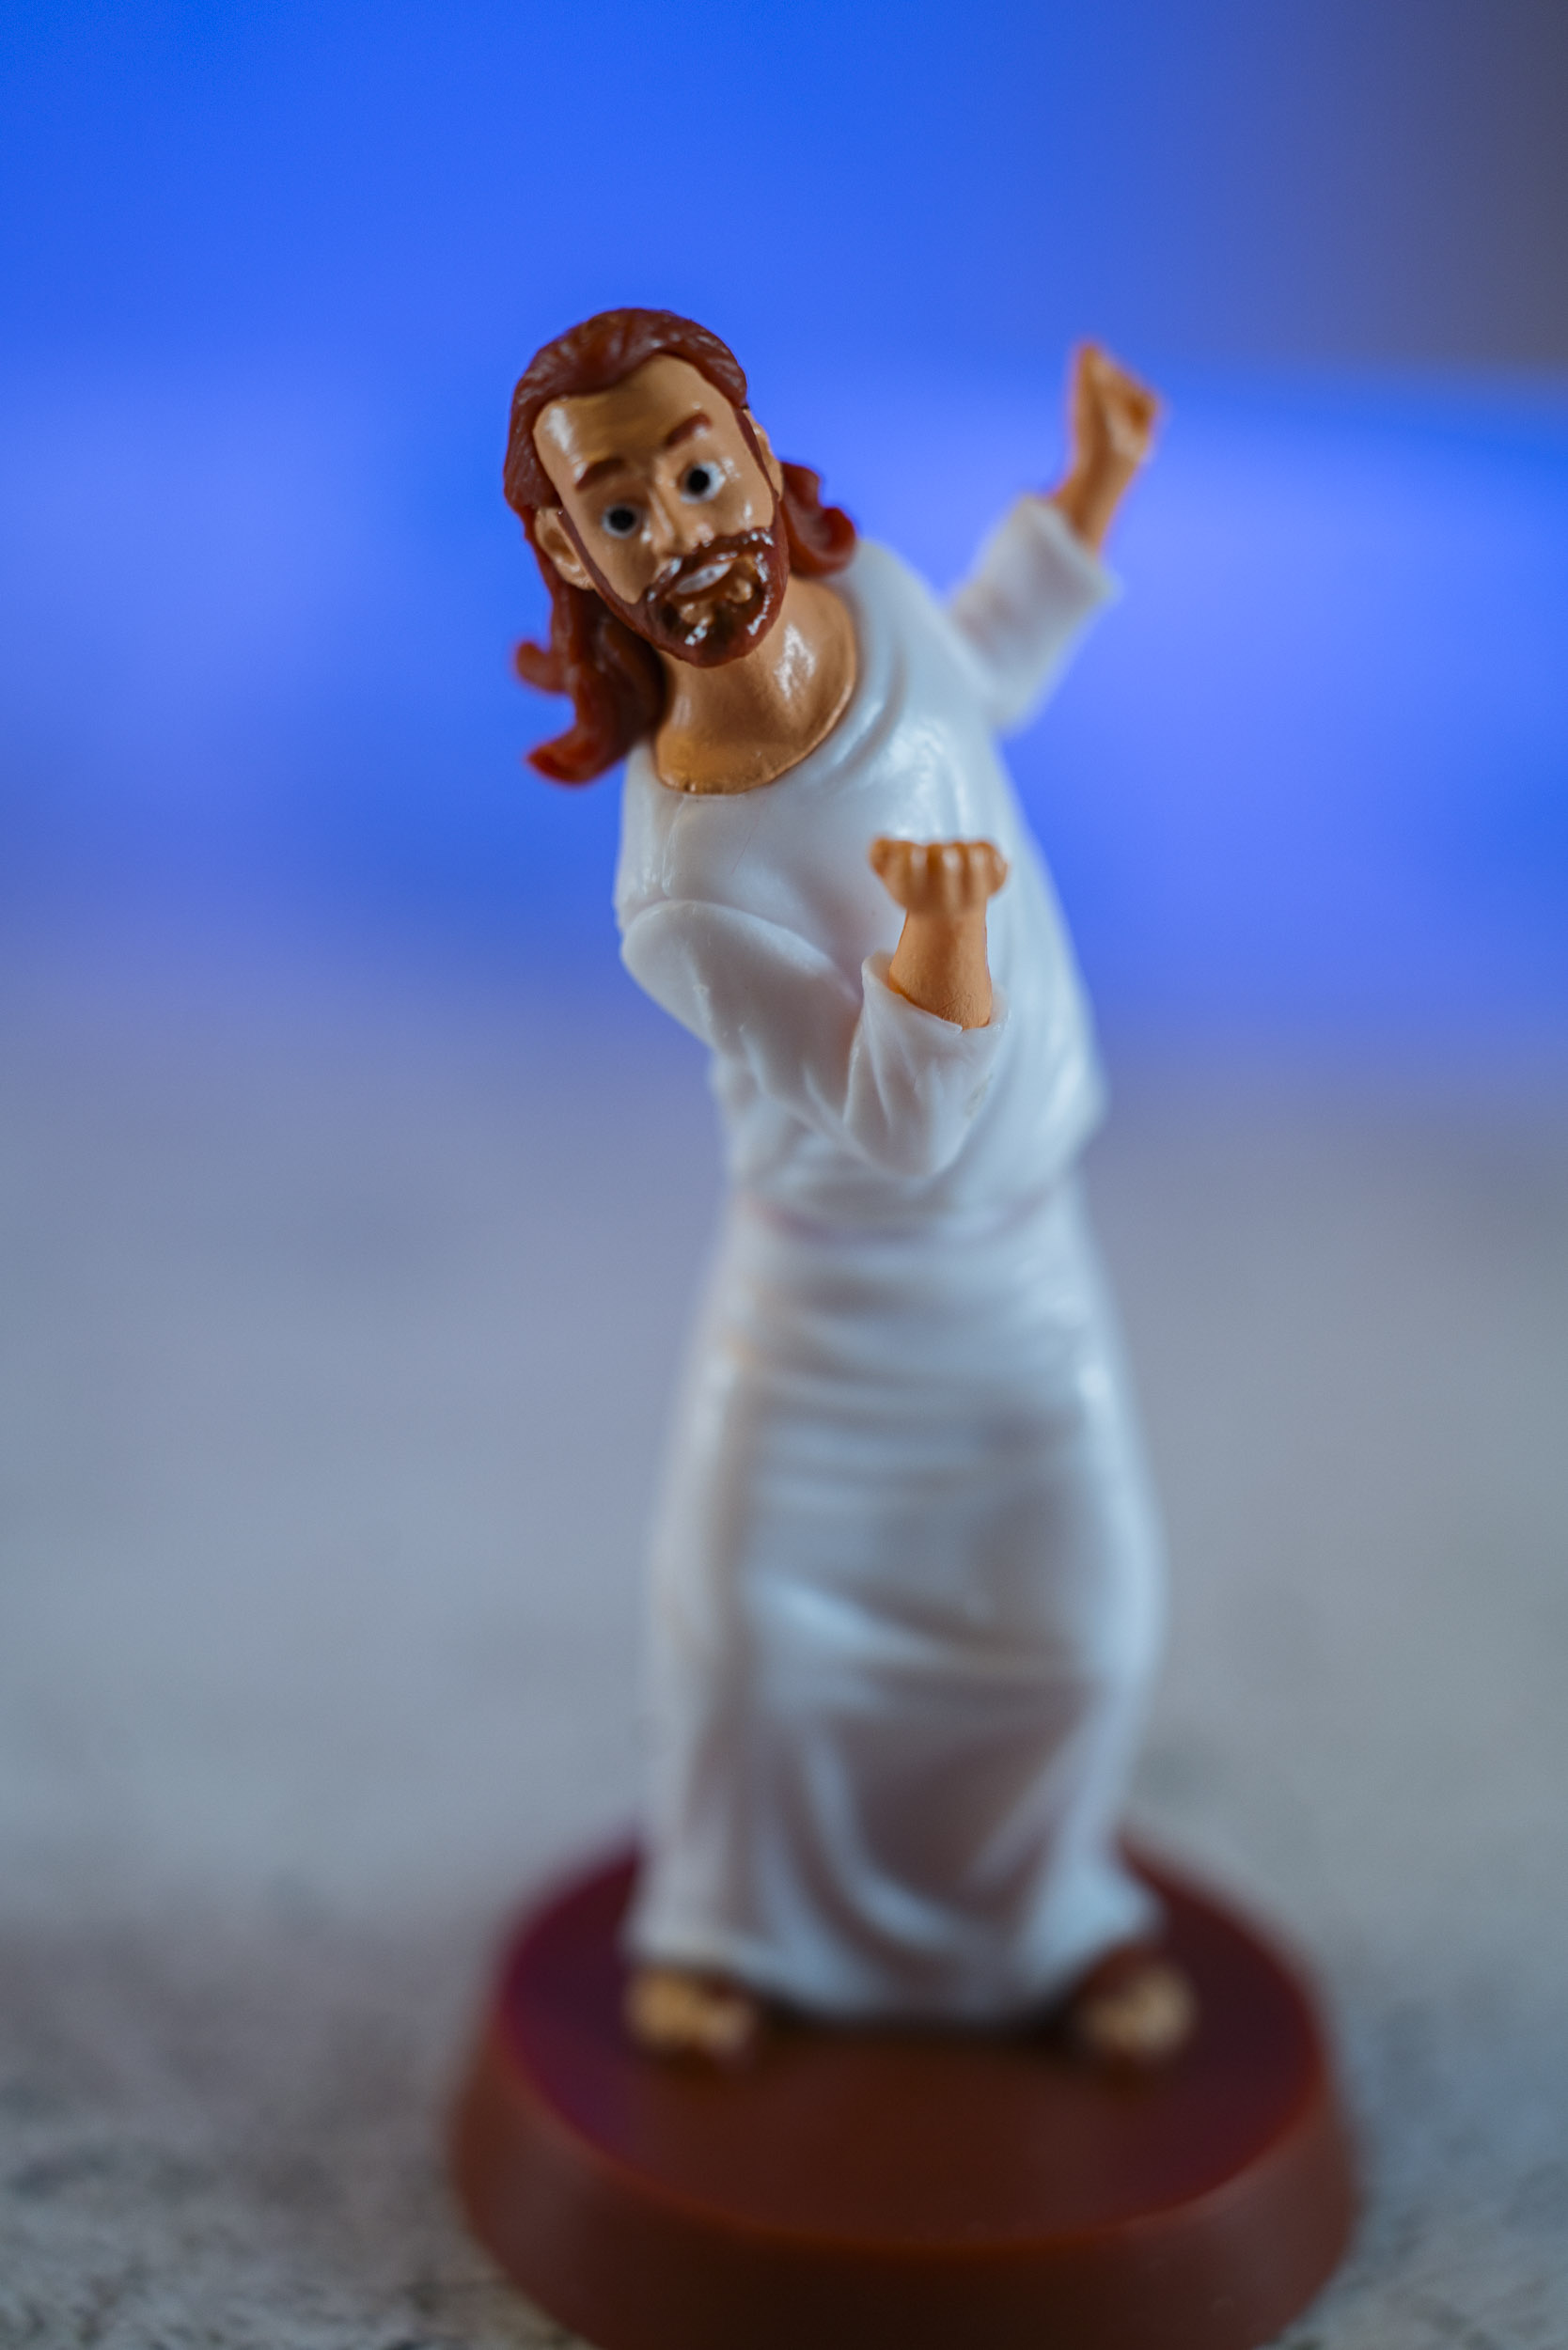
With a close focusing distance of just 15cm and a magnification ratio of 1:2 the Tamron 35mm f2.8 Di III is very suited to product photography.

Build Quality

In terms of build quality the Tamron 35mm the internet has largely been critical of it. The body is made out of some form of engineering plastic which you’d think had been manufactured by Tupperware judging by a lot of the reactions. Comparing this to recent Sigma lenses and Canon L lenses there is very little to distinguish the Tamron from the others. The only difference I can find without some sort of destructive testing is that the Tamron has a slightly more “satin” finish than the more “mat” of the Canons and Sigmas. The lens mount appears to be chrome plated brass which is nice, and there is an “o” ring which provides some semblance of sealing from the elements at the mount. There is no other weather sealing so I would say the lens isn’t really weather sealed at all despite Tamron’s claims. Tamron isn’t alone in this and I think it is high time the industry took a leaf out of Olympus’s book and actually stated to what level their products are sealed and give an IPX rating. Anything else is just weasley marketing BS as the majority of the camera and lens manufacturers state their products are weather sealed but won’t cover water water ingress under their warranties.  

The metal lens mount as a gasket to provide some weather sealing.

The lens is larger than other 35mm lenses of similar specifications and feels quite light in the hand, but it doesn’t feel cheap. It feels quite sturdy and well made. On the lens barrel there is only a ribbed focusing ring which is of the focus by wire type which means there is little chance of getting repeatable focus pulls using it.A the front of the lens the front lens element is well recessed and while the lens doesn’t focus internally it extends within that recess so it does not protrude beyond the front of the lens barrel. Like all Tamron’s mirrorless range so far the 35mm f2.8 has a 67mm filter thread. Tamron thoughtfully include a lens hood with the lens. Other manufacturers please take note – if Tamron can include a lens hood with its budget lenses there no reason why you can’t. I’m looking at Olympus and Canon here. The lens hood warrants some discussion here as it is quite an interesting design. It is not the conventional bucket or petal shape. Instead it is like a plastic blank that has had a rectangular hole cut in the front and it is very effective at preventing flare and would also provide a degree of protection for the front element. The hood is threaded to take 67mm filters which means that you don’t have to remove it if you want to use a polarising filter. Somebody at Tamron has been doing some thinking. The hood bayonets into place.
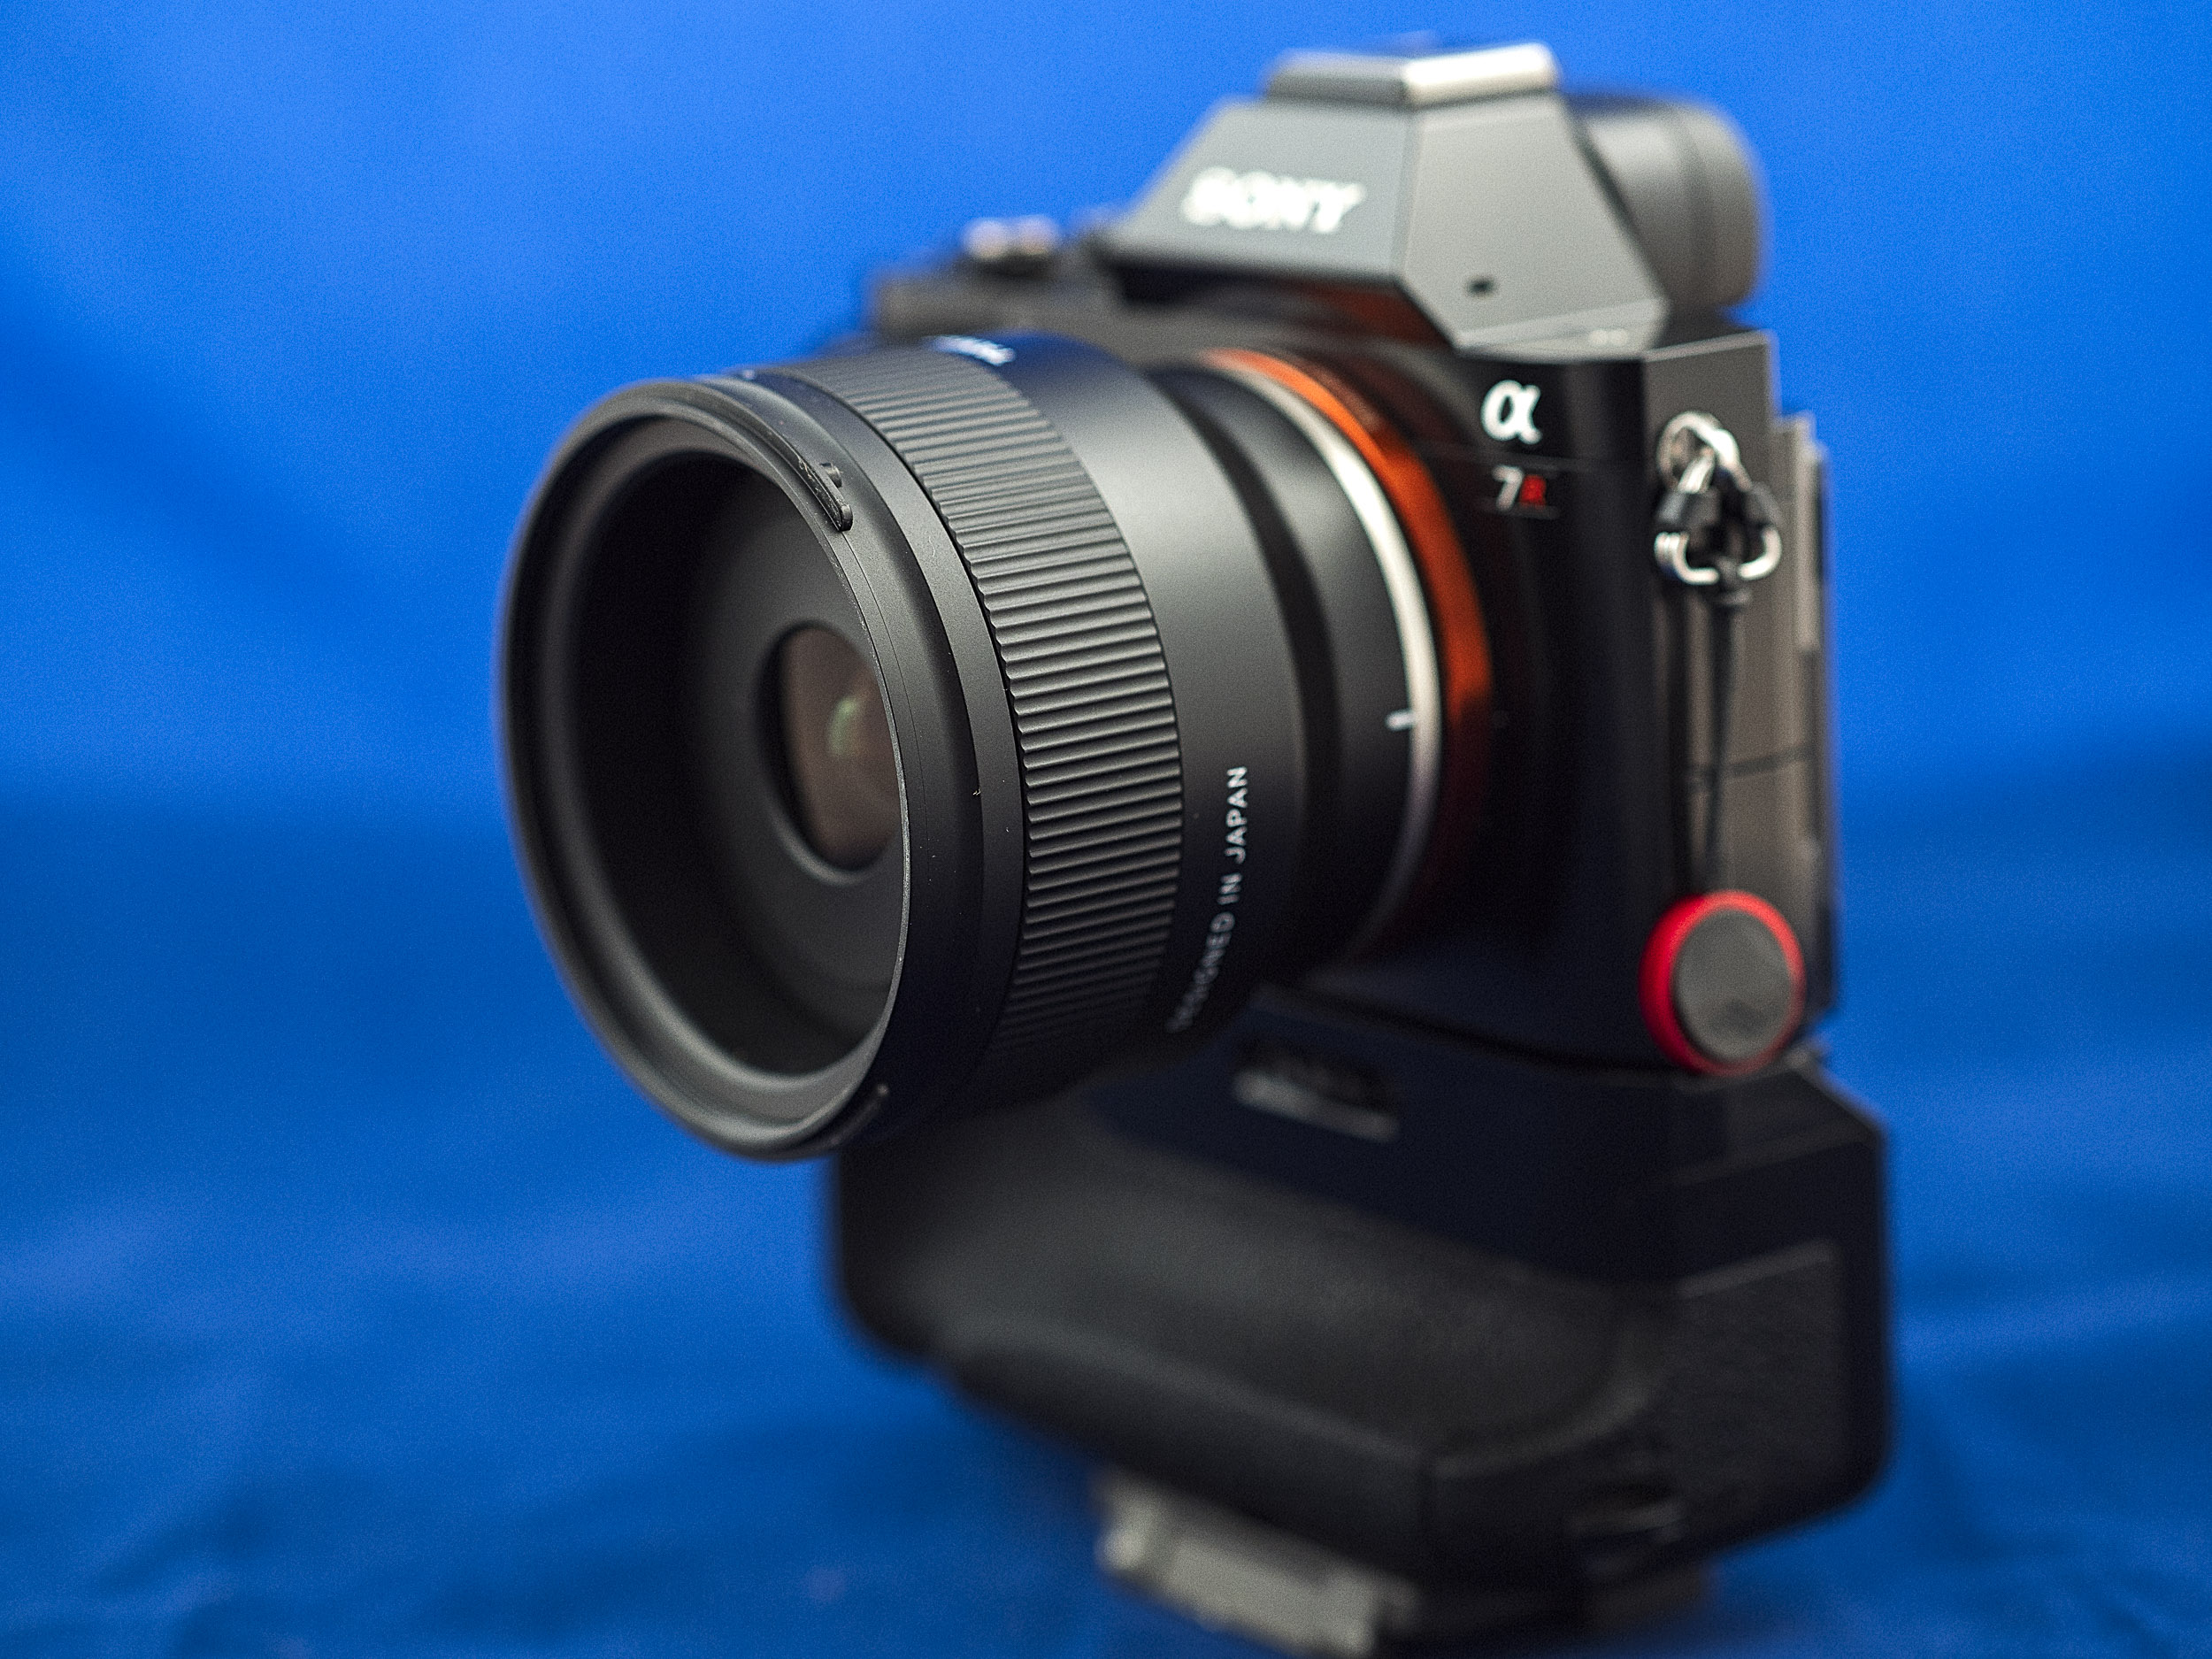
The front lens element is well recessed.

Optical Performance

The Tamron 35mm f2.8 has built in lens profiles that are applied to jpgs and RAW files if so selected in the camera’s menu. I’ve opened the files in both Lightroom with the profiles switched on and then in RawTherapee with no profiles. 

Click on the chart to see larger.

In terms of sharpness well at f2.8 at the centre of the image the lens is nicely sharp and contrasty. At f4 the it reaches its best performance and stays there to f11. At the edges wide open it isn’t quite as sharp as the centre, but by f5.6 the edges are as good as the centre. The old adage of stoping down two stops from wide open to achieve optimum performance certainly holds true of this lens. By f16 the image starts to soften as diffraction rears its ugly head.

In terms of optical aberrations well once the lens profile is switched off there is very slight evidence of pincushion distortion and vignetting. At f5.6 the vignetting disappears. A small amount of lateral chromatic aberration can be seen, but it is so slight I had to magnify the images to 300% to see them. Easily fixed in Lightroom. With a maximum aperture of f2.8 longitudinal chromatic aberration is not a problem. It is really fast apertures of f1.2 and f1.4 that really cause problems with this.
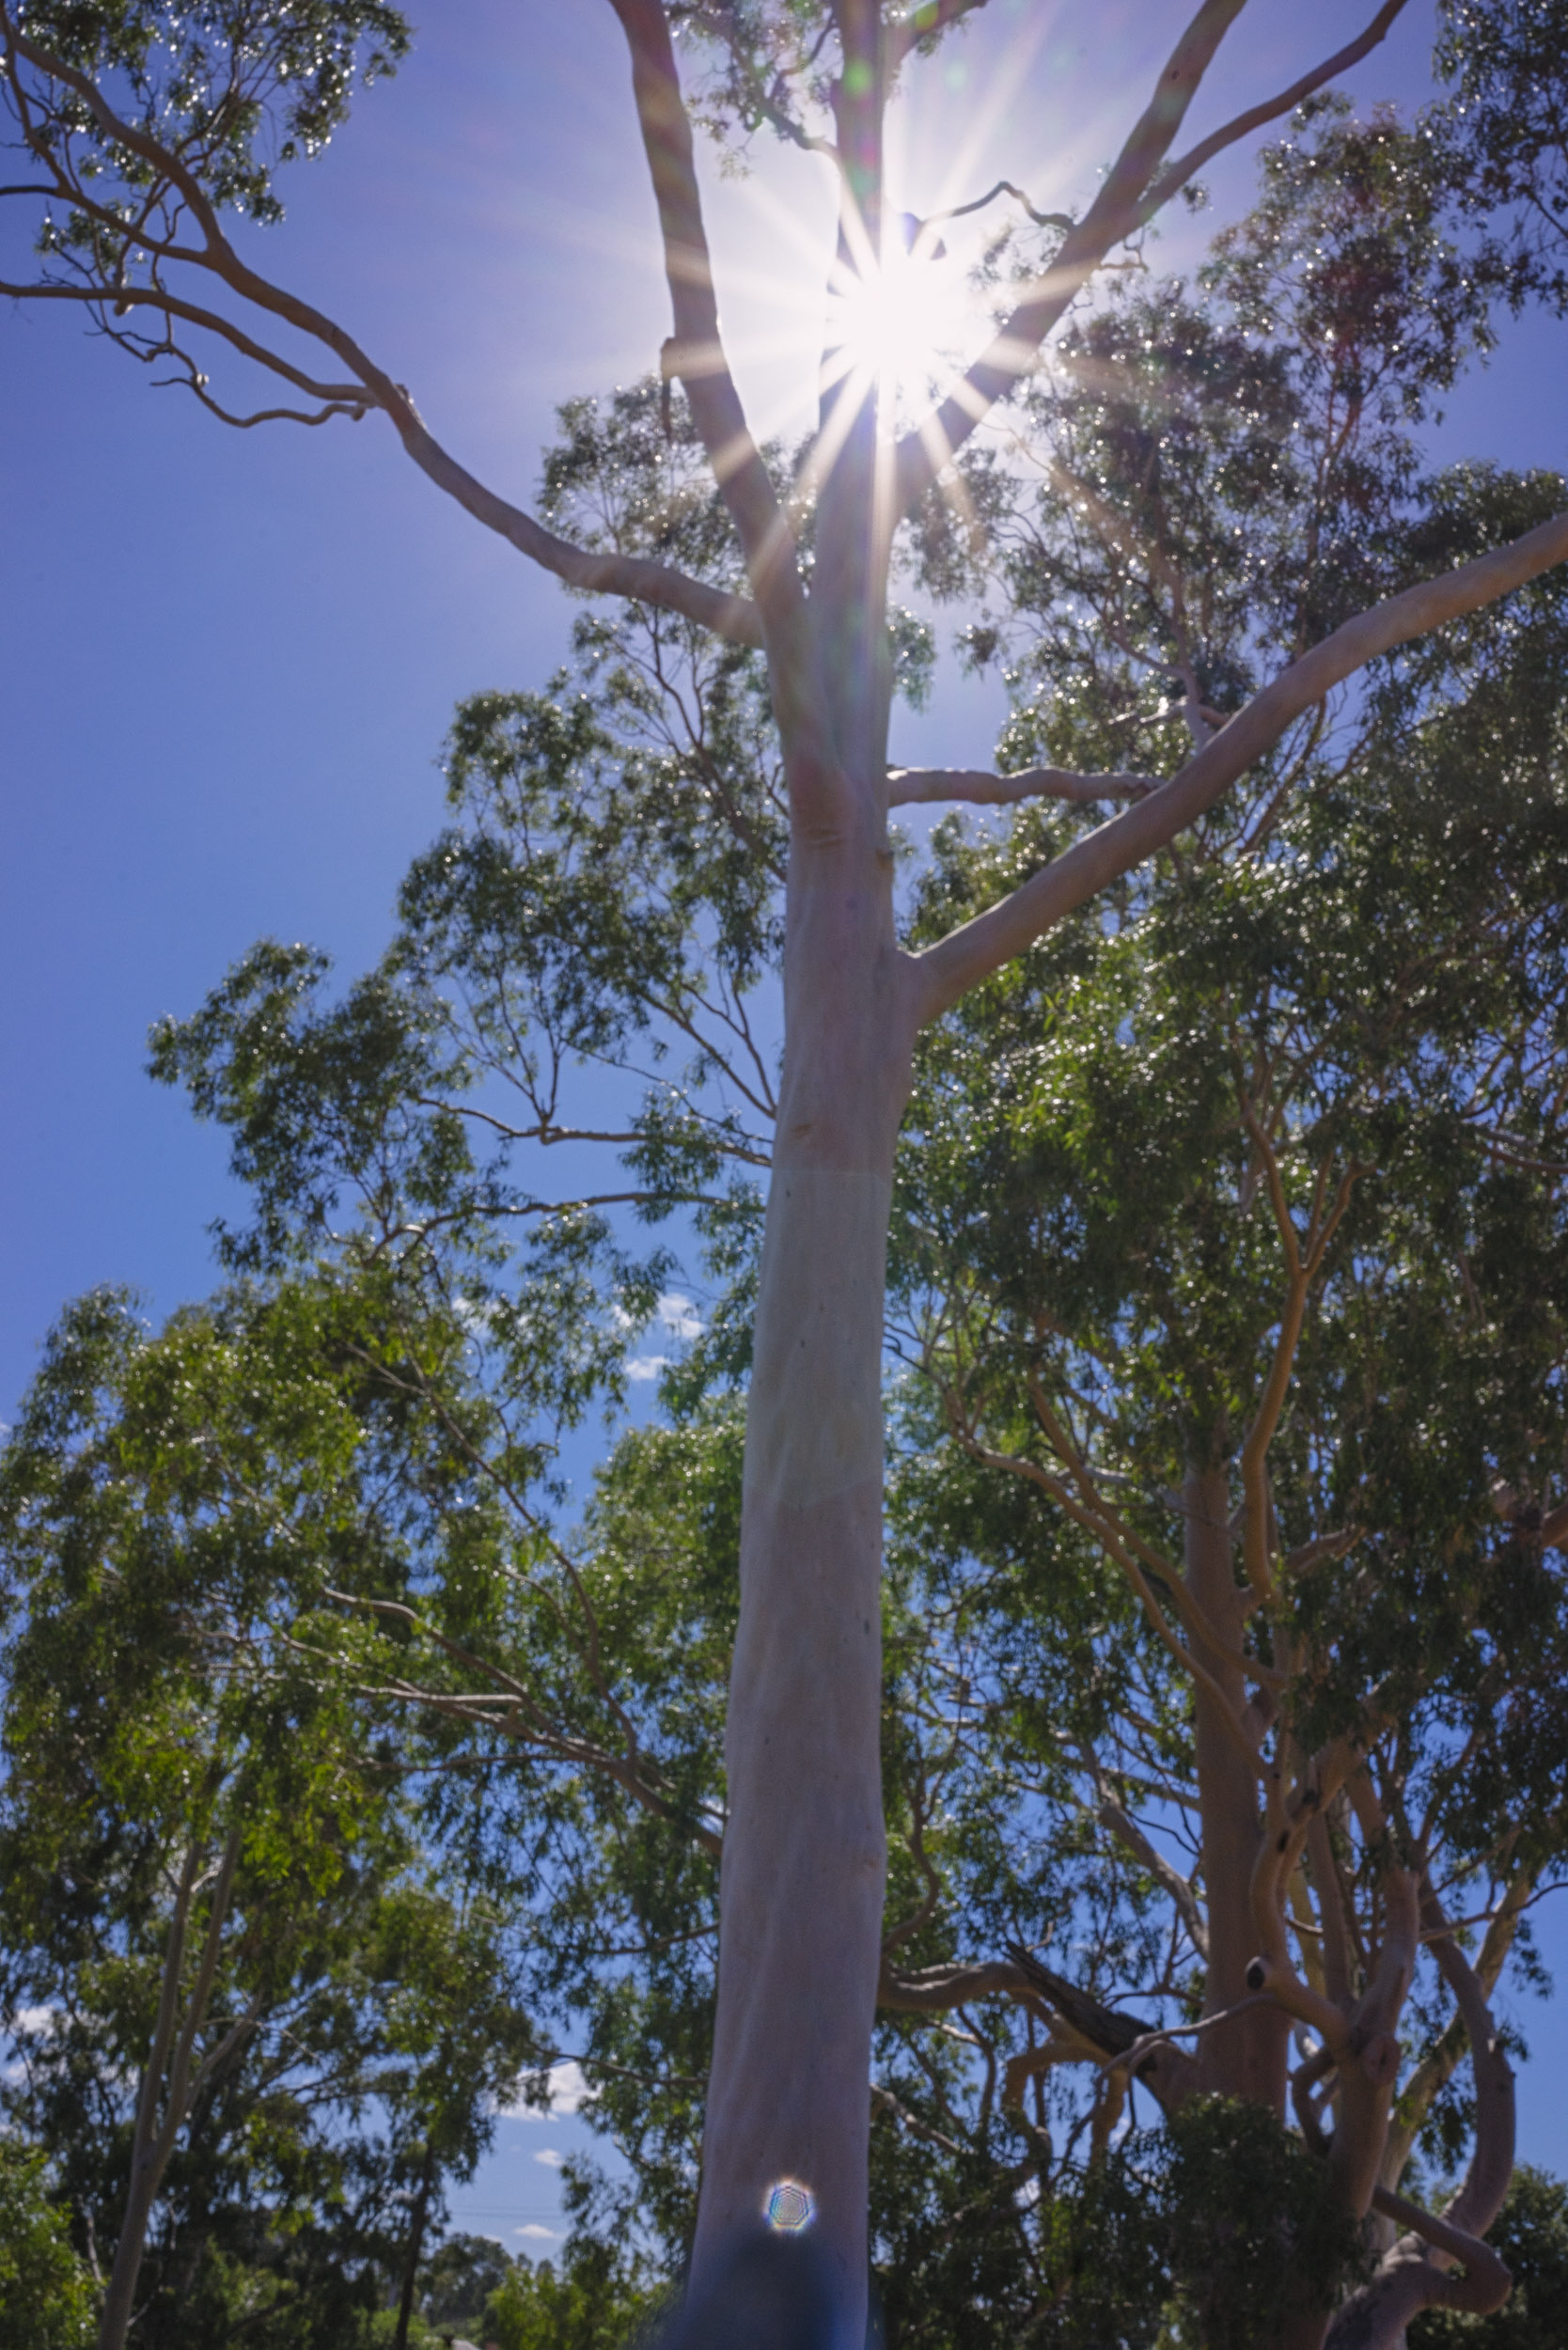
Without a lenshood the lens exhibits quite pronounced ghosting flare. Note the discolourateion on the tree trunk halfway down and the polygonal shape on the trunk at the bottom of the frame. At f22 the sunstars are pronounced, but aren’t that well defined.

Flare resistance is a bit on the pedestrian side without the lens-hood with ghosting visible. The lens-hood is included in the box for a reason so use it. The seven bladed iris produces what to me are quite attractive sun-stars. Speaking of how the lens handles specular highlights the bokeh is not what I would call thrilling but it is not offensive either.  Wide open in the centre there are round balls with faint onion rings present from moulded aspherical element. I suppose the final polishing wasn’t as smooth as that on more expensive lenses as a cost cutting measure. The edges of the balls are not smooth, they have a fuzzy appearance as the light bleeds into the darker areas which is a form of halation. At the edges of the image the bokeh balls take on that elliptical cats eye shape. By f8 the bokeh balls take on a definite polygonal shape.
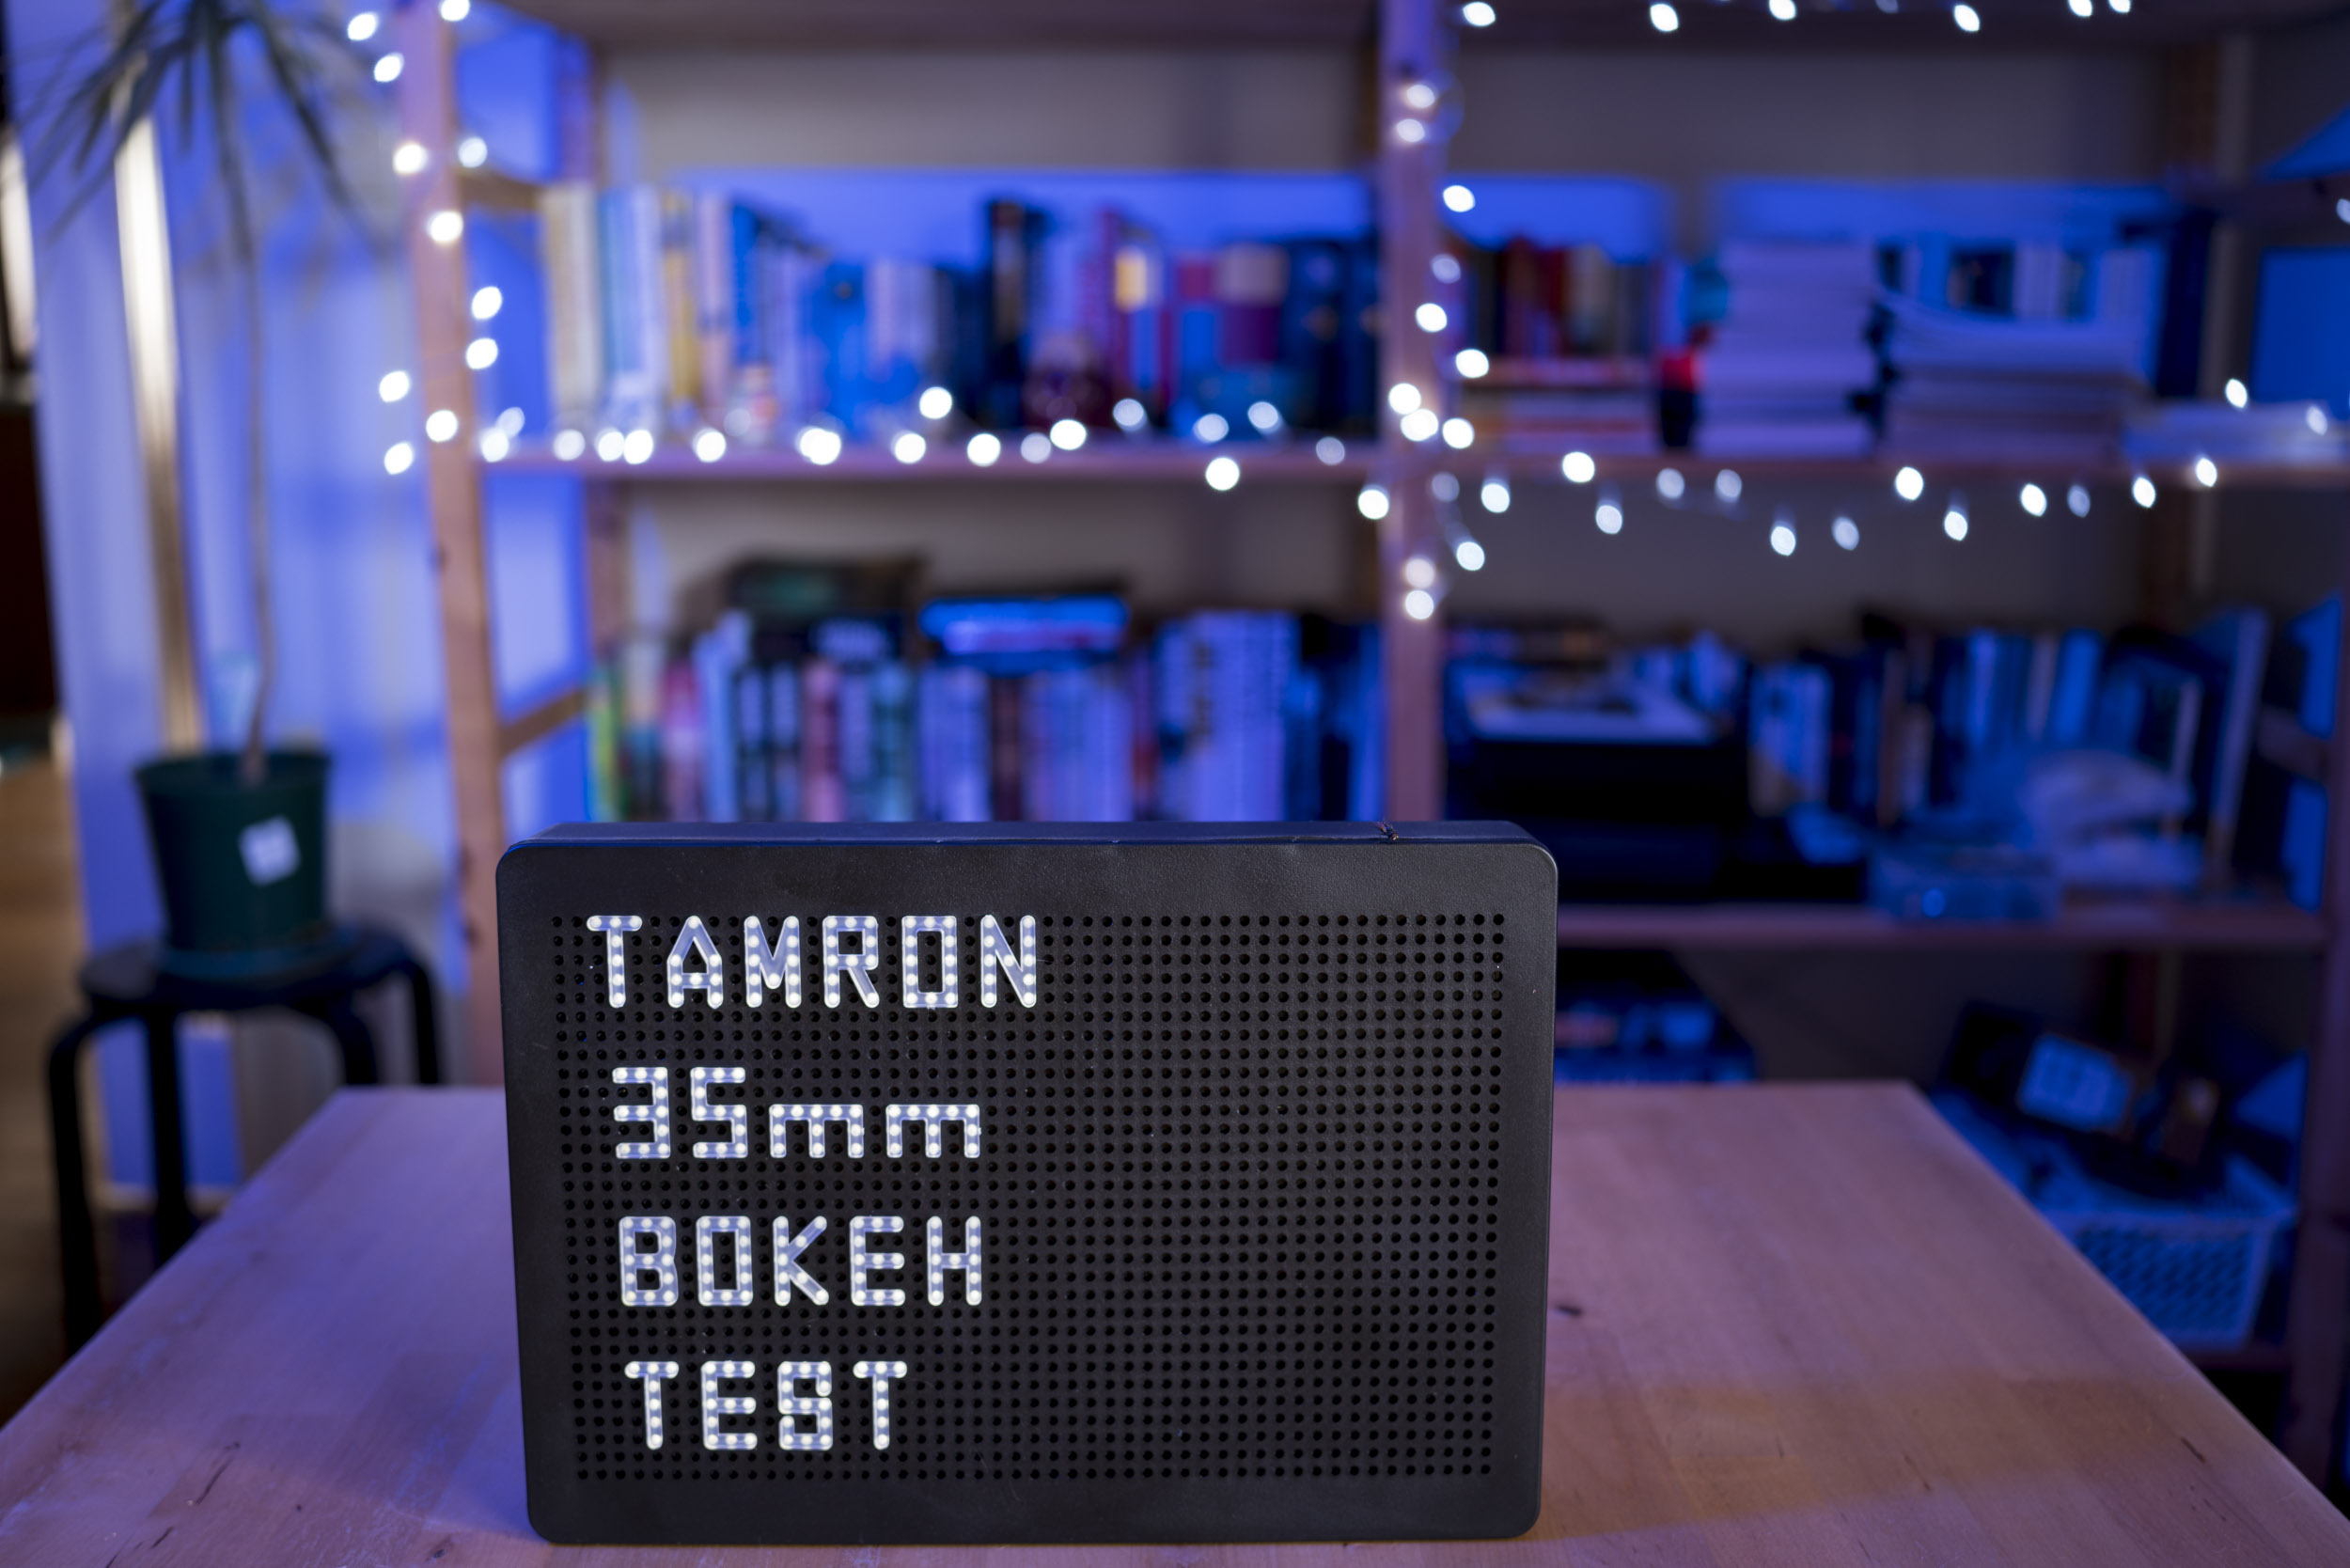
In the bokeh test we can see quite nice round balls in the centre of the image wide open, but on closer inspection onion rings are present and the edges have a fuzzy appearence to them. At the edge of the frame the balls have a definite cats eye shape. As the lens stops down the bokeh balls take on a polygonal shape which is really apparent from f8 and beyond.


Click on the image to see larger.

Comparison 

The Olympus OM Zuiko 35mm f2 mounted on a Sony A7r.

Is a cheap auto focusing lens worth getting over a classic manual focusing version? Well to find out I’m comparing the Tamron 35mm f2.8 lens to the Olympus OM Zuiko 35mm f2 lens. Forty five years separate the two optical designs and a lot has changed. There are several different version of the Olympus lens. It had a long production run from 1974 to 2002. I’m using a later multi-coated version. This MC version is 43mm in length, 240g in weight and has a filter thread of 55mm. It has an optical construction of eight lens elements in 7 groups and a minimum focusing distance of 0.3m. When it’s performance is studied we can see there is slight barrel distortion evident in the test image. CA is present when wide open and clears up on stopping down Wide open the lens is quite soft and lacking in contrast both in the centre and at the edges. Both sharpness and contrast improve in the centre when stopped down to f8. The edges show some signs of improvement but not as much as the centre. 
Our test subject for the comparison.

Comparing the two lenses in an actual real world shooting scenario we can see that with both lenses set to an aperture of f2.8 in the centre of the frame there is virtually no difference between them and I’d say they they are equal. In the corners, however, it is a very different story. The Tamron has a good level of sharpness while the Olympus is very soft. Stopping down to their respective minimum apertures – f22 for the Tamron and f16 for the Olympus -we see again in the centre that there is just a very marginal difference. In the corner the Tamron is better by a gnat’s whisker. Just remember that the Olympus was given an advantage. The Tamron shot wide open at f2.8 while the Olympus was stopped down at to f2.8 allowing an improvement in optical performance. At f16 the Olympus didn’t suffer the amount of diffraction the Tamron did at f22.

A comparison between the Tamron 35mm and the Olympus 35mm at f2.8. Click on the image to see it larger.


The same again but at f22.

Conclusion

When Sony launched the original A7 and A7r in 2014 critics poured scorn over the nascent system by saying there were no lenses. Early adopters divided into the system and tried their hand at adapting lenses they did have to fill the gaps in the line up. Fast forward to 2021 and Sony have done a tremendous job at fleshing out their line up. But the most significant thing is that Sony allowed third parties to access the lens mount protocols and this has meant that are lenses that range in price from decidedly wallet friendly all the way to those that would make a trust fund baby wince. At the time of testing the Tamron lens is selling for $350 AUD (which is the equivalent of being given away with a McDonalds Happy Meal in the USA). Looking on EBay the Olympus is selling for between $300 to $700 AUD depending upon condition and version. The version I have would count as a mint late model which would place it in the upper range. So the question is whether having a new autofocus  lens is worth more to you than having a potentially more expensive 20-40 year old lens. Well I had the Olympus lens left over from OM film days (along with quite a few others) and I actually got a secondhand Sony A7r camera so I could use the Olympus lenses. I was very happy with that arrangement. The Tamron registered on my radar because of its macro capabilities.

So you want to go full frame mirrorless with a 35mm prime lens  but don’t want f1.2 lenses or can’t afford them then buy the Tamron. Don’t want want to carry around a lens that is capable of blocking the Suez Canal buy the Tamron. It is nowhere near a perfect lens. It is a modest lens, with a modest price and with a better than modest performance. So with what it costs and with what it can do it is a great buy.

Corrigin Peregrination

A few days ago I made the 260Km round trip out to Corrigin to try and find the Pygmy Orchid, Corunastylis tepperi. I’d never seen it before and it is an early start to the orchid season. I also wanted to try out some new ideas for photographing orchids before the season proper starts. I knew roughly where to look, but once there it was like looking for a needle in a haystack. The plant lives up to its name – it is very small. The flowers are about 3mm and they can be found on a stalk 2-3 cm tall. As the the orchid prefers leaf litter found in mallee woodlands this makes them even harder to find.


Pygmy Orchid by Paul Amyes on 500px.com
Pygmy Orchid, Corunastylis tepperi. Corrigin, Western Australia.


When I drove up to the spot my heart sank a little as I had hoped that having just come up a fresh green plant would be fairly easy to spot, but as luck would have thanks to some rains we had a few weeks ago some grasses had begun to sprout as well. The area was covered in litter – not recent, it was old, very old. There were rusty steel ring pull cans all over the place. Now I’ve been in Australia thirty three years and drinks cans were aluminium back then, so I would say they were forty years old at least. The beer bottles looked even older. Take your litter home folks and then you can collect the 10c deposit on each item. As luck had it I found a whole patch of the pygmy orchids about 700m from where I’d parked the car.  Having finished so quickly I decided to head off to experience the delights of downtown Corrigin.


Pygmy Orchid by Paul Amyes on 500px.com
Pygmy Orchid, Corunastylis tepperi.


Now besides orchids Corrigin’s other claim to fame is its association with dogs. The town holds the world record for the most dogs in a ute. Non Australians probably will be a bit perplexed by this but for a few years it seemed like very country town wanted to cram as many dogs as physically possible into a ute. The town also has a dog cemetery which has become quite a big tourist attraction so I made a quick stop there. It’s not the first time I’ve visited but I wanted to see if there was anything new as the owners of the dogs erect memorials and I’m fascinated with how their love for their dogs expresses itself.


Corrigin Dog Cemetery by Paul Amyes on 500px.com
The entrance to Corrigin Dog Cemetery, Western Australia.


One of the good things with photographing orchids as opposed to photographing wildlife and in particular birds is that you don’t have to get up at stupid o’clock. In fact some species of orchids will only be at their best in the middle of a bright sunny day. So by the time I hit down town Corrigin it was well past lunch time so I went into one of the two cafes and ordered a BLT sandwich. Two minutes later the waitress informs me that there is no sliced bread would I mind it being in a roll. Another two minutes and I’m informed there’s no lettuce. A further two minutes passes and I’m told there’s no tomato. At this point I’m starting to think that I’ll be told there’s no bacon when the waitress brings this enormous baguette with half a pig in it. It is literally the biggest bacon roll I’ve ever seen.


Hooch by Paul Amyes on 500px.com
Hooch’s grave in Corrigin Dog Cemetery.


The night before we’d watched the movie “The Dry” staring Eric Bana. Although we’ve not had a drought the drive out to Corrigin reminded me very much of the movie. I love driving through the Wheatbelt – you get the feeling that the roads could go on forever and  the movie very much captured that feeling. If you’ve never seen the movie give it a watch as I thought it was very good.

Graffiti

Graffiti is a subject that seems to upset a lot of people – especially members of the “hang ’em high” brigade. Personally I don’t get bent out of shape by it, and in fact some I even enjoy. The other day we were walking in Enright Park in Northam and we ventured under the Brookfield Railway Bridge and we were treated with an extensive graffiti gallery which I quite liked.


These colourful pieces on the bridge piers where what caught our eye and encouraged us to explore under the bridge.


White Crow and a white face.


I don’t think the artists are paying attention to the warning signs.


Graffiti on the Brookfield Railway Bridge near Enright Park in Northam, Western Australia.


For those that complain about graffiti and demand the death penalty for it here’s a few facts. The only known written material in the ancient Safaitic language (an early form of Arabic) comes from graffiti. In the classical era most graffiti was rather sophisticated and demonstrated a very high level of literacy and a deep appreciation of art and poetry which indicates that it was done by the elites in society (Ponnamperuma, Senani (2013). Story of Sigiriya. Melbourne, Australia: Panique Pty Ltd. p. 157). In the Nineteenth Century Lord Byron avoiding his creditors, ex-lovers and looking for lots of non-binary rumpy pumpy graffitied his way round Europe in-between writing poetry and fighting for Greek independence (Shanks, Michael (1996). Classical Archaeology of Greece: Experiences of the Discipline. London, New York: Routledge. p. 76).  I don’t know where Byron got the time and all the energy from.

The Werillyiup Trail


Werillyiup Trail by Paul Amyes on 500px.com

Follow the blue poles for the Werillyiup Trail in Whiteman Park.


The Werrillyiup Trail in Whiteman Park is a 3Km jaunt around an area called Horse Swamp. So called because back in the early days of the Swan River Colony if horses escaped they invariably ended up at the swamp. The word Werrillyiup is is Nyoongar for “a swampy place” so from all this you’d expect to see quite a bit of water. Well for much of the year it is dry and really only fills in June with the coming of the winter rains. Each time I’ve been it’s been akin to walking around a large puddle. That’s not to detract anything away from  it, it is just a statement of fact. What you will see though is an important wildlife refuge in a large ever-growing city. Western Grey Kangaroos are the most visible residents but there is a huge variety of birdlife here particularly in winter, spring and early summer. I’ve had more luck seeing raptors here than at any other location in Perth. EBird Australia has a listing of 101 species that can be seen at various times of the year around the swamp.


Yongka by Paul Amyes on 500px.com

Western Grey Kangaroo, macropus fuliginosus, Whiteman Park, Western Australia.


Australian Hobby by Paul Amyes on 500px.com

Australian Hobby (Falco longipennis longipennis). Whiteman Park, Western Australia.


Djando by Paul Amyes on 500px.com
A pair of Whistling Kites seen flying round the aviaries on the edge of Whiteman Park.


Wyan by Paul Amyes on 500px.com

A white-faced heron looks out from its tree top perch over Horse Swamp. Whiteman Park, Western Australia.


Australian Shelduck by Paul Amyes on 500px.com
Australian Shelduck, Tadorna tadornoides, Whiteman Park, Western Australia.


After your leisurely walk around the swamp you can be revived at the excellent Guerrilla Hub Kiosk with a great coffee and some of their wonderful food. And if after all that you feel as if you’ve not communed enough with the wildlife you can always nip up to Caversham Wildlife Park and have your picture taken with a wombat.


Refreshment after a hard mornings walking and bird watching at the Guerrilla Hub kiosk in Whiteman Park.


Yours truly with one of Caversham Wildlife Park’s staff and a wombat.

Perry’s Paddock and Beenyup Swamp Walk

Yellagonga Regional Park by Paul Amyes on 500px.com
The trails around the southern end of Lake Joondalup are popular with walkers and cylists alike.


Last August I went up to Lake Goollelal in Yellagonga Regional Park and the other day while my partner was enacting her plan for total world domination in croquet I decided to visit the Park again but this time I thought I’d give the southern end of Lake Joondalup a go.


It’s a nice 4 1/2 Km walk taking in Perry’s Paddock, the southern part of the lake and Beenyup Swamp. I didn’t stick to the main paths but followed the smaller paths around as I wanted to see the local wildlife, and as it was a Sunday avoid the MAMILs thinking they’re riding the the Tour de France – more like the Tour de Farce from the look of some of them.


Linhay Cottage by Paul Amyes on 500px.com
This building is known by a variety of names Linhay, LinhayCottage, Linhay Perry’s Shed. It was built in the 1860’s by George Shenton at Perry’s Paddock. The Paddock was one of the first land grants in Wanneroo area made in 1838.


Near the start of the walk there are some buildings, well the remains of them. They’re not building projects waiting for tradies to finish them but they are some of the earliest buildings to have been built in Wanneroo. The field they’re in is known as Perry’s Paddock and was one of the first land grants in the area made back in 1838. This isn’t what I came for as I was hoping to see birds on and around the lake.


Boodelong by Paul Amyes on 500px.com
Boodelong or Australian Pelican (Pelecanus conspicillatus) feeding on Lake Joondalup in Yellagonga Regional Park.

Unfortunately it’s not that easy to get to the lake side – it involves trying to creep through the thick bush on the lakeside without making any noise. One crack of dry twig and you’re rumbled and every birder miles around does a runner. The thick bush has other hazards – they’re thick with spider’s webs – really BIG webs. Where there are big spider’s webs there are BIG spiders. In this case they Golden Orb-Weaving Spiders so named as the webs have a slight gold hue to them. The webs are surprising tough and the female spiders that make them are not shy and are very visible which makes it difficult for those of a more nervous disposition not to scream when blundering through them like something out of Harry Potter. Screaming like a “girlie man” also does not help you creep up on birds unnoticed. Your fearless correspondent was undeterred as he knew that despite their size Golden Orb-Weaving Spiders are harmless unless you are an insect or a male of the species looking for an amorous liaison.


Golden Orb-Weaving Spider by Paul Amyes on 500px.com

Golden Orb-Weaving Spider, Nephila edulis. Despite its size and their massive webs they are harmless to humans. Yellagonga Regional Park, Western Australia.


Manyt by Paul Amyes on 500px.com
Manyt or the Western Corella (Cacatua pastinator subsp. derbyi). Yellagona Regional Park, Western Australia.


Three Wise Corellas by Paul Amyes on 500px.com
Three wise corellas – hear no evil, see no evil, and sorry my mouth is full. Yellagona Regional Park, Western Australia.


At least the corellas found my mad dance of jumping up and down and flapping my arms about while shrieking entertaining. Ah! I didn’t mean to say that! They would have if they’d have actually seen me do it – which of course they didn’t. Leaving the lake and heading down south takes you to Beenyup Swamp which provided an opportunity to see more birds and less spiders.


Yellagonga Regional Park by Paul Amyes on 500px.com
Beenyup Swamp in Yellagonga Regional Park.


Melkullya by Paul Amyes on 500px.com
Melkullya or Yellow-billed Spoonbills, Platalea flavipes, feeding at Lake Joondalup in Yellangonga Regional Park.


Melkullya by Paul Amyes on 500px.com
Lurking in the shade of the swamp paperbark trees.


Wodjalok by Paul Amyes on 500px.com
Red Wattle bird (Anthochaera carunculata subsp. woodwardi) known to the Nyoongar people as wodjalok. Yellagonga Regional Park.


Djitidjiti by Paul Amyes on 500px.com
Djitidjiti . The eponymous Willie Wagtail, Rhipidura leucophrys leucophrys. Yellagonga Regional Park, Western Australia.
Boang by Paul Amyes on 500px.com
Despite their small size the Silvereye, Zosterops lateralis, has an incredibly loud birdsong. Yellagonga Regional Park, Western Australia.


While walking along the Beenyup Swamp Broadwalk I did meet my first cyclist of the day who was definitely not a MAMIL and who was very apologetic for startling me. All in all a very pleasant walk and hopefully I’ll get back at a better time of year when there’ll be more bird activity.


Yellagonga Regional Park by Paul Amyes on 500px.com
Not a MAMIL. Cycling along the Beenyup Swamp Boardwalk in Yellagonga Regional Park.

Olympus m.Zuiko 45mm f1.2 Pro Lens


As usual there is a video for those that prefer or the full written piece is below.


The Olympus m.Zuiko 45mm f1.2 PRO lens mounted on an EM1 mk ii.

The Olympus m.Zuiko 45mm f1.2 Pro Lens was announced in by Olympus back in October 2017 as one of their trio of f1.2 lenses. The others being the 17mm and 25mm. According to Olympus they were designed to “have beautiful defocusing effects” and “beautiful feathered bokeh to make your image stand out” (https://shop.olympus.com.au/m-zuiko-ed-45mm-f1-2-pro). In the case of the 45mm (and I suspect the other two) the lens is designed so that spherical aberration is not fully corrected. This means that as light rays enter the lens only those that pass through the centre of the lens are made to come together at the focus point. The rays at the edges focus slightly in front of that point and this causes the bokeh to have a gentle roll off – the so-called “feathered bokeh”. Olympus themselves claim this matches “classic” older lens designs. At this point it should be noted that spherical aberration and chromatic aberration are different. Spherical aberration occurs when a single wavelength of light or colour cannot be focused whereas chromatic aberration occurs when a lens cannot focus the red, green, and blue wavelengths on a single point. Although Olympus claims to match the performance of older classic lenses they have chosen a lens design that is very different from them.


Lens Construction and Build Quality

Olympus 45mm f1.2 lens has 14 elements in 10 groups with one ED element, four HR element, and one aspherical element.


Focal Length 45mm (90mm in full frame equvalence)
Angle of view 27º
Minimum focusing distance 50cm
Maximum magnification 0.1 X
Lens construction 14 elements in 10 groups with one ED element, four HR element, and one aspherical element
Maximum aperture F1.2
Minimum aperture f16
Diaphragm 9 curved blades
Focusing Auto focus – yes, MSC mechanism making fast and silent AF possible in video mode.

Manual focusing – the focusing ring can be pulled back to engage a clutch mechanism with hard stops at each end.

Filter size 62mm
Dimensions 85mm (h) x 70mm ⌀
Weight 410g
Other features Hermetic sealing making the lens dust proof, splash proof, and freeze proof. 60529 IPX1 IP rating.


The lens mount of the Olympus 45mm f1.2 lens. The mount has an ‘o’ ring that contributes to its 60529 IPX1 IP rating.


To see how this differs from an older classic design lets compare it to Olympus OM Zuiko 50mm f1.4 which was first produced in 1971 and remained in production until 1984. 


Olympus OM Zuiko MC 50mm f1.4


Focal length 50mm 
Angle of view On 35mm 43º, on micro four thirds 21º
Minimum focusing distance 45cm
Maximum magnification 0.15 X
Lens construction 7 elements in 6 groups
Maximum aperture f1.4
Minimum aperture f16
Diaphragm 8 curved blades
Focusing Manual focus with a straight helicoid
Filter size 49mm
Dimensions 36mm (h) x 60mm ⌀
Weight 230g


The 45mm f1.2 dwarves the f1.8 version.


Comparing the Olympus 45mm f1.2 to the Canon EF 50mm f1.8. On their respective bodies they both offer a similar field of view.


The 45mm f1.2 mounted on an Olympus EM1 mk i compared to the Voigtänder 75mm f2.5 Color-Heliar mounted on a Sony A7r. Both a ideal focal lengths for portraiture.

Physically this is a large lens. It dwarfs my Olympus 50mm f1.4, my Canon EF 50mm f1.8 and my Sony FE 50mm f1.8. It is a smidge larger than the Olympus m.Zuiko 12-40 f2.8 Pro and 27g heavier. The 45mm f1.2 follows the look of the other lenses in the Pro line and it also has a L-Fn button which can be programmed to various functions on Olympus cameras. In the hand the lens is reassuringly solid, it has that dense feeling that quality optics have. The focusing ring is nice and large and has the same ribbing that all the other lenses have in the Pro line. Like the other Pro lenses the 45mm f1.2 enables manual focusing by pulling back the focusing ring to engage a clutch to give a nice smooth focus throw of about 110º that has hard stops at either end. Combined with focus peaking this makes for manual focusing nirvana. As to what the lens is made out of this is hard to say, the lens mount is chrome plated brass, parts of the lens barrel have a metallic feel, and other parts feel plastic. Is this a problem? I don’t think so. For certain applications metals can be a poor choice and high quality engineering plastics such as ABS make better sense. In fact Sigma makes a big deal out of the use of their Thermally Stable Composite (TSC) which is substantially stronger than conventional polycarbonates while having similar thermal expansion properties to aluminium. Bottom line the 45mm f1.2 feels nice in the hand and is easy on the eye.


Optical Performance


The Olympus m.Zuiko 45mm f1.2 PRO lens is sharp wide open.


Lens sharpness test at f1.2 and f4. Click on the image to see it larger.

Image sharpness in the centre of the frame wide open is good and reaches its best at f4. The corners wide open are less sharp than the centre, however, by f2.8 the sharpness and contrast improves considerably and the lens reaches optimum sharpness at f4. By f8 the image starts to soften due to diffraction. Vignetting is also present wide open but this disappears at f4. There is a minute amount of pincushion distortion present, but unless you are shooting very demanding architectural work then it is largely unnoticeable. Chromatic aberration is present on high contrast edges, but it is very slight and easily removed in post. Longitudinal chromatic aberration is also present, but it too is very slight and not painfully obvious which is good as it is quite difficult to get rid of in post. All this is managed using firmware corrections. I like to turn these off using RAWTherapee to see how much correction is going on beneath the hood so to speak. The amount of vignetting is greater than the corrected images but it still clears up by f4. The pincushion distortion is also more evident. All in all the firmware corrections plus topnotch lens design make a lens that performs very well.


Chromatic aberration is well controlled and what little there is is easily fixed in post.


Longitudinal Chromatic aberration.


With regard to resistance to lens flare pointing the 45mm f1.2 at a very point light source shows it is quite prone to ghosting flare – images of the lens diaphragm as colourful bright spots. This is more evident on lenses with complex constructions with lots of lens elements. The red blobs in the photo are not lens defects. They are caused by light being reflected  off of the sensor surface back onto the rear element. As each pixel is reflected it causes a grid pattern. Unfortunately the smaller lens flange distances on mirrorless cameras means this phenomena is more apparent than on a DSLR with their great lens flange distance.


The Olympus 45mm f1.2 is quite prone to flare so it is advisable to use the included lens hood.


The Olympus 45mm f1.2 is quite prone to flare so it is advisable to use the included lens hood. At f16 the sun stars are quite pronounced.


f1.2 bokeh balls test. In the centre of the frame nice round and smooth bokeh balls with no evidence of any onion rings. At the edgeges you can see cats eye shapped balls. Click on the image to see it larger.

Olympus make great claims about the bokeh, or more importantly the feathered bokeh of this lens. Up until the announcement of this line of lenses I’d never heard the term feather bokeh before and to be honest I’m not all that sure about what it is and how that you quantify it. I guess in simple terms Olympus means that edges of the bokeh balls are not harsh and to quantify how feathered they are we’ll have to make some comparisons. At f1.2 the centre of the frame has nice round bokeh balls with no evidence of any onion rings. Onion rings occur with the use of ground aspheric lens elements. Basically the grinding process leaves a series of ridges which can be seen with a defocused point source. The biggest problem with them is that for most people they go unseen, but once seen they can’t be unseen. At the edges of the frame there is cats eye shaped bokeh – this is caused by mechanical vignetting from the lens barrel.  At f5.6 I was quite surprised to see star burst effects forming around specular highlights, I was expecting them to start appearing at the f11 mark. By f16 the bokeh balls in the corners have become spherical.

So the question is what to compare the Olympus 45mm f1.2 to? The most obvious contender is the 45mm f1.8. In their advertising blurb for the f1.2 Olympus compare the lens on an Old EM1 mk ii to a full frame DSLR with 85mm lens. Interestingly having made such a bid deal about the bokeh the only comparison is made with weight so I’ve decided to make the comparison using weight and bokeh quality with the Canon EF 50mm f1.8 on a Canon EOS550d. The 50mm lens has an equivalent focal length of 80mm in full frame terms. The nearest full frame equivalent I’ve got on hand is the Cosina Voigtländer 75mm f2.5 Color-Heliar on a Sony A7r2. Finally as I’ve already talked about the Olympus OM Zuiko 50mm f1.4 I’ll add it to the list with it mounted to the Olympus EM 1 mk ii. The older Olympus and the Canon and Voigtländer are also considered classic lens designs.

Olympus OMD EM1 mk ii with Olympus 45mm f1.2 Pro lens 984g
Olympus OMD EM1 mk ii with Olympus 45mm f1.8 737g
Canon EOS550d with Canon EF 50mm f1.8 mk ii 601g
Sony A7r2 with Voigtländer 75mm f2.5 Color-Heliar 932g
Olympus OMD EM1 mk ii with Olympus OM Zuiko 50mm f1.4 980g

So the Olympus 45mm f1.2 combo is the heaviest. Lets look at the bokeh. With the three Olympus lenses I’ll just compare the lenses at widest aperture of the slowest lens. With the other two I’m going take equivalency into account so 45mm f1.2 on the Olympus is roughly equivalent to 50mm f1.8 on the APSC sensor and the Olympus’ f1.2 is equivalent to f2.5 on the full frame sensor. 


Bokeh comparison between Olympus 45mm f1.2 and the Olympus 45mm f1.8. Click on the image to see it larger.


First cab off the rank is the Olympus m.Zuiko 45mm f1.8 lens. It has an optical construction of 9 elements in 8 groups, weighs in at 116g and has a 37mm filter thread. This little lens is an absolute gem and I use it a lot to do both stills and video product shots. It currently retails for $1300 AUD less than the f1.2. Wide open at f1.8 there is vey little to distinguish it from the more expensive lens at f1.8. So I would have to say unless you absolutely need an aperture of f1.2 then save your money.


Bokeh comparison between the Olympus 45mm f1.2 and the Olympus OM 50mm f1.4 at f1.4. Click on the image to see it larger.


The Olympus OM Zuiko 50mm f1.4 was introduced way back in 1972 with the original OM1. The lens used here is the revamped version with improved coatings that came out in 1984.  The lens construction is very simple with 7 elements in 6 groups and no fancy glass. Wide open it is not the sharpest lens and the bokeh balls are irregularly shaped, but stop it down to f2 and the bokeh is just as good as the 45mm f1.2 at f2. It’s possible to pick this lens up for about $100 on eBay and for $150 you can get it with a film SLR such as an OM1 or 2.


Bokeh comparison between the Olympus 45mm f1.2 at f1.2 and the Canon EF 50mm f1.8 at f1.8. Click on the image to see it larger.


When you put the Canon EF 50mm f1.8 on an APS-C camera such as my EOS550d it has a focal length that is equivalent to 80mm on full frame. It has a simple double-gauss design of 6 elements in 5 groups. This model is the mk ii version which was introduced in 1991 and is sometimes called the “plastic fantastic” because of its plastic body and lens mount. At the edges and in the corners of the frame the Canon has more pronounced cats eye bokeh, but at the centre it is nice and round. Thanks to only having a diaphragm consisting of 5 blades the bokeh becomes polygonal as it is stopped down. No longer in production it can be picked up for around $60 on eBay or you could really push the boat and buy the latest version which retails for $200 AUD. 


Bokeh comparison between the Olympus 45mm f1.2 at f1.2 and the Voigtländer 75mm f2.5 Color-Heliar at f2.5. Click on the image to see it larger.


The last lens is the Voigtländer 75mm f2.5 Color-Heliar mounted on a full frame body.The original Heliar design was developed in 1900 by Dr. Hans Harting as a symmetrical 5-element variant of the simple anastigmatic and well colour-corrected Cooke triplet. In 1902 the design was revised correcting astigmatism, curvature and coma better than the original design. That new design was asymmetrical six elements in five groups. In 1950 Dr. A.W. Tronnier refined the design even further to produce the Color-Heliar. When Cosina revitalised and relaunched the Voigtländer line they revived the Heliar concept with the 75mm f2.5 Color-Heliar. Cosina wanted to recreate the German optical aesthetic and engineering quality from the 1950s. The lens construction by modern standards is pretty basic with 6 elements in 5 groups and the 10 aperture blades bodes well for nice bokeh. Wide open at f2.5 it has the same depth of field characteristics as the Olympus at f1.2. It is not as sharp as the Olympus wide open but the tonal transitions are very smooth. The bokeh balls are nice and round at the centre, but at the edges and corners they take on the elliptical cats eye shape. This lens is longer in production and for a while it was possible to pick one up for around the $300 mark second hand, but the interest in adapting classic lens to mirrorless cameras has seen prices rise to almost $700.


Auto Focus Performance


the reluctant bull terrier test


Shooting stills the AF is very quick and accurate. Using the reluctant bull terrier test I shot a sequence of 25 frames using continuous autofocus  at 10 frames per second with an EM1 mk i which does not have the latest iteration of Olympus’ on sensor phase detection AF. At f4 all the shots were in focus. Switching out the mk i for the mk ii with its better AF systemI shot a 71 frame sequence at f2 at 10 frames a second and only 6 frames were slightly soft.

Shooting video on the Olympus EM 1 mk ii using face tracking the camera and lens responds quickly and smoothly without hesitation. Many m4/3 users shoot video using Panasonics cameras so I put the 45mm f1.2 on my G85 and set it it use face tracking. The results were dismal. There was a lot of hunting, and if and when the camera acquired focus it would quickly drift off. Having had good success with the EM1 I can only put this down to Panasonic’s use of DFD contrast based autofocus and not the lens.


Conclusion


The fantastic  little 45mm f1.8 is only $500 new and is just as sharp. The only place where it is found wanting is the maximum aperture.


There is no doubt that the Olympus m.Zuiko 45mm f1.2 PRO lens is a very good lens. It is well built and optically performs very well. The only thing that counts against it is its price when compared to other options. In the last quarter of 2020 Olympus ran a promotion in many parts of the world enabling purchasers of the EM1 to claim a free lens from the f1.2 trinity. If you were one of those and chose the 45mm then you got a great lens and I hope that you really enjoy it. If you are a committed Micro Four Thirds user and were wanting to purchase this lens today at the street price of $1800 I would suggest that your money could be better spent. The fantastic  little 45mm f1.8 is only $500 new and is just as sharp. The only place where it is found wanting is the maximum aperture. If you are not so wedded to the idea of 45mm but just wanted a fast short telephoto then I’d seriously consider the Sigma 56mm f1.4 which at $750 is great value and a seriously good performer.

If you are just getting into photography and want a camera and lens combo that gives enormous creative control over depth of field then you’ve got to look at full frame cameras ($1800 will get you a new one less if second hand) and pick up an 85mm f1.8 where Canon, Sony and Nikon all have offerings between $600-900 new. 

For video the 45mm f1.2 is a nice option as on the right camera it can autofocus extremely well and the the provision of a manual focus clutch that gives hard stops makes it very useful for manual focus pulls. If autofocus isn’t important to you then there are a huge number of older classic f1.2 and f1.4 lenses that can be picked up very cheaply.


Example Images


Wide open the Olympus m.Zuiko 45mm f1.2 PRO lens gives a nice please rendition with gentle tonal transitions.


The close focusing capabilities of the Olympus 45mm f1.2 are impressive and couple this with pleasing bokeh it makes for a very nice lens with which to do product photography or still life.


The Olympus 45mm f1.2 also makes for a good lens for equine portraits.


Frida at 45mm f1.2.


Taken at the minimum focusing distance of 50cm.

Jaundiced


York and its surroundings have have taken on a definite yellow tinge of late. This is mainly due to the canola crops in the fields but soursob and yellow daisies are also to blame. It’s not a warm and inviting yellow but rather a green tinged acidic looking yellow. Nevertheless it sends the tourists wild and as you drive round you can see countless people standing in canola fields having their picture taken or taking a selfie even though many of the fields have signs up asking people not to. I don’t know when this became a trend – I can’t remember people doing this when I grew up in Kent and Sussex. Mind you back then it wasn’t canola it was oil seed rape. I think it’s probably got something to do with mobile phones and Instagram, but as somebody who has only just started an Instagram account I can’t be too certain of that so don’t quote me.


Oh did I mention I’ve now joined the 21st Century and got an Instagram account? I’m not really au fait with it yet. That’s probably because I don’t really like messing about with images on my phone – I’d rather do it my computer but Instagram won’t let you upload from a computer. If anyone knows of a way to load photos to instagram from a desktop please let me know.

Winter Coat*

Winter Coat by Paul Amyes on 500px.com


As the nights are getting longer and colder the local horses have been put into their winter coats. Another two photos from the shoot with the Olympus OM Zuiko 50mm f1.4 lens.


Winter Coat by Paul Amyes on 500px.com


*This week’s post title was inspired by Paul Kelly’s song “Winter Coat”

Wrecked

Seen Better Days by Paul Amyes on 500px.com
Seen Better Days. An old car wreck on the banks of the River in York, Western Australia. Sony A7R with Olympus OM Zuiko 50mm f1.4 lens. Exposure: 1/320 sec, f4 at ISO 100.

It would be tempting to say that this picture is a metaphor for these COVID19 times, but actually that would be quite crass. While all the restriction have been in place I’ve been determined to have some creative output and this is part of it. Over the last week I’ve been making myself go out in the evening to photograph. To make things a little more interesting I decided to impose a restrictions on myself. In this case I would use a focal length that I don’t particularity like (50mm) and an old vintage lens on a digital camera.I’ve walked past this wreck many times with the dog and really not taken any notice of it. Well on this particular evening the local farmers had been burning off and the smoke in the air was creating a nice warm light as the setting sun shone through it. I thought that the rust of the car complemented the warm lighting.