The other week I had the privilege of being asked to judge one of Mundaring Camera Club’s monthly competitions. It was a great experience and I really enjoyed looking at all the wonderful photos that had been entered. At one point when looking a shot of a flower I made my oft said statement shoot photos of flowers like they are a portrait of a person. So what do I actually mean by that? After a couple of weeks thought – I’m not the quickest! – I’ve decided to actually write it down.
The following four shots are all photos of the same Winter Donkey Orchid – it’s nothing special it’s just a plant I found the other day. But they do illustrate how I approach each subject.
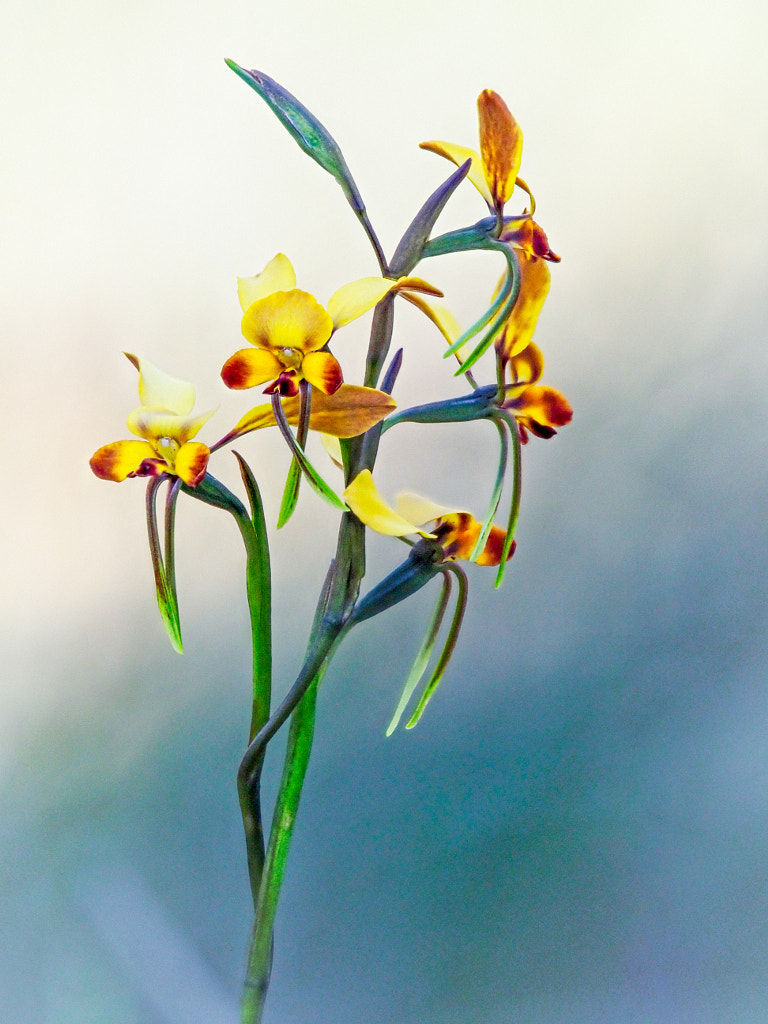
Winter donkey orchid, Diuris brumalis. Woottating, Western Australia.
The first is the establishing shot, an environmental portrait. It shows the plant in situ and how it relates to bush around it.
The first of the mid length portraits.
The second mid length shot done with the macro lens and flash. It creates a very different looking picture when compared with first one.
The next two are mid length shots. Two different techniques are used to try and produce the same effect. One is a single shot taken with a macro lens and flash, the other is done with a long telephoto lens as a focus stack. The aim is produce a shot with a nice clean back ground.
The tight “head” shot.
The fourth shot is a close up portrait – a head and shoulders if you like – to reveal some of the characteristics of the flower.
It is how I work the subject. Unlike Austin Powers I’m not asking the flower to be a tiger, but, what I am doing is taking a series of photos from different angles to bring out the best in the subject.
As an aside the clip of Austin Powers is its self a parody of another famous screen photographer – the protagonist of Michelangelo Antonioni’s masterpiece ‘Blowup’. I certainly don’t behave like David Hemmings’ character did when photographing Veruschka von Lehndorff in the film. That would be a bit strange.
Based on the evidence of what I post on this blog I go out to take nature and wildlife photos, but actually I go to be out in nature. The photos below are what I love being out in.
The warm light of sunset reflected by the trees in the Oswald Sargent Reserve.
Driving back home from the Oswald Regent Reserve at sunset.
This shot of a Scented Sun Orchid was what I considered my first successful photo of an orchid. The subject is separated from the background making easy to see.
I took what I call my first proper shot of an orchid back in 2008. Back then my technique was very simple – handheld with a macro lens. The problem was that it was often very difficult to isolate the flower from the background while having sufficient depth of field and a low ISO. For every successful photo there were hundreds of duds.
This shot of a Butterfly Orchid is one of the hundreds of duds. The messy background threatens to overwhelm the subject.
After about a year of trial and error (mostly error) I decided to photograph the orchids in the same way I would take a portrait of a person. Get down at “eye” level, use an off axis flash to provide the key light and have the natural light as my fill light at -1 to -2 stops. This was a huge improvement, but I still wasn’t getting the clarity and sharpness in the images I desired.
My first flash rig for photographing orchids. Using a flash brake allowed me to get the flash off of the lens axis and get a more pleasing lighting effect.
The next attempt at better lighting was a heavy tripod and light stand. My back hurts just looking at this photo.
The next evolution was to mount the camera on a tripod and then mount the flash to one of the tripod legs via a “magic arm”. This allowed greater choice in the positioning of the flash and allowed me to use different flash modifiers such as soft boxes, grids and snoots. The arrival of affordable and reliable wireless flash triggersmeant I could use multiple speedlights for more sophisticated lighting. This came a tremendous cost. I have a chronically bad back and all that kit was heavy, the tripod and “magic arm weighed just under 6Kg. Then there was the futzing about setting everything up, taking the shot, breaking it all down, walking to the next subject and then repeating it all again. Suddenly it wasn’t fun anymore. Something had to give and it was my back.
The diminutive Olympus EP-2. Just what the orthopaedic surgeon ordered.
A size comparison of my DSLRs (Canon 5d and 550d) and the Olympus EP-2 which replaced them.
In 2013 I bought an Olympus EP-2 mainly for travel and street photography. It was a revelation – small size, In Body Image Stabilisation (IBIS), and excellent flash implementation. It quickly became my orchid camera of choice. I could chuck out the tripod and become more mobile. It wasn’t all beer and skittles though. The 12Mp sensor wasn’t the best in terms of high ISO performance and dynamic range, the lack of a viewfinder made usage in bright sunlight problematic (solved with the addition of the optional EVF) and the contrast based autofocus system was a bit on the temperamental side. But the positives were enough to keep me using it and when the EM10 came out with a built in EVF, a better IBIS system and an improved sensor then I knew that the system would be just about perfect for what I did. I could walk around in the bush for hours at a time without back pain which meant I could explore further afield. This freedom allowed me to experiment a lot more.
Sigma’s 105mm f2.8 DG DN macro lens attached a Sony A7Rii.
The Tamron 35mm f2.8 lens has excellent macro capabilities.
Curly Locks, Thelymitra spiralis. Wandoo National Park, Western Australia. Sony A7r2 with Sigma 105mm f2.8 DG DN macro lens.
White Spider Orchid, Caladenia longicauda subsp longicauda. Wambyn, Western Australia. Sony A7r with Tamron 35mm f2.8 lens.
In 2021 I felt that I wanted more resolution than the 20Mp EM1 mk ii was giving me. So I tentatively dipped my toe into the world of full frame mirrorless and I went with a second hand Sony A7r2. The image files produced by the camera were absolutely gorgeous. Alongside my usual working method of using flash with macro lens I decided to experiment with environmental portraiture of orchids. For this I used a 35mm lens with a half size macro capability and the results were pleasing. The downsides were as follows. The rear LCD is hopeless in bright light and it has no touch control facility. The IBIS wasn’t as effective as that on my Olympus cameras and the sensor resolution emphasised very tiny camera shake. A tripod was the solution. The sensor is a dust magnet which means that changing lenses enables dust bunnies to proliferate. The answer was to have one camera with the 105mm macro and one camera with the 35mm. Arrrrrgh! I was back carrying a load of heavy equipment. So it was back to the Olympus kit.
This shot of a Lemon Scented Sun Orchid was made with the Olympus Em1 mk ii, Olympus 40-150mm f2.8 lens with 1.4 x teleconverter and the Olympus FL600R flash using the focus stacking function.
I’m still trying to evolve a style which produces a nice clean portrait of an orchid. One of the great benefits of Olympus’s cameras and lenses is that it allows very long telephoto lenses to have an almost macro capability. The use of such long lenses allows you to throw backgrounds well out of focus by dint of their increased magnification which reduces depth of field. The problem is that that decreased DOF means that it is hard to get your subject rendered sharp whilst retaining all that loverly bokeh. The counter to this is focus stacking which involves taking a series of pictures of the subject while moving the focus point and then blending the images in post. Olympus has a very neat feature that allows you to do this automatically in camera which is fantastic. Unfortunately the function limits your flash usage by restricting your maximum flash sync speed to 1/50th second and you have to manually set the flash exposure. I tried doing this for a while and it was a right royal pain. So now I don’t use the flash and just make the exposure using ambient light. The lens I’m using is the Olympus 40-150mm f2.8 with the the mc-14 1.4 x teleconverter. This gives me a 210mm f4 lens (420mm in full frame terms). Despite shooting wide open this invariably means shooting at a low shutter speed. So while the IBIS is fantastic on my EM1 mk ii using it with a long lens while focus bracketing wasn’t the best way to proceed. So it was back to a tripod. My aluminium Manfrotto 055 tripod is a good tripod but it is that heavy you could use it as a boat anchor. It was time to get a bit of fibre in my life – carbon fibre. So I bought a nice SiruiAM-254 carbon fibre tripod which weighs just a smidge over 1Kg. It doesn’t have a centre column and so a minimum working height of 7.8cm which means you can get down and close to the subject. The results have been excellent and now I feel that using both my normal macro lens and the telephoto zoom with converter I’m getting closer to what I have envisioned.
The Sirui AM 254 tripod in action.
So this has been my journey of finding what works for me. I’ve discovered that learning how your equipment works is just as an important step in developing vision and style as is technique. Continual learning and experimentation will help you develop as an artist and we shouldn’t be afraid to do so. A few times I’ve felt that I was going backwards, but it was worth persevering. I’ve still got a couple of things to sort out, but I feel now I’m on the right track.
The following shots were made this last week.
Common Bunny Orchid, Eriochilus dilatatus subsp. multifloris. Oswald Sargent Reserve, Western Australia.A focus stack using the Olympus EM1 mk ii with the Olympus 40-150mm f2.8 lens and 1.4 x teleconverter.
Hare Orchid or Fringed Hare Orchid (Leporella fimbriata). Oswald Sargent Reserve, Western Australia.
The Nissin MF18 macro flash mounted on a Sony A7R and Sigma 105mm f2.8 comination.
Before we get going I’m going to be a little bit pedantic. The Nissan MF18 Macro flash is not and I repeat NOT a ring flash. A ring flash such as the Profoto ProRing2 Plus UV has a continuous light tube that forms a circle. The MF18 has two separate flash heads (A + B) in two semicircular diffusers.
The Nissin MF18 macro flash mounted on a Sony A7R and Sigma 105mm f2.8 comination.with the flash heads positioned at their widest setting.This also shows that the head is comprised of two separate flash tubes in their own semi-circular diffusers.
What I’m looking at in this review is the Nissan MF18 for Sony cameras. This is important because the features and the included accessories vary somewhat depending on whether you have the Sony, Canon or Nikon models. Also while this unit is capable of wireless control I didn’t have the where withal to test that as I don’t own a suitable controller.
TLDR
Specifications
The MF18 is compatible with the following flash protocols:-
Canon ETTL and ETTL ii
Nikon i-TTL
Sony ADI/P-TTL
Having said that some cameras from Sony, Canon and Nikon aren’t compatible.
Canon:-
1dx mk ii, 5d mk iv, 6d mk ii, 80d, 900d, 1d, 1ds, and all the EOS M series of cameras.
Nikon:-
D2Hs, D2H, D100, D1H, D1. Firmware updates are required to ensure compatibility with the Z series cameras, the D6 and the Zfc.
Sony:-
RX100 mk ii
For Sony cameras the wireless strobe will not fire unless the flash mode is set to [WL(wireless)] in the camera menu or the wireless flash function is set to [ON].
Guide Number (GN)
16/53 (ISO 100 m/ft)
Flash output
83 Ws at full power
Power Source
Internal – 4 x AA alkaline/Ni-MH batteries
External
Nisin PS300 battery pack
Nikon SD-8a or SD-9 battery pack
Canon CP-E4 battery pack
Battery Life (approx.)
AA batteries 120-800 flashes
Nisin PS300 500 flashes
Nikon Sd-8a or SD-9 200 flashes
Canon CP-E4 260 flashes
Recycling time
0.1-5.5 seconds with AA batteries
0.7 sec with the Nisin PS300
1.5 sec with the Nikon SD-8a/SD-9
1.5 sec with the Canon CP-E4
Colour Temperature
5600 K at full power
Flash duration
1/700 sec at full power when using both flash heads and 1/300 sec when using one.
Wireless flash
Optical system relying of line of sight only
Sync
Hot shoe or PC sync
Modes of operation
Auto, TTL, full manual (power ranges from full to 1/64 in 1/6th increments) and fine macro (1/128 to 1/1024 in 1/6th increments).
1st curtain sync
2nd curtain sync
High speed flash sync (dependent on whether the camera allows this).
Dimensions
Body 115 x 65 x 85mm
Head 120 x 134 x 41mm
Weight
446g without batteries
Included accessories
Adapter rings to mount the flash head to the lens.
For Canon and Nikon 52, 58, 62, 67, 72, and 77mm.
For Sony 49, 55, 62, 67, 72, and 77mm.
It is possible to buy adapter rings individually in all sizes from 49mm to 82mm.
First Impressions
The box the Nissin MF18 comes in.
The contents of the box. The flash body and head plus 6 adapter rings. The sizes of the included rings depends upon on whether your camera is Sony, or Canon/Nikon.
The quick start guide printed on the inside of the box lid.
I don’t normally talk about packaging but in this case I’ll make an acceptation. The box and its overall presentation were very nice – almost “Applesque” – and showed nice attention to detail which I thought boded well for the flash itself. Overall the MF18 feels very well made. Like all flashguns/speedlights it is of a plastic construction. There is no mention of any weather sealing on the Nisin website so I’ll assume there is none. The body is connected to the head via a chunky coiled cable that feels nice and secure at both ends. In the case of problems with the cord it doesn’t look user replaceable but this is not unusual. The batteries are held in a magazine that slides out of the side. It is a very neat arrangement and spares are available (Nisin BM-01) for those who want a fast reload capability. The flash body is held in the camera hot shoe via blue anodised knurled ring. Not as fast as a lever that is sometimes found on other brands but perfectly satisfactory. On the rear of the body you’ll find a 3cm square colour LCD panel which is sadly not touch compatible. I really like the touch capabilities on my Metz flashes and it is a shame Nisin didn’t include it. Underneath the screen you’ll find an on/off/lock switch, a four way ‘D’ pad with central button, and a combined pilot and status indicator light/button. On the flash head are four buttons – the two vertical ones release the head from the adapter runs, and the two horizontalallow the flash tubes to positioned further out. This prevents vignetting and also allows more even lighting over some larger subjects.
The rear of the MF18. The A and B buttons allow the flash head to open up to prevent vignetting and provide a wider coverage.
Overall everything is very confidence inspiring.
Performance
Nissin claim that the MF18 has a Guide Number of 16 (ISO 100 in metres). Here the subject is 1m from the camera sensor, the power has been set 1/64 and the aperture set to f2. As we can see the photo is approx two stops under exposed. Also Nissin claim that the white balance of the flash is 5600K. The camera white balance was set to 5600K and this resulted in warm cast.
Nisin quote a Guide Number (GN) 16 (ISO100 m) but my testing has found this to rather fanciful as you can see from the table below:
Power setting
GN per Nisin
Measured
full
16
6.9
1/2
11.3
4.9
1/4
8
3.6
1/8
5.6
2.7
1/16
4
1.9
1/32
2.8
1.5
1/64
2
1.4
1/128
1.4
N/A
The measured guide numbers are between 2 and 21/3 of a stop lower than Nisin’s figures which is quite disappointing. The only positive I can say about it is that running the test 3 times the measured results were very consistent.
I measured the colour temperature using a grey card and setting the camera’s white balance to 5600K and found that the actual colour temperature was 4750K.
Checking recycling times using a fresh set of AA Ni-MH batteries saw recycle times average out at 8.9 sec when shooting at full power and 4.55 sec at 1/2 power. This falls short of Nisin’s claimed figures.
In Use
York Sun Orchid, Thelymitra yorkensis. Wandoo National Park, Western Australia. Using high speed synchronisation means I can overpower the sun and render backgrounds dark while illuminating the flower.
OK testing is one thing how does real world performance stack up. I’ve been using the MF18 since August 2021 on a Sony A7r2. The only manual shooting I’ve done with it is just testing it for this review. The rest of the time I use it in TTL mode for photographing flowers. More often than not I use it in high speed sync mode as well so I can have the flash as my key light and the ambient light as my fill. For this it has worked extremely well.
Shy sun orchid, Thelymitra graminea. York Golf Course, Western Australia.
Operating the MF18 is simplicity itself. The basic functions are controlled by the camera. The only time I have to go into the menu is select high speed sync. You can also select 1st or 2nd curtain flash there as well. It is so easy to use that I really don’t have to think about it
The MF18 control menu.
The menu for selecting advanced features such as second curtain sync power saving modes etc.
Conclusion
Pros
Cons
High speed flash synch
Simple to use
Fine macro mode allows power output down to 1/1024 power
A spare battery magazine is available (Nisin BM-01 and it costs approx $20 USD
Can be powered from the mains
Can be powered by Canon and Nikon external battery packs
Firmware can upgraded via a USB port
No case provided – other brands I’ve used provided a case
Only a limited range of adapter rings supplied in the box and while the rings are available as separate items they are quite pricey at $30 USD each.
Compatibility issues with certain models of camera
No weather sealing
GN not accurate
Colour temperature not accurate
The Nissin MF18 macro flash mounted on a Sony A7R and Sigma 105mm f2.8 comination.viewed in profile.
I bought the Nisin MF18 with my own money. At the time it was the only macro speedlight compatible with Sony that had high speed flash synchronisation. While some of the performance issues such as the GN, recycling times and colour temperature are a bit disappointing they have had no impact on how I use the flash.
The Nissin MF18 macro flash mounted on a Sony A7R and Sigma 105mm f2.8 comination.viewed from the rear.
In terms of value for money, compared to the Olympus and Metz equivalents it seems quite keenly priced. It is better specified than the Metz unit but doesn’t have the overall flexibility and the weather sealing of the Olympus.
Blue China Orchid, Cyanicula gemmata. Wandoo National Park, Western Australia.
Would I recommend it? Well if you are just going to use it as I do and are happy with the compatibility issues then yes I would. But if you are still using cameras such as the Canon 5d vi or the 6d ii then I would look elsewhere.
Yep you read that right. You know how you can stand at a bus stop for ages and not see a single one and then suddenly three come along together? Well orchids are like that. I’ve been walking the same patch of woodland looking for the Curly Locks Orchid for years without seeing a single one and then the other day low and behold there were three of them just standing there.
Curly Locks, Thelymitra spiralis. Wandoo National Park, Western Australia.
Curly Locks, Thelymitra spiralis. Wandoo National Park, Western Australia.
Curly Locks, Thelymitra spiralis. Wandoo National Park, Western Australia.
I’ve spent the last couple of weeks walking the Wandoo forest looking for various orchids. I’ve bumped into a male emus and his brood (too quick to photograph), met bob tailed lizards and countless Western Grey Kangaroos (again too quick to photograph). So even if I’ve not found the particular flower I’m looking for it has still been quite an experience.
The slower bob tailed lizards are easier to photograph than fleeing emus and kangaroos.
Speaking of finding orchids well I’ve seen plenty. On Thursdays outing to Wambyn Reserve I saw eleven different species and was amazed by how early some of them were.
A very early flowering Clubbed Spider Orchid, Caladenia longiclavata. Wambyn Reserve, Western Australia.
Little Pink Fairy Orchid or dwarf pink fairy orchid, Caladenia reptans subspecies reptans. Wandoo National Park, Western Australia.
Sugar Orchid, Ericksonella saccharata. Wambyn Reserve, Western Australia.
Frog Greenhood, Pterostylis sargentii. Wambyn Reserve, Western Australia.
Jug orchid or recurved shell orchid, Pterostylis recurva. Wandoo National Park, Western Australia.
Common Donkey Orchid or wallflower orchid, Diuris corymbosa. Wambyn Reserve, Western Australia.
Stark White Spider Orchid, Caladenia longicauda subsp eminens. Wambyn Reserve, Western Australia.
Photographically I’ve been on a bit of a full frame kick preferring to either use the Sony A7r ii and sigma 105mm macro lens or the Canon EOS6d with Canon 100mm macro lens. All the shots are lit with a flash being used as the key light and natural light as the fill. I’ve enjoyed the change but my back doesn’t. There’s a huge weight difference between the full frame cameras, lenses and flash equipment compared to the usual Olympus micro four thirds system I usually use. But to be honest shooting at base ISO using artificial lighting and only printing at A3+ I can’t see any real advantage to shooting full frame so this next week I’ll go back to using the Olympus kit.
When I put up on Facebook that I was in Bremer Bay this was the reaction I got.
Bremer Bay is down south of Perth. Way down south to the tune of around 6 hours drive. We had been wanting to go for a long time and so we decided to tack on a visit when we last went down to Stirling Range National Park. The aim was to use it as a jumping off point to explore the Fitzgerald River National Park, but with the huge rainfall Western Australia had had this winter when we asked at the local tourist office what the 4WD access roads were like we were told they were impassable. So we made do with exploring around the town and driving out to some of the beaches. The weather, however, was not conducive to going to the beach so we did what generations of English people on holiday have done which drive there and lookout of the windscreen. A thermos flask of Tetley tea and some egg and cress sandwiches and our life would have been complete.
Native Dog Beach, Bremer Bay, iPhone 6s back camera 4.15mm f/2.2. Exposure: 1/7000 sec, f2.2 ISO 25.
Short Beach, Bremer Bay. iPhone 6s. Exposure: 1/2201 sec, f2.2 at ISO 25.
Candle Stick Banksia at Short Beach, Bremer Bay. iPhone 6s. Exposure: 1/1501s, f2.2 at ISO 25.
I did manage to get some orchid photography and manage a few snaps of some species that I’d not seen before.
Esperance White Spider Orchid, Caladenia longicauda subsp crasa. Bremer Bay. Olympus OMD EM 1 mk ii with Olympus 60mm f2.8 macro lens. Exposure: 1/250 sec, f8 at ISO 200.
King Spider Orchid, Caladenia pectinata, Bremer Bay. Olympus OMD EM 1 mk ii with an Olympus 60mm f2.8 macro lens. Exposure: 1/640 sec, f5.6 at ISO 200.
Esperance King Spider Orchid, Caladenia decora, with visitor. Bremer Bay. Olympus OMD EM1 mk ii with Olympus 60mm f2.8 macro lens. Exposure: 1/250 sec, f8 at ISO 200.
Cataby 170Km north of Perth in Western Australia could hardly be called the epicentre of the universe. There’s a titanium mine to the north and a mineral sands operation just south. There is the Cataby Important Bird Area just 2Km outside the settlement. None of these were the reason for my visit. I was there to explore the scrubland that runs along side the Brand Highway looking for orchids, in particular the Arrowsmith Pansy – insert politically incorrect joke here. I must say that when I first pulled up I didn’t expect to find much. The low lying scrub was difficult to walk in and it was very difficult to see the smaller plants. Here’s what I found.
Arrowsmith Pansy Orchid, Diuris sp ‘Arrowsmith’. Cataby, Western Australia.
Autumn Leek Orchid, Prasophyllum parvifolium. Cataby, Western Australia.
Winter Donkey Orchid, Diuris brumalis. Cataby, Western Australia.
Hairy stemmed snail orchid,Pterostylis sp. ‘hairy’. Cataby, Western Australia.
Northern Banded Greenhood, Pterostylis sp ‘Dongara’. Cataby, Western Australia.




You must be logged in to post a comment.