A Flash Piece Of Kit

The Olympus FC-WR flash controller mounted on an Olympus OMD EM1 mark 2 and the FR-WR connected to an Olympus FL-600R speedlight.

When Olympus launched their wireless radio controlled flash system there were howls of derision from the combined blogosphere and photographic forums. Mainly it went along the lines of Olympus had lost the plot in charging so much for something that others were offering so cheaply.  If all you want to do is take portraits with a couple of off camera speedlights then there maybe something to this argument. Let’s make a quick comparison.

Olympus Godox
Commander or transmitter Olympus FC-WR Wireless Commander $385 AUD Godox X2T-O Wireless TTL Trigger $99 AUD
Speedlights with built in receivers 2 x Olympus FL-700WR Flash $449 AUD each 2 x Godox TT685OP Speedlight Flash $195 AUD each
Total Cost $1283 AUD $489 AUD

So that is quite some difference – $794 AUD is a lot of money. Then the Godox fans will tell that the system is much more flexible because if you change camera system all you have to do is change the wireless trigger to one that is dedicated to your new system and you can keep using your existing speedlights. On the face of it it this quite a compelling argument. But this really doesn’t tell the whole story as it assumes that you have no existing flash equipment and that all you want to do is shoot basic lighting set ups with either TTL or full manual control. Now a lot of people who are attracted to Olympus cameras aren’t just attracted by the small size of micro four thirds but also by the advanced features that the cameras have such as focus stacking, keystone compensation, High Res Shot Mode, Live Bulb, Live Time, Live Composite, multi exposure, art filters, picture modes, and interval shooting. Plus Godox doesn’t offer a TTL enabled flash such as the Olympus Twin Flash STF-8 for macro and close up photography.

Using the Olympus STF-8 close up flash as part of a multi flash set up controlled by the Olympus FR-WR and FC-WR.

Regular readers will know that I do a lot of wildflower photography, product shots and the occasional portrait all using flash. I realised I wanted to use more complex lighting arrangements and so I decided to put together a system based around the existing flash units I already had – an Olympus FL-600R, an Olympus STF-8, 2 Metz 44AF-1’s, and a Metz 64AF-1. To that end I bought an Olympus FC-WR wireless commander and three Olympus FR-WR Wireless Radio Flash Receivers ($285 AUD each). Still not a super cheap option, but one that gives me a lot of scope. Now when I started this because the system was not well received there were next to no reviews of it and I didn’t know if everything I had, particularly the Metz units would work. Also I wanted to know whether they would also work with my Panasonic G85. So this was a real voyage of discovery

As I progressed with this I realised that I didn’t just want to write a review, but that I’d also say how to use the equipment in various modes across both Olympus and Panasonic cameras using third party flashguns so that prospective users can find all this information out without having to take a punt like I did. As usual I’ve provided the information in both video and written formats.

So with all that preliminary guff stated (phew!!) lets dig in by looking at the Commander and Receivers themselves first.

FC-WR Commander


Specifications

Maximum communication distance Approx. 30 m
Frequency 2.4 GHz band
Number of channels 15 (in the commander mode; with automatic channel setting function)
Number of groups 3; maximum number of flash units; unlimited
Flash control modes TTL / MANUAL / FP TTL / FP MANUAL / Off
Flash compensation ±5 EV (Increment: 1/3 EV or 1/2 EV)
Manual flash power settings From 1/1 to 1/128 (Increment: 1/3 EV or 1/2 EV)
Power supply AAA alkaline dry-cell batteries x 2 / AAA NiMH batteries x 2
Continuous usage duration Approx. 6.4 hours (when using AAA alkaline dry-cell batteries)
Operable temperature / humidity From -10 to 40℃ (14 to 104°F) / From 30 to 90%
Dimensions Approx. 59.5 (W) x 51.0 (H) x 67.4 (D) mm
Weight Approx. 73 g (excluding batteries)

Firstly the WR in designation is Olympus speak for the fact that the commander has a degree of weather resistance. This is a huge positive for me as I shoot a lot of stuff outside in all weathers. Olympus doesn’t specify the degree of water resistance, but says the unit will operate in temperatures ranging from -10 to 40ºC and humidity up to 90%. I didn’t throw it in a bucket of water but I have used it out in the rain on several occasions with no functional problems, and when I opened up the battery compartment it was dry so that’s all good.

The FC-WR uses AAA batteries. This was a bit of a disappointment and I would have liked AA as it means I only have to carry one type of battery and AAs last longer. However in practice I’m still using the first set of AAAs, and I suppose the use of them keeps the size down.

Olympus FC-WR, showing the information panel and the various controls.

Physically the FC-WR is made of sturdy plastic which doesn’t creak or flex if you give it a squeeze. The door to the batter compartment is on a sprung hinge and slides to lock and open. It fits well and there is some initial resistance to moving so there won’t be any accidental opening. On the base is a locking hotshot with the standard m4/3 pins providing electrical contact. On the to is a large LCD screen which gives all the necessary info and is backlit.  Underneath that are three buttons – one each for the the three groups. Then there is a mode button, a test button, a dial and rocker switch surrounding the OK button and finally the on/off button. A nice touch is that if you turn off your camera the FC-WR automatically switches off, and if you restart your camera within 10 minutes it will automatically switch back on. Any longer and you have to press the on/off button.

To use it is simplicity itself. First select the group or flashgun you want to control, press the button followed by the mode button. Select between TTL, manual or off. Use the right side rocker switch to move to the +/- ratio to select either flash compensation for TTL mode or the power levels for manual mode. Another press of the rocker switch and you can select whether you want high speed flash sync or FP mode in Olympus speak. A final press of the rocker switch lets you select the channel that you want all this to occur on.

FR-WR Receiver


Specifications

Maximum range Approx. 30 m
Frequency 2.4 GHz band
Number of channels 15
Number of groups 3
Control modes RCV (commander flash control), X-RCV (connected flash control)
Charging completion indication Beeping sound
External terminal Sync terminal (output)
Power supply AAA alkaline dry-cell batteries x 2 / AAA NiMH batteries x 2
Continuous usage duration Approx. 6.4 hours (when using AAA alkaline dry-cell batteries)
Operable temperature / humidity From -10 to 40℃ (14 to 104°F) / From 30 to 90%
Dimensions Approx. 59.1 (W) x 46.1 (H) x 51.0 (D) mm
Weight Approx. 75 g (excluding batteries)
Olympus FR-WR showing the controls on the rear of the unit.

In terms of construction what I said about the the commander applies here. On top of the receiver is a standard four thirds protocol hot shoe. On the base there is a locking cold shoe with 1/4 20 mount. On the left side (looking from the front) is a pc sync socket – does anyone actually use these any more? – which would allow you to tigger a studio mono block or power pack. On the other side is the battery compartment which takes two AA cells.  On the back panel is a dial that enables you to select channels (1-15) and beside it another dial for selecting channels. Then there are three buttons which are from the bottom the on/off switch. The neat little touch with this is if you are using an Olympus brand flash then switching off the receiver will switch off the flash. In the middle is a button for switching the beep on and off. I leave it on as it gives me an audible indication of when everything has recharged. Finally at the top is the X-RCV button. This allows you to either control the flash from the commander unit or from the flash itself. I choose to control the flash via the commander unit as I find that more convenient.

Usage Scenarios


Standard Mode

The Radio triggers work with both Olympus and Panasonic cameras and with third party flashes. It also works with the Olympus ST-F8 as part of a multi flash set up, but you will have to cobble together something to hold the FR-WR and ST-F8 body off of the camera.

Using the Olympus STF-8 close up flash as part of a multi flash set up controlled by the Olympus FR-WR and FC-WR.

FP Mode or High Speed Sync

FP mode or high speed sync is a function of the flashgun and not the camera. So if your flash supports it it you can use it. I got it work with the Metz 64AF-1 and the Olympus FL 600-R using both Panasonic and Olympus cameras.

Focus Stacking or Bracketing

The focus stacking feature found on Olympus cameras imposes certain operating restrictions:

  1. Uses the electronic shutter
  2. The flash sync speed is 1/50th sec or longer
  3. You can’t use TTL flash you have to manually adjust the power settings of the flash to get correct exposure

When you set operating parameters for focus stacking in the camera menu remember to allow a a delay between shots that allows for the flash to recycle. I’ve found four seconds to be sufficient. Having set that up switch on the FC-WR and it automatically selects manual flash mode and the camera selects the the flash sync speed. This worked with both the Olympus and Metz flashes on only the Olympus cameras. Panasonic’s focus stacking function is video based (4K capture) and not stills like that of the Olympus.

The original shot with no focus stacking.
The end result of the in camera focus stacking. Twelve shots taken at a different focusing distance and then merged in camera. The camera always applies a slight crop when doing this.

High Res Mode

In many ways this is similar to the focus stacking mode mentioned previously.  It requires an electronic shutter set at 1/50th sec or longer and the flash to be set manually. This worked well with both the Olympus and Metz flash guns. I didn’t test this with a Panasonic camera as my G85 doesn’t have this function.

Conclusion


The Olympus FC-WR flash controller mounted on an Olympus OMD EM1 mark 2 and the FR-WR connected to an Olympus FL-600R speedlight.

Lets get the niggly issue out of the way first. Yes the system is expensive and I wish that it was a little cheaper. Having said that you get rock solid dependability. I found that the Godox units were somewhat flaky at times – occasional misfires where the flash didn’t go off. I like dependability and I’m prepared to spend a little more to get it.

The good stuff. I like the fact that the operation of the constituent parts is seamless even when using the advanced Olympus camera features. The build quality and the weather resistance is excellent, Olympus do a really good job in making small equipment that can handle all the vagaries that life can dish out. The fact that this works with Panasonic cameras is great. Cross compatibility was another factor that brought me into the micro four thirds system. If you want full frame these should work with Panasonic’s full frame offerings as they also share the m4/3 protocols for flash. I say “should” as I’ve not tested it and cannot find anything online to confirm one way or the other. The fact that you can use it with third party speedlights is a huge bonus.

If you are a micro four thirds user and want a rock solid off camera flash solution that gives you access to multi-flash set ups even with specialist close-up equipment using the specialist in camera features such as focus stacking or high res mode then I think its worth spending the cash.


I have written and made videos about several aspects of the Olympus flash system and these are:

In The Bag

The video is the short version of this article with a slide show of the best of this year’s orchids at the end.


It’s not for nothing that Western Australia is referred to as the “Wildflower State”. There are over 13,000 species of plant to be found, with new discoveries added every year. If we narrow it down to my particular area of interest – orchids – there are 394 species of terrestrial orchids in the South West Corner of the state. Some of these species are so specialised that are confined to very small areas and found nowhere else. Some species will not bloom unless there has been a bush fire the summer before, others if the winter rains are delayed or are insufficient will not put a show on either. This means that no two years are the same. An example of this is my favourite spot near where I live is prolific with the number of orchid species found there. When I first went I was simply amazed by the number of fringed mantis and white spider orchids that were flowering. Over the ensuing ten years I’ve seen such a display of those species since. This year there was a carpet of purple and pink enamels like I’ve never seen before. So this not knowing quite what you are going to find adds to the whole experience. On a few occasions I may be lucky enough to be able to access the flowers by car and a short walk, but most of the time I end up walking through the bush for anything up to four hours.


Pink Enamel Orchid by Paul Amyes on 500px.com
Pink enamel orchid, Elythranthera emarginata. Mokine, Western Australia. Olympus OMD EM 1 mk ii with Olympus 60mm f2.8 macro lens. Aperture priority, exposure: 1/800 sec, f5.6 at ISO 400.


Purple Enamel Orchid by Paul Amyes on 500px.com
Purple Enamel Orchid, Elythranthera brunonis. Mokine, Western Australia. Olympus OMD EM 1 mk ii with Olympus 60mm f2.8 macro lens and Metz 64AF-1 flash. Exposure: Aperture priority mode, 1/40 sec, f8 at ISO 200 with -1 stop exposure compensation.


The Canon EOS 6d camera with 100mm f2.8 macro lens that I used to use for photographing orchids alongside the Olympus EM 1 mk ii with 60mm f2.8 macro lens that I use now.


I approach photographing orchids as I would shooting a person’s portrait – using off camera flash and reflectors to fill shadows, separate from the background, bring out the shape and textures. Too many botanic studies show indistinct photos where the subject does not fill the frame and the background is intrusive. To that end I use a macro lens of around 100 -120mm (35mm equivalent). It’s not because I’m necessarily shooting at a 1:1 ratio, it’s just because I’ve found there are very few zoom lens that focus close enough and have a fast aperture to allow control of depth of field.I used to use a Canon DSLR with a Canon EF 100mm f2.8 IS L lens and carry around a Manfrotto 143 Magic Arm Kit to support the lights. I made a video about using that setup some 7 years ago and that can be seen just below. Since making that video I added a full frame 6d, the Canon macro lens, and extra light and a set of TTL wireless flash triggers and consequently found myself schlepping 10-12Kg of kit into the bush on longer and longer forays. Something had to give – and my back did! So fast forward 7 years and I’m now using an Olympus OMD EM1 mk ii with Olympus 60mm f2.8 macro lens. I’ve not given anything up in terms of image quality with this change because I’m generally working at a base ISO of 200 with lighting which means all the usual objections to m4/3 about excessive noise and poor dynamic range have been taken out of the equation. The Olympus 60mm f2.8 is easily the optical equal of Canon’s EF 100mm f2.8 IS macro L lens at less than 1/2 the price and about 1/3 of the weight. The Manfrotto Magic Arm got binned as it was very heavy at 2.7 Kg and replaced with a Manfrotto Table Top Tripod Kit 209, 492 Long which weighs 454g. As far as lighting goes I’m using a Metz 64AF – 1 and an Olympus FL-600R flash with small soft box, snoot and honeycomb grid. The only thing that I have given up is radio TTL triggers for the flash, I’m using a TTL flash sync cable at the moment. I prefer to use the Metz unit when doing a lot of high speed sync work as it is the more powerful of the two. This may change in the New Year, it may not.


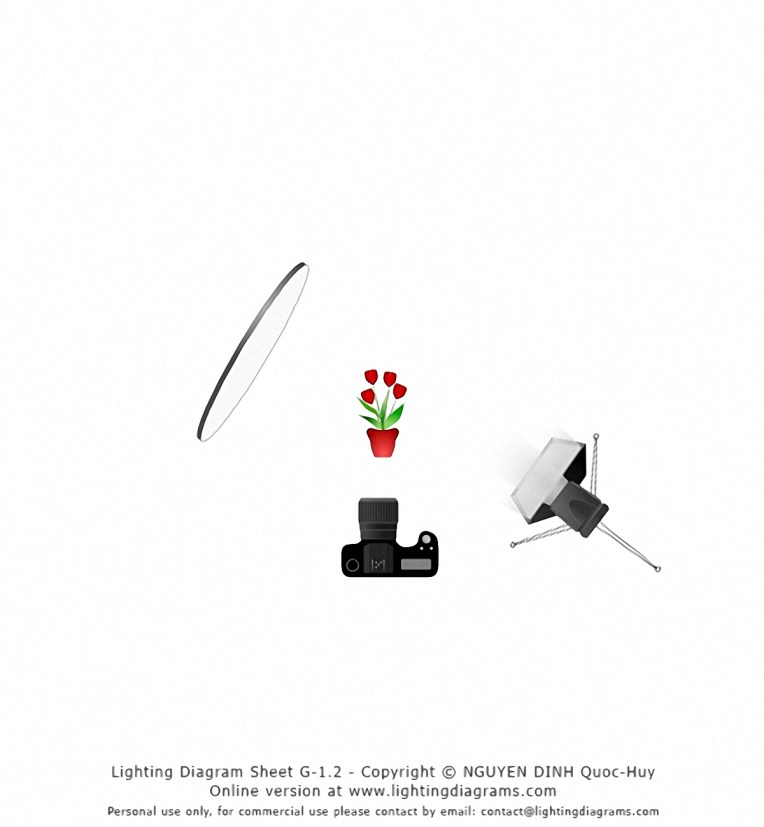
Lighting diagram for my basic lighting of an orchid.


The FL-600R is a flash with a guide number of of 50 (ISO200/m). In addition, it comes with a LED lightt for use when shooting video.


Other things in the bag include an 80cm 5 in 1 reflector – I only use the white reflector as the silver is too strong, the gold too garish. Some times I use the diffuser over a plant to cut down on ambient light levels. A Vittorinox CyberTool L is there. It has a good selection of small screwdriver bits that can most screws on a camera body, a set of pliers, wood saw, metal saw and file and a host of other doodads. I once re-assembled my Voigtländer 35mm f2.5 Color-Skopar with it while in on holiday in Beijing. Water – this can be in a 1L bottle for shorter expeditions or a 3L water bladder for longer ones. Extra clothing if needed, sunscreen and insect repellent to avoid nasty encounters. Batteries for camera and flash. Wallet of memory cards. That’s it. The whole process is very simple.

Croquetwest Grip and Grin

Beloved Significant Other collecting an armful of trophies from Emma Cole, mayor of the City of Vincent, at the recent Croqetwest awards presentation for 2018-9.

Well Beloved Significant Other (BSO) Helen Amyes had a stonker of a year on the croquet front and was invited to attend the Croquetwest 2018-9 trophy presentation. Yours truly was tagging along as the +1 with aim of taking just a couple of photos for her clubs Facebook page. The inevitable happened. Turn up with a camera, couple of lenses and a flash and suddenly you are the “official” photographer and taking the photos for the press and social media. As I’ve said before grip and grin is not my favourite form of photography. There wasn’t a lot of wriggle room for an alternative approach this time so it was pretty basic event photography. At least it was helped along in the form of a jolly jape where fake awards were interspersed with the real ones. Even the recipients were left wondering what they’d actually just won.

Brett McHardy and his partner Janine were winners of Golf Croquet Under Age Doubles. Brett is trying to work out what he’s just won.


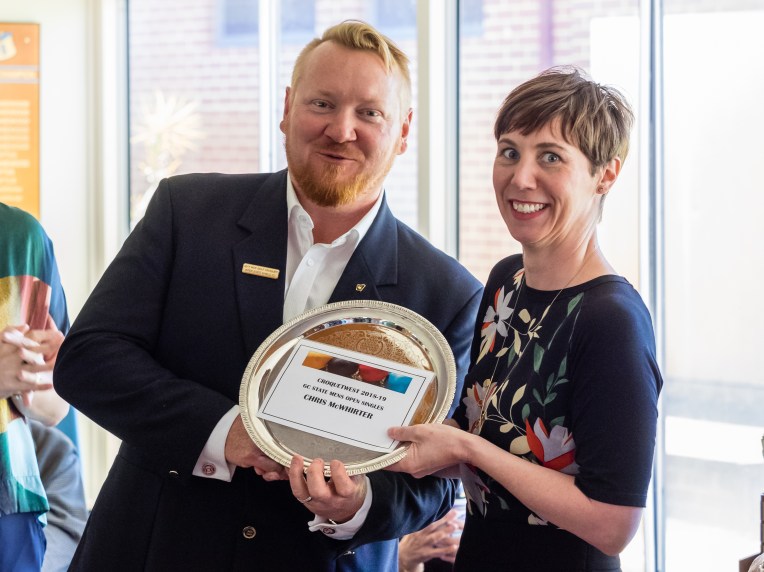
Chris McWhirtter receiving the prize for being the winner of the Golf Croquet open singles from Emma Cole.


All in all it was a fun afternoon

Make Do

I’ve not had access to a proper studio since I left TAFE (college) where I abused, I mean used the excellent facilities. Now working from home I have to make do with whatever is around the house and a few well-chosen bits of photo kit. In the above pic I’m doing a product shot of back pack in the sitting room. I don’t have a white infinity curve on a product table so I use a small Ikea coffee table covered in a white shower curtain and a white double sheet as the background. I want the backpack on a white fore ground and against a white background. Experience has taught me that if a light the background with a flash gun (speed light to our American readers) and over expose by 1 stop it will show as pure white. The subject is lit by two flash guns in brolly boxes arranged at 45º to each other. The camera sits on a tripod and the flashes are triggered wirelessly using a Phottix Odin transmitter. Unlike a lot of photographers I shoot using TTL control and use flash exposure compensation on each flash to control the lighting ratio which in this case is 2:1 or the key light (the black brolly) is set to be twice as powerful as the fill light. All very simple really.

The Hills Are Alive…

…  with flowers. Definitely not Julie Andrews and the ghastly singing Von Trapps.

When people think about Australian biodiversity and nature hot spots they automatically think of the rainforests of North Queensland, Kakadu National Park in the Northern Territory or Cradle Mountain-Lake St. Clair National Park in Tasmania. If prodded a little bit Western Australians might mention the Stirling Ranges National Park. But what if I were to tell you that there is a very significant region of biodiversity, a landscape that is still in its pristine state (i.e. has never been cleared) that is less than two hours drive from Perth? That it contains more than 1400 species of flowering plant, 24 of which are unique and not found anywhere else, there are 78 different species of bird, and there are ancient Aboriginal artefacts. So where is this place? Wongan Hills.

The name Wongan Hills comes from the Nyoongar Wongan Katta which means talking or whispering hills. The range of hills, which are about 10 north-west of the townsite are the largest single area of natural vegetation remaining in the northern wheatbelt. It is spring when everything happens – there is a truly spectacular display of wildflowers. I focus on native orchids and it is absolutely gobsmacking the number of different species and the sheer quantity of them. In the space of a morning’s walk around we found ten different species and they were totally new to me. Below are the fruits of that trip.


Pink Candy Orchid by Paul Amyes on 500px.com
Pink Candy Orchid, Caladenia hirta subsp. rosea. Christmas Rock, Wongan Hills, Western Australia.Exposure: manual 1/125 s at f/8.0, Iso 200. Olympus OMD EM1 with OLYMPUS M.60mm F2.8 Macro lens, TTL fill flash provided by Metz 15 MS-1 ring flash.


Chameleon Spider Orchid by Paul Amyes on 500px.com
Chameleon Spider Orchid, Caladenia dimidia. Christmas Rock, Wongan Hills, Western Australia. Olympus OMD EM1 with Olympus 60mm f2.8 macro lens, with Metz 15 MS-1 ring flash. Exposure: aperture priority 1/80 s at f/8.0 with -1 stop exposure compensation and TTL flash.


Yellow Spider Orchid by Paul Amyes on 500px.com
Yellow Spider Orchid, Caladenia denticulata subsp. denticulata. Christmas Rock, Wongan Hills, Western Australia. Exposure: manual 1/160th sec, f8, ISO 200 with TTL flash. Olympus OMD EM1, OLYMPUS M.60mm F2.8 Macro lens, Metz mecablitz 15 MS-1 ringflash.


Salt Lake Spider Orchid by Paul Amyes on 500px.com
Salt lake spider orchid ( Caladenia exilis subsp. exilis). Roger’s Reserve, Wongan Hills, Western Australia. Olympus OMD EM1 with OLYMPUS M.60mm F2.8 Macro lens and Metz 15 MS-1 ring flash. Exposure: Manual mode, 1/250 s at f/8.0 ISO 200.


Clown Orchid by Paul Amyes on 500px.com
Clown orchid (Caladenia roei) also known as ant orchid, man orchid and jack-in-the-box orchid. Christmas Rock, Wongan Hills, Western Australia. Olympus OMD EM1 with OLYMPUS M.60mm F2.8 Macro lens and Metz 15 MS-1 ring flash. Exposure: aperture priority 1/50 s at f/8.0 at ISO 200 with -1 stop exposure compensation.


Mottled Donkey Orchid by Paul Amyes on 500px.com
Mottled donkey orchid, Diursis sp. ‘Wyalkatchem’. Christmas Rock, Wongan Hills, Western Australia. Olympus EM1 with OLYMPUS M.60mm F2.8 Macro lens. Exposure: aperture priority mode 1/80 s at f/8.0 ISO 200 with -1 stop exposure compensation and flash from Metz 15MS-1 ring flash.


Yellow Granite Donkey Orchid by Paul Amyes on 500px.com
Yellow Granite Donkey Orchid, Diursis hazelii. Mount Matilda, Wongan Hills, Western Australia. Olympus OMD EM1 with OLYMPUS M.60mm F2.8 Macro lens and Metz 15 MS-1 ring flash. Exposure: Manual mode 1/100 s at f/4.0 ISO 200.


Sugar Orchid by Paul Amyes on 500px.com
Sugar Orchid, Ericksonella saccharata. Mount Matilda, Wongan Hills, Western Australia. Olympus OMD EM1 with OLYMPUS M.60mm F2.8 Macro lens and Metz 15 MS-1 ring flash. Exposure: Manual mode, 1/80 s at f/5.6 ISO 200.


Dainty Donkey Orchid by Paul Amyes on 500px.com
Dainty donkey orchid, Diuris sp. ‘north-western wheatbelt’. Rogers Reserve, Wongan Hills, Western Australia. Olympus OMD EM1 with OLYMPUS M.60mm F2.8 Macro lens and Metz 15 MS-1 ring flash. Exposure: aperture priority with -2 stops exposure compensation 1/125 s at f/5.6 ISO 200.


Crimson Spider Orchid by Paul Amyes on 500px.com
Crimson spider orchid, Caladenia footeana. Rogers Reserve, Wongan Hills, Western Australia. Olympus OMD EM1 with OLYMPUS M.60mm F2.8 Macro lens and Metz 15 MS-1 ring flash. Exposure: Manual mode, 1/200 s at f/8.0 ISO 200.


Christmas Spider

Christmas Spider by Paul Amyes on 500px.com
The Christmas spider, aka jewel spider, (Austracantha minax astrigera) so-called because they are most commonly seen in December and January. York, Western Australia. Olympus OMD EM10 Mki with OLYMPUS M.60mm F2.8 Macro paste and Metz 15 MS-1 ringflash. Exposure: aperture priority 1/20 sec, f8 ISO 200 with -1 stop exposure compensation.


Seek and You Shall Find

Dark Banded Greenhood by Paul Amyes on 500px.com
Dark Banded Greenhood, or Pterostylis sanguinea, found at the base of Wave Rock near Hyden in Western Australia. Olympus OMD EM1 with OLYMPUS M.60mm F2.8 Macro lens and Olympus FL600r speed light mounted off camera.. Exposure: 1/250th sec, f8, ISO 400.


As you might have gathered from my last post I didn’t pay a lot of attention to Wave Rock itself. Besides watching tourists I spent my time looking for orchids. I had seen on my Facebook feed someone had found some dark banded greenhoods at the base of the rock so I spent ages walking along the vegetation looking for a small green and brown plant amongst a sea of other small green and brown plants. Amazingly I found a patch of half a dozen under a clump of sedge. I did my usual thing of lying down to photograph them. So there I am my torso in amongst the sedge and my legs out on the path quietly photographing flowers.

Me in orchid mode lying on the ground. Photo by Helen Amyes.

After a little while of me lying completely flat trying to get the best possible viewpoint a woman walks along the path and finds my prostrate form. Perhaps being a fan of the “cosy crime” genre she thinks she has found a body, or at best someone who has collapsed sick while sightseeing. So she kneels down to touch me – I suppose to check whether I’m alive or not. I say “Hullo” and she jumps out of her skin and looks like she could keel over with a heart attack. I quickly explain that I’m fine really, and it’s very kind of her to be so concerned, but I’m just photographing some flowers. From the look she gave me I think she would have rather found a dead body than a mad man lying in the mud taking photos.

Dark Banded Greenhood by Paul Amyes on 500px.com
Up close and personal with a dark banded geenhood. Olympus OMD EM1 with OLYMPUS M.60mm F2.8 Macro lens, and Olympus FL600r speed light. Exposure: 1/250th sec, f4, ISO 400.


The Black Hole Of Babakin

Plus One by Paul Amyes on 500px.com
Plus One – a winter spider orchid (Caladenia drummondii) and its visitor. Sorenson’s Reserve, Western Australia. Canon EOS 6d with Canon EF 100mm f2.8 IS L macro lens. Exposure: 1/250 sec, f11, at ISO 400.


Yesterday I decided to go on a little road trip to Babakin in search of the winter spider orchid. You’ve got to be mad to do a round trip of 320Km in the hope of finding one very small flower. It was a good day for it, the weather was cloudy and overcast, perfect for this type of photography, and I had nothing else scheduled. So packed my camera gear into the car, made sure the mobile was loaded with music and set off to the teeming Wheatbelt metropolis of Babakin. Now Babakin is in the local government area of Bruce Rock, which according to the Australian Bureau of Statistics covers an area of 2,727 square kilometres (1,053 sq mi) and has a population as of 2015 of 939 people. Babakin itself has a population of 25 – it is safe to assume that the local canine population out numbers the people – so there’s not a lot out there except wheat fields.


The drive was great, a lot of it on dirt track so plenty of red dust, and the time and distance just flew by thanks to the music. The shuffle play threw up some golden oldies – the best being Crazy On You by American group Heart. Put that one on full-bore. I wasn’t exactly head banging but lets say that the bouncing around of the car wasn’t entirely due to the road surface.  Oh that took me back to the Chichester RocSoc at the New Park Road Community Centre.

Now these days we rely an awful lot on technology, I’m no exception,  I was using my mobile phone for music and navigation. As I got close to my destination the phone just cut out – no more navigation,  no more music. No mobile network coverage could explain the first but not the later. I switch to my TomTom SatNav and that packed up – couldn’t get a signal. OOOOeeeeeerrrrrr! Luckily I was nearly there. When I got to the nature reserve I did what I normally do and that is switch on my handheld GPS and mark the position of the car. These reserves have no facilities of any kind, not even paths or tracks, so I do this so I can just wander around in the bush and then when I’ve had enough I just follow the GPS to get me back. So off I walk. After an hour and a half I eventually find a single tiny specimen and proceed to photograph it. I use off camera flash fired by radio triggers to light my pictures of orchids. I set everything up as usual took a shot and noticed the flash didn’t go off. Tried again – nothing. Checked everything was firmly in place – nothing. Changed the batteries in the transmitter and receiver – still nothing. Bugger! Had a rummage around in my camera bag and found an old TTL cable so that got me out of the fix. Eventually I packed up and started walking to the car.  I looked at the GPS screen and saw that it was blank. Bugger! I replaced the batteries – nothing. Another set of batteries and still NOTHING!!! Buggeration with bloody great knobs! A rising tide of panic starts to wash over me. Wash? No it was more like a tsunami. After a little pep talk I heard a truck go past. Now remember how I said earlier that this was a sparsely populated area? Yes? Well I can tell you I have never been so glad to hear a truck. I walked off in that direction battling through the scrub and eventually hit the road about 300 metres from the car. Phew!

The drive home was quiet – no phone, no SatNav, no music. When I got there after an hour and a half I carried everything into my office and started my usual post shoot ritual of zeroing all the camera settings, downloading the images and checking batteries prior to packing everything away. I almost jumped out of my skin when my phone beeped and started to play music. I checked the SatNav and it was picking up a signal, as was the handheld GPS. I tentatively got the flash triggers out and checked them and they were working just fine. WEIRD! Perhaps there’s just something about Babakin.

I can’t go without putting a YouTube video up for Heart’s Crazy On You. It’s a cracking track and this time I’ll put up a live recording from 1978 and from 2013 so you can see how the band has fared over time. All I can say is that Anne and Nancy Wilson can still strut their stuff in their sixties. Respect!


“The Boys…

…Are Back In Town”*


Under Starters Orders by Paul Amyes on 500px.com
York Croquet Club members Gordon MacFarlane, Dennis Bull, John Bullock, and Eric Ayling preparing the courts prior to the annual Over 65 Championship. Canon EOS6d with EF 24-70mm f4 L  IS lens. Exposure: 1/1600th sec, f5.6 at ISO 100 with -1 stop EV and HSS flash.

*todays musical reference is of course Irish band Thin Lizzie’s hit “The Boys Are Back In Town”.

Thin Lizzie were a hard rock band from Dublin which formed in 1969, the song was a hit for them in 1976. The band had a floating line up with Phil Lynott and Brian Downey forming the nucleus. Their distinctive sound was in part due to the twin lead guitars, a technique pioneered by Peter Green’s Fleetwood Mac and Lynyrd Skynyrd. At various times the band included some of the best guitarists the UK had ever seen, Gary Moore and Snowy White being two of them. But for most people the band was all about Lynott who played bass and was the lead singer. He once famously likened himself to a pint of Guinness – tall, dark, handsome and from Dublin. Lynott also wrote or co-wrote virtually all the band’s music.