As you drive into York on the Great Southern Highway standing tall on your left is the historic York Flour Mill built in 1892, home to The York Mill.
I like wide-angle lenses, I use them a lot, but funnily enough mostly in the 24-35mm range (35mm full frame sensor speak that is). Occasionally I’d pull oy a 20mm, but as I said only very occasionally. The above shot was taken with a 24mm lens, it’s OK but a little cramped. I couldn’t back up any more as I was against the fence so I threw caution to the wind and chucked a 15mm lens on the front of the camera – and we’re talking full frame sensor here.
York Mill again this time Voigtlander 15mm Super Wide-Heliar lens.
It’s amazing how much difference 9mm can make. Same viewpoint but this time with the camera in the landscape orientation. It sets the building in its context and thus makes it more appealing. I also like how the whole building is acting as a giant reflector for the setting sun. This will be the picture that is used for the end product, however, the one I like the most takes advantage of the enormous depth of field that such a short focal length provides.
What a lot of depth of field – from 30cm to infinity at f16.
* Today’s title comes from a couple of lines from the lyrics of “Is It A Crime” by Sade the über cool and totally smooth chanteuse of the 1980’s.
The second instalment in my look at classic Olympus OM Zuiko lenses and how they perform on modern full frame high megapixel digital cameras. This time we are looking at the Olympus OM Zuiko MC 24mm f2.8.
Olympus OM Zuiko MC 24mm f2.8 lens
This is the second iteration of the versions produced by Olympus – the silver nosed H.Zuiko, the MC and the NHC. All three share the same construction of eight elements in seven groups in a compact body that is 31mm long and weighs 185g for the multicoated versions and 180g for the earlier single coated design. The filter size is 49mm.
Barrel distortion is very obvious as is a small amount of CA wide open at f2.8. The CA clears up quickly by f8. Wide open the lens is reasonably sharp in the centre and soft at the edges. By the time it is stopped down to f8 the centre improves as a consequence of an increase in contrast and the edges while appreciably improving still aren’t as sharp as the centre of the image. Flare is impressively controlled on a lens of this age (its been raining a lot here so haven’t had much sun to poke it at) and so I’ve not felt compelled to whack a lens hood on the front.
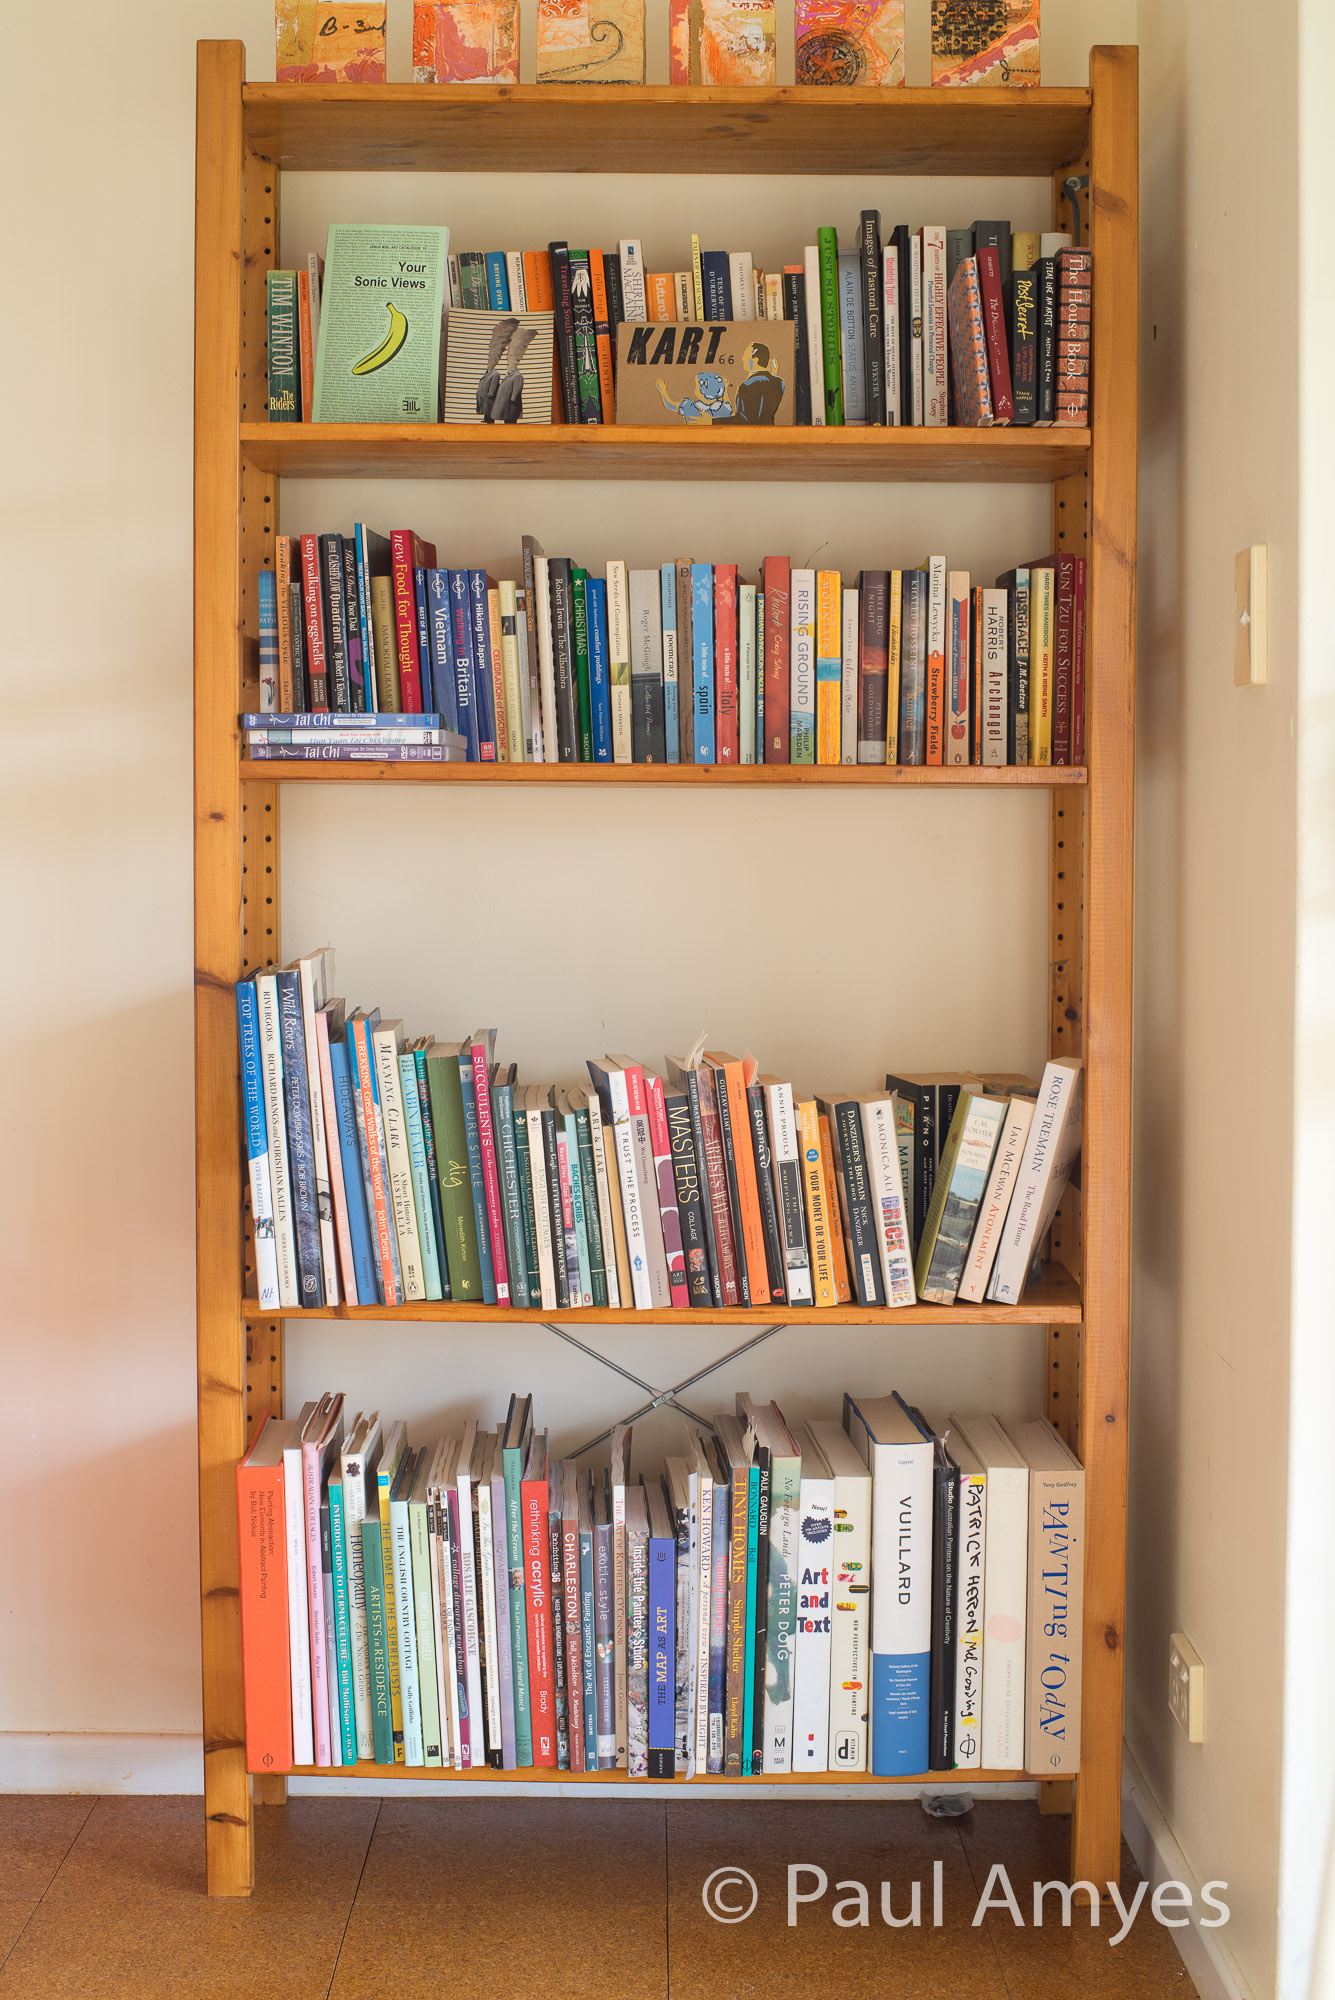
The bookshelf test shot. Olympus OM Zuiko 24mm f2.8 at f8. Note the barrel distortion.
OK! OK! This isn’t the sexy f2 version, but with the modest aperture of f2.8 you get a very compact lens that is a very capable performer. Yes it does not exhibit the modern fetish of corner to corner sharpness but don’t let that put you off – this lens will handle landscapes, environmental portraits and reportage with aplomb. This lens will do most of heavy lifting work in my up coming new project so will end up with a Cokin P-series filter adapter mounted on it with a single lens hood extension and there are no signs of any vignetting with it mounted. Gotta love vintage glass – such modest filter sizes.
Cellarbrations Bottleshop, Avon Terrace York, WA. Olympus OM Zuiko 24mm
Aboriginal art at Quairading Railway Station, Western Australia. Sony A7r with Olympus OM Zuiko 24mm f2.8 lens. Exposure 1/4000 f8 ISO 400.
The Car Dealership From The 1970’s. Quairading. Sony A7r with Olympus OM Zuiko 24mm f2.8 lens.
My new full frame Olympus with the Olympus OM Zuiko 50mm f1.4 lens mounted on a Fotodiox adapter.
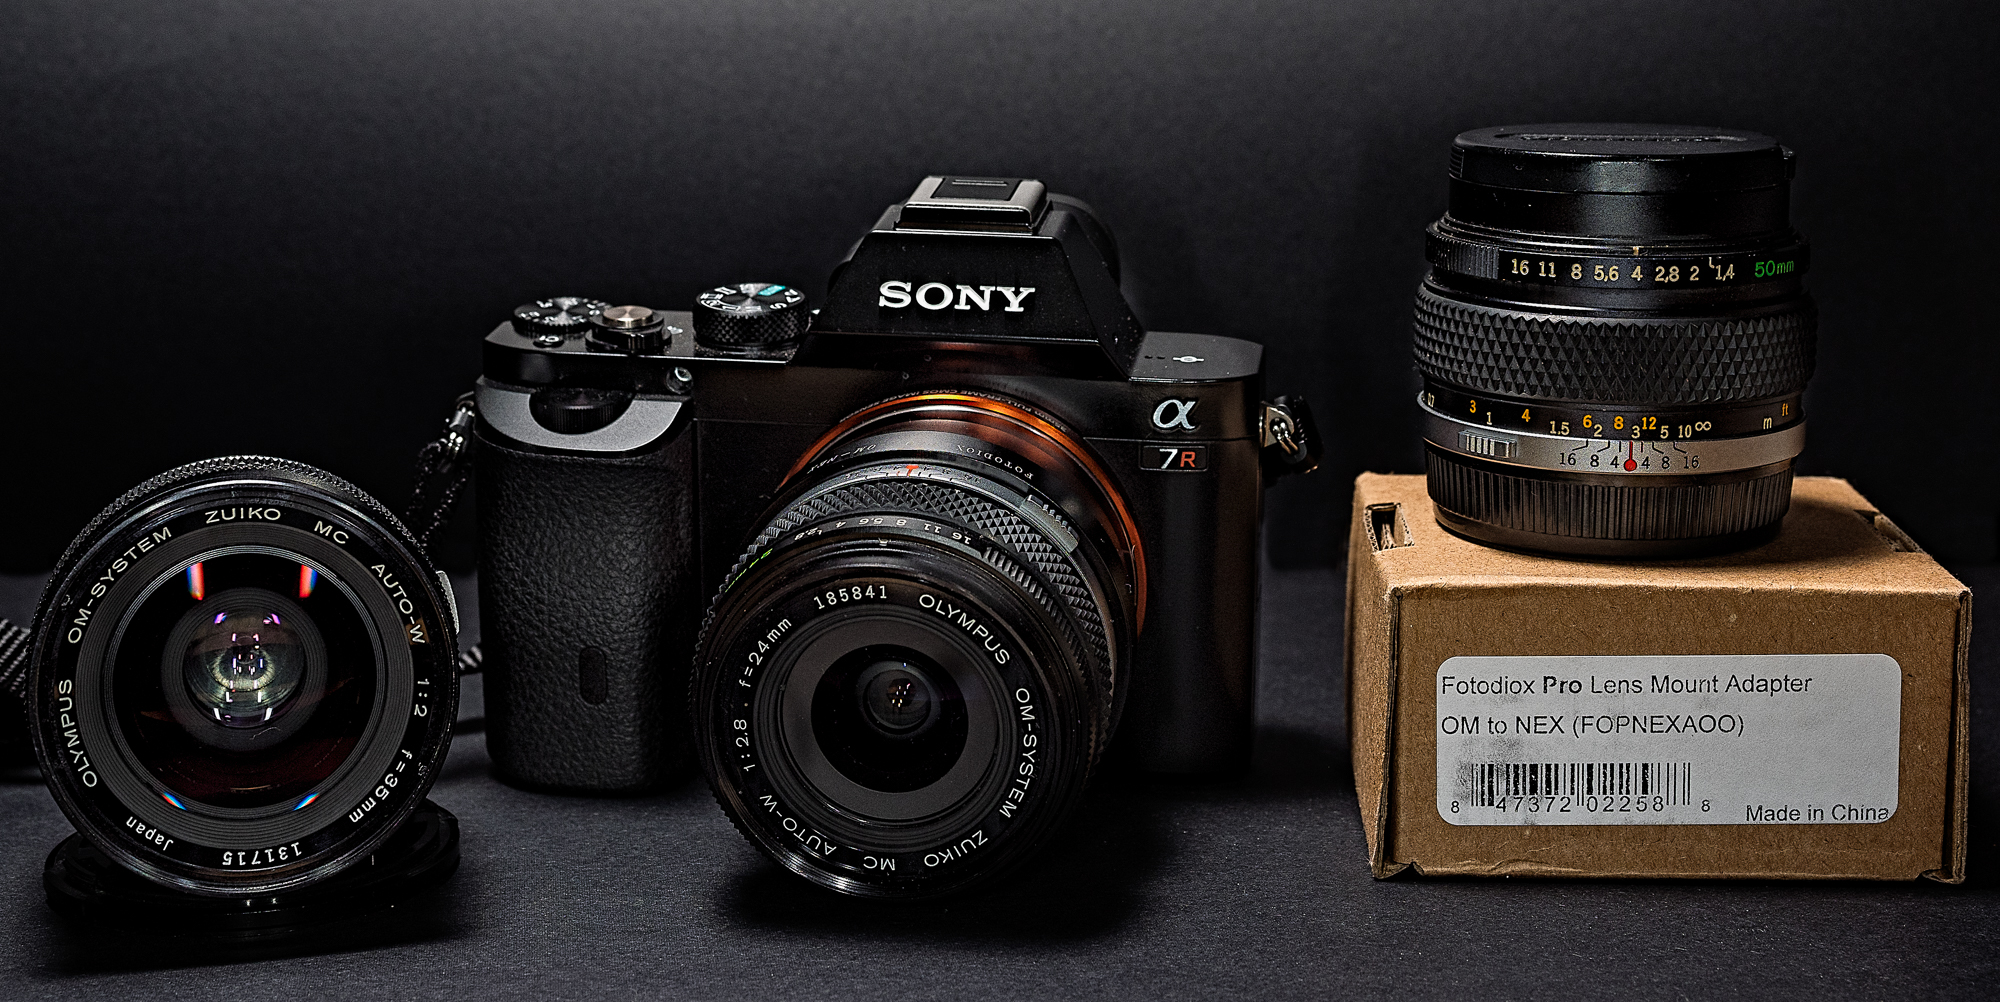
Well I’ve done it. I’ve gone full frame digital with Olympus. No I’ve not got access to some top-secret prototype from Olympus. Instead I’m mounting OM Zuiko lenses on a “full frame” (I hate that term, I much prefer 35mm sensor) camera digital – the Sony A7r to be precise – with a Fotodiox pro OM-NEX adapter.
“If you date your cameras, you marry your lenses.”
Sony A7r with Olympus 24mm, 35mm and 50mm lenses. The Fotodiox Pro OM to Nex lens mount adaptor allows them to be mounted to the camera.
I was left with a collection of Olympus OM lenses when Olympus in their infinite wisdom decided to abandon the OM mount – this did not occur with the advent of digital imaging, but back in the film era. I migrated to the Canon EOS system reluctantly and left my lovely jewel like Zuiko lenses sitting in a drawer. Every now and again I would get one out and fondle it. Oh the beautiful feel of the buttery smooth focusing ring with its long throw. The cool feeling of the metal body with that heft that instantly denotes high quality precision engineering. To cap it off and send me into a rapturous state is the aperture ring – firstly there is one, and then there is the feel and sound of that ring as you change aperture. Just thinking about sends me into the throes of ecstasy.
Now it is a little known fact that when Yoshihisa Maitani designed the OM system he chose to make the flange distance a mere 46mm. At the time he probably thought that this would make a very compact SLR. But the unforeseen benefit of this decision is that it makes the OM lenses very easy to adapt to other cameras. Indeed when Canon brought out the ground breaking EOS 5d I was aware that you could buy an adapter to fit Olympus lenses to the body. But the experience was to me somewhat dismal. DSLRs really aren’t made to use manual lenses. It’s like expecting to find meat in a chicken McNugget. A disappointing experience. When Panasonic and Olympus announced the birth of micro four thirds in 2008 one of key features was the jettisoning of the mirror box found in SLRs. This has a couple of benefits. Firstly it means that a much shorter flange focal distance can be used. In ordinary speak this is the distance between the sensor/film plane and the lens mount on the camera body. Micro four thirds has a distance of 19.25mm which meant it was ideally suited to adapting lenses. I talked about this in April 2013 and again in April 2016. The second benefit was the provision of focus peaking. Focus peaking had long been found on video cameras by dint of them having an electronic viewfinder, it was quickly added to the feature list of mirrorless cameras. I first used it with the EM10 and was very happy with it. But there was a fly in the ointment. My carefully considered lens collection had been altered by virtue of the crop factor, basically a 50mm lens on m4/3 gives an angle of view equivalent to a 100mm lens on a 35mm sensor. Bugger! So apart from video use I put the old lenses away again.
A little while later Sony heralded the launch of their A7 series of full framed mirrorless cameras and initially my interest was piqued but the reality of buying into another camera system (I was already running Olympus m4/3 and Canon EOS) was just not an option. So I feigned disinterest. But an interesting thing happened, Sony update their models with incredible speed and that meant the prices of second-hand A7 and A7r dropped faster than an Essex girl’s knickers. All of a sudden my beautiful OM lenses were restored to their full frame glory.
Olympus OM Zuiko 50mm f1.4 at f8.
To test the lenses I shot a standard scene which was composed of a book shelf in my sitting room. Mounting the camera on a tripod I then framed up so that the complete height of the shelf filled the frame. The shots were taken wide open and then stopped down to f8. To see more detail in the test shots just click on the image and it will open in a new browser. This will be an evolving series of articles about using various OM lenses.
Olympus OM Zuiko MC 50mm f1.4
Olympus OM Zuiko MC 50mm f1.4
The first lens most people whack an adapter on is a fast standard. The 50mm f1.4 was one of the original lenses that was introduced when the OM system was launched at Photokina in 1972. The original silver nosed (a term referring to chromed front mount ring) had a single lens coating and was 36mm in length.The newer MC version was introduced in 1984. Along with the new improved lens multi coating the design was changed resulting in a length of 40mm with a weight of 280g. The lens construction is seven elements in six groups. Despite being a fast lens it has a modest size and has a 49mm filter thread.
Shooting my test subject one of the very first things I noticed is that the image displays very slight barrel distortion. This is where image magnification decreases with distance from the optical axis and makes parallel straight lines look like the edges of a wooden barrel. This phenomenon is usually associated with wide-angle prime lenses or the wide end of standard zooms. It does happen in standard primes lenses but usually only at close focussing distances so it was surprising to see it here. Wide open lateral chromatic aberration (CA) is perceptible and at f8 cannot be seen. In terms of sharpness at f1.4 the image is universally soft and lacking in contrast. Stopping down to f8 improves the image and the lens is sharp across the frame. The lens renders beautifully with a gentle fall off in tones and the bokeh is a delight being soft and smooth. The lens is quite resistant to flare and I haven’t felt any great need to put on a lens hood.
A street sign on Avon Terrace in York, Western Australia. Taken on a Sony A7r with Olympus OM Zuiko 50mm f14. Shot at f1.4.
Al fresco at Henry Saw in Grand Lane in Perth WA. Olympus OM Zuiko 50mm f1.4
In conclusion – well I always thought that it was a very good lens when I shot film and now having had the opportunity to mount it on a high megapixel digital camera I am not disappointed. If adapted lenses are your thing I would definitely recommend you to acquire a copy.
The sky reflected in the bonnet of a Mercedes-Benz. York, WA. Sony A7r with Voigtlander 15mm f4.5 Super Wide – Heliar. Exposure: 1/200 sec, f8 at 1600 ISO.
Aboriginal art at Quairading Railway Station, Western Australia. Sony A7r with Olympus OM Zuiko 24mm f2.8 lens. Exposure 1/4000 f8 ISO 400.
Situated 166 Km (or 103 miles for the imperially minded) east of Perth is the small Wheatbelt town of Quairading. If you can’t pronounce it you’re not a local! Really it is just a blip on the map, one of countless small Australian country towns. Gazetted in 1907 the town was built around the rail terminus. Typical of many Wheatbelt towns is the CBH grain handling facility built near the station to ship the crop out at harvest time. The railway line has since closed and the grain moved by road. For many towns this would possibly be the last straw, but Quairading carries on. As you drive into town you are met
The land around Quairading was cleared for farming and in 1932 two grain elevators were built and wheat from the district was transported via rail. The railway shut in 2013 and now the grain travels by road. Canon EOS 550d with Sigma 17-50mm f2.8 OS EX lens. Exposure: 1/100, f8, at ISO 400.
by members of the grain family – cartoon characters based on grains of wheat created by local artist Lyn Whyte. Some of the businesses in the town centre shut down long ago but their buildings have been repurposed. The old bank is now someone’s home and has been called the Brass Razoo Bank, which is Australian slang for having no money and is kind of appropriate.
Wesley Wheat a member of the Grain Family. He and his siblings Basil Barley, Ollie Oat and Lucy Lupin are the concept of local artist Lyn Whyte, the family can be seen in quite a few locations around the Quairading district.
One of the old shops has a huge street frontage and this now houses a collection of cars straight out of the 1970’s. Just a few doors down is the antique/collectables shop whose contents spill out onto the pavement. The items displayed are often arranged in odd juxtapositions which often cause passers-by to do a double take to see what is going on.
Flowers of Quairading. A street side shop display from the antique shop in Quairading. Sony A7r with Voigtlander 15mm f4.5 Super Wide – Heliar. Exposure: 1/5000 sec, f16 at ISO 6400.
The Car Dealership From The 1970’s. Sony A7r with Olympus OM Zuiko 24mm f2.8 lens. Exposure: 1/200 sec, f16, ISO 1600.
An old Mercedes truck sits in a paddock slowly rusting. Quairading, Western Australia. Sony A7r with Voigtlander 75mm f2.5 Color-Heliar lens. Exposure: 1/4000, f2.5 at ISO 400.
The Anzac memorial in Quairading. Western Australia. Sony A7r with Voigtlander 15mm f4.5 Super Wide – Heliar lens. Exposure: 1/250 sec, f16 at ISO 1600.
The real highlight is the people – friendly, upbeat and generous. My partner walked into the local tourist office cum art centre cum civic museum and walked out with a free pumpkin. What more could you want?
Portrait of me in Majorca taken in March 1986 by my father in law, Brooke Spencer. Probably taken with a Leica R4 with a Leica 135/2.8 Elmarit-R on Kodak colour negative film. I’m holding my trusty Olympus OM1n with the Olympus Zuiko 35-105mm f3.5-4.5 lens. Those were the days.
Since the trans-continental relocation of the global behemoth that is Paul Amyes Photography (PAP) I have been hunkered down in the research lab deep in thought. To continue with my quest for photographic world domination I have been contemplating a new fine art project with a commercial bent that trades heavily on nostalgia for a bygone age.
While studying photography at art school I took two units in fine art photography and I was particularly taken with alternative processes, namely gum bichromate and cyanotypes. I experimented with taking digital images and then turning them into an A4 sized negative and using that to contact print onto papers that I had coated. To tap into that nostalgia thing and enjoy a retro photographic process I initially thought about capturing the new images on large format and using the resulting negative to make the contact print. There is something very beautiful about a large format contact but this is countered by the very damaging effect a large format camera has on your bank account. So this made me think about using digital capture and then making a negative from the file. It is not particularly difficult and at art school I experimented with paper negatives and ones made using overhead projector sheets. The paper negatives were best oiled with WD40 and they produced an image which was softened by the natural fibres of the paper. OHP transparencies gave a sharper image but the out put still looked like a modern image. Then I had a brain wave. What if I took older lenses and adapted them to a modern high-resolution digital body. The Sony A7r is now appearing on the second had market at very reasonable prices, and these will continue to fall as Sony introduces a new updated model every other week (a slight exaggeration perhaps). But before I splashed out some serious cash I thought I better find out whether the motley collection of old lenses I’ve got tucked in a shoe box in my equipment cupboard would be suitable. I decided to put them on an m4/3 camera and see how they perform.
Four of my favourite lenses; an Olympus Zuiko 35-105 zoom, an Olympus Zuiko 50mm f1.4, a Voigtlander 75mm shot telephoto and a Voigtlander 35mm lens.
The test was relatively straight forward. I’d use my Olympus EM1 as the camera body and mount the lenses using the relative adapters. The camera would be hand-held with the image stabilisation set manually to the focal length. The camera would be in aperture priority at base ISO (which for the EM1 is 200) and I would shoot wide open and then stop down full aperture stops until f8 – any smaller aperture and the results would be clouded by diffraction. I’d use focus peaking to focus accurately and I would refocus after every aperture change to avoid focus shift.
Voigtlander 35mm f2.5 Color-Skopar mounted on an Olympus OMD EM-1 mirrorless camera.
The lenses were:
Olympus Zuiko 50mm f1.4 MC. This was the third version of the lens and was introduced in 1984. I had fond memories of the lens and it produced some cracking images for me. Olympus Zuiko 35-105mm f3.5-4.5. This lens was introduced in 1983, which is when I bought it. It cost me a small fortune, if I recall correctly £189, which at that time was two weeks wages. At the time I thought it was worth it and I used it as my every day do anything lens right up until 2003 when I switch to Canon because I could no longer get my OMs serviced. This was a lens that figured prominently in my plan. Voigtländer 35mm f2.5 Color-Skopar. Introduced in 2004 this was another favourite lens, it was tiny, and very sharp. I loved using this with Ilford Delta 400 on my Bessa R2. Again a lens I had very high expectations for. Voigtländer 75mm f2.5 Color-Heliar Introduced in 1999 this was a lens I feel I should have liked. It is wickedly sharp and with its ten aperture blades produced wonderful bokeh. But for some reason I just did not click with it – I think it was the minimum focusing distance which made it possible to only get a head and shoulders portrait rather than a full headshot.
The images were shot with the camera in RAW and then opened up in Lightroom and examined at full screen size and then at 100%. There was no post processing done. The results weren’t really a surprise, but they were somewhat disappointing as they revealed some uncomfortable truths and some pleasant surprises. Here are the results:
Olympus 50mm f1.4 – wide open there was significant colour fringing, low contrast, and overall the image was soft getting worse at the edges. Stopping the lens down brought about significant improvements – the chromatic aberration all but disappeared by f8 and the corner sharpness really started to improve from f4. The bokeh was nice and smooth. A good start.
Olympus 35-105mm – at 35mm and wide open the colour fringing very apparent even before pixel peeping at 100% and it didn’t improve any by f8. At 105mm and wide open the CA was significant but it does improve by f8, but is still visible. Edge sharpness was nothing to write home about wide open but by the time it was stopped down to f8 it did improve. Surprisingly the bokeh was better than expected at both extremes of the focal range.
35mm Color-Skopar – chromatic aberration was quite well controlled wide open and just improved as it was stopped down. The edge sharpness was slightly soft wide open but improved dramatically once stopped down to f4 and kept improving past that. Bokeh was a bit iffy, something that Voigtländers are often criticised for on the inter web.
Voigtlander 75mm f2.5 Color-Heliar. Aperture 2.5
75mm Color-Heliar – straight off the bat this was a very strong performer and for me was a real surprise. Wide open CA was virtually non-existent and disappeared by f4. Edge sharpness was very good from f4 onwards. The bokeh was just gorgeous. The 10 aperture blades produce very smooth tonal transitions and lovely perfectly round bokeh balls.
Frida. Olympus OMD EM1 with Olympus Zuiko 35-105mm lens.
Of the 4 lenses the poorest performer is the 35-105 zoom. In reality this should be expected in a thirty year old zoom lens design, but it is disappointing to me as I had such a high regard for this lens based upon my extensive use of it. Countless rolls of Fuji Velvia and Kodachrome 64 over a twenty year period had convinced me that it was a good performer. However slap it on a digital camera and the results are quite frankly so-so at best and absolutely pants at worst.
The 50mm has a lovely creamy dreamy quality to it that would make it very suited to fashion and beauty portraiture. The 50mm has a very nice smooth tonal fall off which now makes me question whether sensor size is as significant factor for this and that perhaps lens design also plays a considerable part.
The 35mm Color-Skopar was OK – meaning it wasn’t good or bad. I’d be interested to see what it does on a full frame sensor.
Frida on Mount Brown taken on an Olympus EM10 with Voigtlander 75mm f2.5 Color-Heliar.
Pig melons on Mount Brown. Olympus EM-10 with Voigtlander 75mm f2.5 lens.
The 75mm Color-Heliar was a revelation, and it is certainly the standout lens here. It was when introduced an underrated lens when introduced with the Bessa rangefinder film cameras and was quickly replaced with an f1.8 version. But since then this lens has developed quite a following with people adapting it for use on digital cameras. Voigtländer took a classic lens design, gave it modern glass and coatings, boosted the lens aperture blades to 10 and produced something rather special. For shooting studio portraiture it would make anyone look good. Definitely a keeper lens and quite possibly the kind of lens you’d buy a camera body for just so you can use it. If only the 35mm was that good – I’d go out and hit the camera shops and dent the credit card straight away.
Modern lenses are technically very good, most of the problems with vignetting, corner and edge sharpness and colour fringing are now corrected in camera by software. They are sharp and contrasty which appeals to a great many photographers who have only known digital imaging. The legacy lenses are sharp in the centre of the frame, but they have lower contrast and this doesn’t give the edge acuity that many digital photographers want. But this also makes them more attractive because they have character and render images in a more 3D way with smoother tonality. The test has shown that the Olympus Zuiko 35-105mm is really not up to the demands of a high-resolution digital sensor. Nostalgia destroyed by the brutal reality of modern digital imaging. The other three lenses could stand some further experimentation.
The “blood moon” or the red lunar eclipse brought out the apocalyptic in me.
According to Wikipedia…”A lunar eclipse occurs when the Moon passes directly behind the Earth into its umbra (shadow). This can occur only when the Sun, Earth, and Moon are aligned exactly, or very closely so, with the Earth in the middle. Hence, a lunar eclipse can only occur the night of a full moon… the red colouring arises because sunlight reaching the Moon must pass through a long and dense layer of the Earth’s atmosphere, where it is scattered…Several cultures allude to the lunar eclipse as being a good or bad omen. For example, in some Chinese cultures, people would ring bells to remove wild animals that bit the moon. During the Zhou Dynasty in the Book of Songs, the sight of a red moon engulfed in darkness led them to believe the sign as a foreshadowing of famine or disease.” SPOOKY!
Thankfully we all woke up happy and well the next morning.
The weather conspired against me. I had planned my shoot using The Photographer’s Ephemeris, got my angles and location sorted out and then just half an hour before heading out I stuck my head outside and we have thick cloud cover. Bugger! What to do? I didn’t want to drive out to my location, walk to the point and stand in cold wind coming straight off of the Antarctic for nearly 3 hours with the chance of getting nothing. So I decided to set up my cameras on my deck and only start filming when there was a break in the cloud cover. So out of 3 hours and 20 minutes of potential eclipse action I got in total about 30 minutes. Ah well I shall wait until the next one on the 04/04/2015.
Filmed using the time-lapse movie function on the Olympus OMd EM-10 with a 75mm f2.5 Color-Heliar and a Zuiko 40-150mm f4-5.6 lens. Additional footage filmed on a Canon 550d with 70-200mm f2.8 L IS lens
It’s been raining – a lot! Most unusual for the Wheatbelt.
Well here I am back with another look at the EM-10 now I’ve had it in my possession for a month. First I’d like to thank reader Mike Hendren who set me straight about the bracketing feature. Thanks to him I’ve found that if you go into the HDR function then you can find lots of bracketing features. The camera is capable of in camera HDR and it processes the images as a jpg. The camera shoots a burst of four shots each with a different exposure and you have a choice of two settings for the output – one is more “dramatic” than the other.
Marwick’s Barn, a large stone and timber structure with a high-pitched iron roof was built in the 1870s. Single exposure with just a little sharpening in Lightroom.
In camera HDR from Olympus EM-10 using the “dramatic” setting.
Not a lot of difference really, just a flatter image. Scrolling past the in camera processing you can choose to bracket your exposures and then process the images on your computer. You have a choice of 3, 5 or 7 frames at -/+ 2 stops, 3 and 5 frames at -/+ 3 stops. The picture below was 3 5 frames at -/+ stops and processed in Lightroom and HDR Efex Pro 2.
Using the HDR bracketing function of the EM-10 to make 5 exposures -/+2 stops and then process in Google’s HDR Efex Pro.
If HDR is your bag then I think you have a definite idea of how you want your photos to look and will choose to blend the images in software on your computer. However, the function could be just the ticket if you’re a confirmed jpg shooter. Speaking of bracketing and jpgs, then the Art Filter bracketing may prove to be a boon if you ever feel a little indecisive about how you want an image to look. You can choose as many of the filters as you like, but bear in mind that you will need a bit of patience while you wait for the buffer to be cleared.
This slideshow requires JavaScript.
I must say that I’m pretty impressed with the robustness of the files the EM-10 produces, they hold up to post processing very well.
Detail of a vintage car radiator grill. Avon Tce, York, Western Australia. ORF processed in Lightroom and then in the desktop version of Snapseed.Curly wire on a fence post. Focusing the Color-Heliar 75mm f2.5 wide open using focus peaking.Raw file processed using Lightroom and Snapseed.Two horses kept on a property on the banks of the Avon River in York, Western Australia. Shooting with a 35mm Color-Skopar lens wide at f4 with focus peaking. Raw file processed using Lightroom and Snapseed.
Sheep garden ornaments. Color-Heliar 75mm f2.5 wide open focused with focus peaking on the new Olympus EM-10. Raw file processed using Lightroom and Viveza 2.
Noise, both colour and luminance, seem very well controlled as this shot Diego my cockatiel shows.
High ISO noise test. Diego my cockatiel at ISO 6400. No noise reduction applied.High ISO noise test. Diego my cockatiel at ISO 6400. Close up of Diego’s beak to show noise.
Olympus has always had a good track record when it came to metering systems. The OM 3 and 4 introduced multi-spot reading with shadow and highlight priority, which made them very popular with adherents of the Zone System pioneered by Ansel Adams. The Om 40 saw the introduction of ESP metering which meters from several areas of the image and it is a more sophisticated version of this using 324 areas is present in the EM-10. Spot metering, high light and shadow spot metering are also present, but multi-spot metering is not present. The metering is very accurate and backlit subjects don’t fool it into under exposing.
The ESP multizone metering handled this well with good detail being maintained in both the shadows and the highlights. Straight out of camera jpg.
A few readers asked questions about the capabilities of the camera. Several wanted to know whether the EM-10 was suited to BIF. Sorry the only biff I know about is jujitsu and aikido. Seriously I don’t have a lens long enough to attempt birds in flight, and when I try with my 40-150 they certainly take flight but can only be seen as tiny specks. I do have a sequence of Frida, my English Bull Terrier, doing a “bully run” .
Twelve frame sequence on low continuous shooting of my dog running towards me using the 40-150mm zoom. On some of the frames the focus tracking lost focus but then quickly reacquired.
I mentioned in the previous part of the review that I had used the EM-10’s pop up flash to act as a controller for off camera flash and several people asked how I did this. Well the video below should answer that question.
Another reader asked about using the inbuilt WiFi function. This is the first camera I have used with this function and I have to say I think it is really great. I used my iPad and it was brilliant to use it as a gigantic screen to aid with composition and focusing. The only downsides are that it uses up the camera battery real quick and you can’t use to in movie mode.
So, as I’ve got to know the camera have my feelings changed? Well I have to say when I first picked it up I felt that the camera felt unnecessarily complicated and frustrating to use. Four weeks on I have to say that we’re starting to establish a relationship, I’ve largely set the camera up so I don’t have to do much menu diving which means I can just get on and shoot. The metering is reliable and the files are great, so for still photography I think the EM-10 has the makings of good camera. As for video, well I’m still out to lunch on that one. As I said at the beginning of this entry it has been very wet here and so I’ve not had enough time to get out and shoot anything. I’m hoping to get out in the next week or two and shoot a small project with it, so when that is ready I’ll post my thoughts about it. Stay tuned for the next thrilling instalment.








You must be logged in to post a comment.