Been playing with a new lens – and so far I’ve been very impressed and it’s made me reconsider my camera system. I’ll put up a full report in the next week or two. Here are a couple of photos to whet your appetite.
Back lit bully. Frida modelling for a lens test.
Bully blast off! Frida helping test the auto focus capabilities of a new lens.
Both shots were taken with the Canon 6d, which continues to amaze me with its picture quality, and converted to monochrome in AlienSkin’s Exposure 4.
At a bit of a loose end we decided to go out on the Goldfields Road to Tammin. The town’s sole raison d’être is the transportation of the surrounding areas grain crops. The grain bins and railway siding around which the town is built are the key features of the town. With the increasing industrialisation of modern agriculture farms have got bigger and bigger and employ less and less people so like many rural areas although generating a lot of wealth the town is in decline.
Abandoned farmhouse on the Goldfields Road in Western Australia. Olympus Pen EP-5 with Olympus 12-50mm f3.5-6.3 lens. Exposure: 1/640 sec, f5.6 at ISO 200. Converted to monochrome in AlienSkin Exposure 4.
When I first got interested in photography I was living in the South East of England which is a very verdant and prosperous region. Naturally the first photographers who caught my eye were British ones like David Bailey, Snowdon, Patrick Litchfield and Terrance Donovan.As I went on I discovered more socially aware photographers such as Chris Killip, Graham Smith and Don McCullin. I remember going to see Killip and Smith’s exhibition “Another Country” in 1985 and being absolutely blown away by the subject matter and the quality of the work – it was one of transcendent experiences and it altered my perception of what photography could be dramatically. It was quite a while before I turned my attention to non British photographers. When I first saw the work of Walker Evans, Robert Frank, Joel Sternfeld, Stephen Shore, and Robert Adams I couldn’t really relate to the subject matter. Their vision and representation of the USA was one that was completely foreign to me and outside that which the mainstream media presented. It wasn’t until I migrated to Australia and started to explore the rural areas seldom visited by tourists that the penny finally dropped. I started to see similar scenes and over time I have attempted to capture them. I’m never quite sure whether it should be in black and white or colour so I find myself fluctuating between the two mediums and never quite happy with the results.
Tammin grain bins and railway station. Olympus Pen EP-5 with Olympus 12-50mm f3.5-6.3 lens. Exposure: 1/800 sec, f5.6 at ISO 200. Converted to monochrome in AlienSkin Exposure 4.
Which brings us to the photos in this post. They are just a small sample of the photos that I took on our road trip to Tammin. At first I processed them as colour and felt that the colour detracted from the starkness that I saw and felt. I then tried monochrome. When I worked in the darkroom I liked to use Ilford Multigrade FB warm tone glossy paper and that is a look I try to replicate with my digital images albeit without much success. When Ilford’s digital media arm Harman Technology introduced their warm tone gloss baryta inkjet paper I thought that my prayers had been answered and I used it for a couple of exhibitions I did. It was a sad day when it was discontinued – I still have 5 sheets of A3+, not enough to do any proper work. So now I try to replicate the look in AlienSkin Exposure 4 which is what I have done with these photos. The problem is that while it looks OK on screen when you translate it to printed media it does work as it is not subtle enough. Perhaps the photos should have stayed in colour after all.
Empty shop front in Tammin, Western Australia. Olympus Pen EP-5 with Olympus 12-50mm f3.5-6.3 lens. Exposure: 1/100 sec, f5.6 at ISO 200. Converted to monochrome in AlienSkin Exposure 4.
On 7th October 2018 I put a video up of me unwrapping the Panasonic Leica DG Vario-Elmar 100-400 f4-6.3 ASPH Power OIS and my initial impressions of it. Well after six months of use this is my opinion of the lens. I don’t know if it has won the title for having the longest model name, but if not it should be a contender. For brevities sake I’ll just refer to it hence forth as the PanaLeica 100-400. At the outset I’ll say that this is my lens bought with my money and I’ve only used the one copy of it
First off let’s set things straight – this is a very specialist bit of kit that you either have a need for or you don’t. I’ll also say that there is a very good argument to adopt the micro four thirds system just for this lens alone. No I’ve not stopped taking my meds, this lens should be a contender for anyone who shoots wildlife, particularly birds, and travels a lot. A long time ago someone said to me, and I’m not entirely sure who it was, but I’ll attribute it to Hugh Graham who’d been a Fleet Street photographer, that you should choose your camera system on the basis of the lenses you’ll use. I think Panasonic were very smart when they designed this lens because this leverages all the benefits of the m4/3 system. It uses the two times crop factor and small size to produce a lens that is just not available in the 35mm full frame world ie a compact lightweight 200-800mm zoom lens. Recently a muppet on YouTube pronounced that micro four thirds is dead but this lens proves that the system is very viable indeed. Lets compare the PanaLeica 100-400 to some of its rivals.
Comparing the Canon EOS6d with Sigma 150-600mm lens to the Panasonic G85 and PanaLeica 100-400 lens. Remember folks the Panasonic combination has more reach.
Lens
Weight
Cost
PanaLeica 100-400
0.985 Kg
$1900 AUD
Canon EF 800mm f/5.6L IS USM Lens
4.5 Kg
$17000 AUD
Sigma 800mm f/5.6 APO EX DG HSM Lens
4.9 Kg
$8400 AUD
Sigma 300-800mm f/5.6 APO EX DG HSM Lens
5.8 Kg
$8000 AUD
Nikon AF-S 800mm f/5.6E FL ED VR Lens
4.5 Kg
$23000 AUD
Or lets look at it another way. My Panasonic G85 with battery grip, two batteries, a memory card and the PanaLeica 100-400 weighs in at 1.829 Kg. A Canon EOS 550d with a Sigma 150-600mm F5-6.3 DG OS HSM Lens which has the same equivalent angle of view is 2.958 Kg and my Canon 6d with the same Sigma lens is 3.345 Kg and doesn’t have the same range. To get the same zoom range the 6d would need to be paired up with the Sigma 300-800mm f/5.6 APO EX DG HSM Lens and the combination would weigh 7.1 Kg. Now if you sit in a bird hide all day with your camera on a tripod then you might be prepared to sacrifice weight, expense and portability to get high image quality. But if like me you walk around anything up to 20 Km in a day looking for birds and are willing to work around the issue of the smaller sensor and it’s inherent poorer performance at ISOs over 6400 (and coming from the days of shooting slide film at ISOs between 50 and 400 I can’t believe that I see 6400 as a problem) then you will be very happy. The argument about image quality is very spurious if you only look at your images on an iPad or phone. So you can see why I think that this lens is enough to persuade people to adopt the m4/3 system – it has enormous reach, is lightweight and is very affordable.
Tech Specs
Focal Length
100-400mm (200-800 35mm equivalent)
Aperture range
f4-6.3 to f22
Construction
20 elements in 13 groups
Diaphragm
9 circular blades
Focus drive
Ultra sonic stepper motor
Close focus distance
1.3 m
Maximum magnification
x 0.25
Length collapsed
17.15 cm
Diameter
8.3 cm
Filter size
72 mm
Weight
985 g
The Leica designation denotes that Leica had input into the design but the lens is made by Panasonic at their Yamagata lens factory in Japan. The PanaLeica 100-400 retains the same design cues as Leica’s own lenses and the other Panasonic lenses in this series such as the 8-18mm f2.8-4 ie it uses the same fonts and the same ribbing for the focus and zoom rings. It features an all metal body construction and is listed as being weather proof. However, there is no rating as to the extent of the weather resistance. It is a very attractive lens to look at and has a satisfying heft to it which reinforces the fact that this a quality bit of kit. In November 2015 I blogged about the Olympus m.Zuiko 75-300mm f4.8-6.7 mk ii which I bought when I first started dabbling in wildlife photography, with its plastic construction it makes the PanaLeica 100-400 look like a luxury item.
The PanaLeica 100-400mm mounted on Olympus OMD EM1 with lens zoomed out to 400mm.
With regards to the physical controls on the lens body working backwards from the built in mini lens hood (a separate full-sized one can attach to this but I have never used it) there is a narrow focus ring. As per usual with Panasonic this a fly by wire ring with no direct physical coupling to the lens heliocord. Behind the focusing ring is ring which locks and unlocks the lens mechanism to prevent zoom creep. This can be applied at any point in the focal range. The zoom ring is nice a broad enabling a good grip and is quite smooth with a little resistance to movement. It has a ninety degree throw and works very nicely when shooting video. The lens body extends outwards as you progress through the lens range. The front lens element, however, does not rotate which is good news for users of polarizing and variable neutral density filters. The tripod foot and collar is really a rather clever piece of design. There is no collar as such, the rear part of the lens rotates 90 degrees to allow users to change from horizontal to vertical orientation. The foot screws into the lens and can be completely detached. In another nice touch you don’t need the foot to attach a tripod plate as you can attach it directly to the lens body which reduces the profile of the lens considerably. Just before the lens mount there are three physical switches. The first is a focus limiter which offers two positions, full focus range and 5m to infinity. Below that is a switch for AF or manual focus, and below that a switch for the optical image stabilisation system. The lens mount is metal and there is an o ring that provides some sealing against water and dust ingress.
Without a doubt the PanaLeica 100-400 is a very complex lens with 20 elements in 13 groups, 1 ultra low dispersion element, 2 extra low dispersion elements and 1 aspheric extra low dispersion element. From this we can see that it is corrected against chromatic aberration and optimised to produce high contrast, high-resolution images whilst maintaining a compact form factor. Although each group is positioned precisely within the lens barrel it is impossible to do this perfectly so the three lens groups that are most acutely effected by tilt and centring defects and therefore impact most upon image quality are the only ones that are adjustable. This has meant that repair or adjustment of the lens is very difficult and only Panasonic’s Yamagata factory is able to do this which means warranty repairs are sent back to Japan for assessment and then are usually replaced. If your lens fails outside of the warranty period customers are offered a refurbished lens at a discount rather than a repair. To further complicate the issue Panasonic in most countries contracts out its customer service and it is very difficult to access and there have been quite a few accounts of poor service on various camera forums. So my best advice would be to buy this lens from a bricks and mortar store with a good returns policy and then thoroughly test the lens, because if you have a problem it could be quite difficult to resolve.
The image quality is very good from 100-300 and just gets a little softer towards 400. This is not unusual for zoom lenses. At all focal lengths the edges of the frame are a little softer wide open but sharpen up nicely as you stop down. Diffraction becomes apparent at f16. There is next to no chromatic aberration, and the only times that I did observe it a simple click in Lightroom fixed it. Flare is remarkably well controlled on a lens with so many glass elements. I have shot a lot of frames into the light and have found that I don’t need to use the full-sized screw on lens hood, I just use the mini sliding hood that is built into the lens. Filter users be aware that this lens is very fussy about filters as many long lenses are. I’ve had no problem with multi-coated B+W and Heliopan filters. For giggles I tried an uncoated Fotga variable neutral density filter and using a combination of the lens on both a G85 and an EM1 could not get focus. This is not a fault of the lens but shows the effect that using cheap uncoated filters can have on lenses. My Canon 70-200mm f2.8 IS L does exactly the same with the Fotga filter. I’ve never understood why people will spend $2K on a lens and then slap a cheap $10 filter on it. If you are going to use filters use good ones.
Australasian Grebe, Tachybaptus novaehollandiae. Lake Monger, Western Australia. Olympus OMD EM1 with PanaLeica 100-400mm. Exposure: 1/1000s, f6.3, ISO 400.
Rainbow Lorikeet, Trichoglossus moluccanus. Lake Monger, Western Australia. Olympus OMD EM1 with PanaLeica 100-400mm lens. Exposure: 1/1000s, f5.1 at ISO 6400.
Laughing Kookaburra, Dacelo novaeguineae. Avon Walk Trail, York, Western Australia. Panasonic Lumix G85 with PanaLeica 100-400mm lens. Exposure: 1/1000s, f6.3 at ISO 250.
White faced heron, Egretta novaehollandiae, Wilson Inlet, Denmark, Western Australia. Olympus OMD EM1 with PanaLeica 100-400mm lens. Exposure: 1/800s, f6.3 at ISO 320.
In Use
After six months of use and a few thousand exposures I think I’ve got a good handle on this lens. The inbuilt optical stabilisation combines with Panasonic’s Dual IS bodies (at the time of writing the GH5, G9, G95, G85, GX85, and GX9) to give impressive results, around 5-6 stops. When shooting 4K video with the G85 it is very impressive being able to shoot handheld with such a long lens. The video below has footage using the lens on both the G85 and EM1 as well as more stills examples. Unfortunately the OIS does not combine with the IBIS on Olympus bodies so it’s a case of either or. I have my EM1 set up with the IBIS permanently on and have selected Lens IS Priority in the custom functions. This means that when a lens with inbuilt stabilisation is detected the camera switches IBIS off. The reason for this is with shorter lenses IBIS is more effective, but with longer telephoto lenses lens based stabilization works best. The OIS works well enough to get fairly good handheld 1080 video with the EM1, but it’s obviously not as smooth as the G85. The hybrid AF system in the EM1 (a combination of contrast detect and on sensor phase detect) is more confident than the DFD (depth from defocus) of the Panasonic. With small subjects against busy backgrounds I’ve found that the G85 and the PanaLeica just hesitates that little bit as it tries to acquire focus and with small birds that slight hesitation is difference between getting a shot or not. The EM1 is very quick to acquire focus and that is why I’ve ended up favouring it more for bird photography. Now I’m perfectly happy to accept that this just might be a shortcoming of the AF system in the G85 and having read the Lumix GH5/Gh5s/G9 AF Guide Book things might improve significantly if I were to use one of those bodies. But for now I have the quandary of superb image stabilisation versus better AF and I’d sooner have better AF and use faster shutter speeds.
Conclusion
Good close focusing and fairly decent maximum magnification of 0.25 means that the PanaLeica 100-400 is very good when photographing larger insects such as butterflies, moths, dragon flies and damsel flies. Australian painted lady (Vanessa kershawi). Thomsons Lake, Western Australia. Olympus OMD EM1 with PanaLeica 100-400mm lens. Exposure: 1/1000s, f6.3 at ISO 640.
If you are already invested in the m4/3 ecosystem and are interested in photographing birds then this is a no brainer. The PanaLeica 100-400 is streets ahead of the Olympus 75-300 and I would imagine the similarly priced Panasonic 100-300mm. It’s absolutely the muts nuts for walking around in the bush photographing birds and larger insects. Now if you’re interested in wildlife and nature and either don’t have a camera or have another brand I’d really recommend giving this lens and a micro four thirds camera some serious consideration. The image quality is very good as long as you’re not a pixel peeper and are honest with your self on what you’ll do with the image. It is very liberating to walk through the bush unencumbered by heavy camera kit that cost the equivalent of the annual GDP of a small Pacific Island nation. My only wish is that there were more compatibility within the micro four thirds system so that the image stabilisation worked across brands, the zoom rings turn in the same direction and that Panasonic adopt the clutch mechanism on their lenses for manual focus with hard stops.
Sacred Kingfisher, Todiramphus sanctus, the Knoll, Walpole, Western Australia. Olympus OMD EM1 with PanaLeica 100-400 lens. Exposure: 1/1000s, f5.7 at ISO 800.
Time to promote the achievements of Beloved Significant Other (BSO) via the wonderful medium of video. I didn’t intend to shoot a croquet video. No. I was enlisted as a logistical consultant (alright driver!) to take aforementioned personage and a friend to a croquet competition at the Cambridge Croquet Club. While the event was happening I was going bird watching at the nearby ornithological Mecca of Herdsman Lake with the hope of photographing nankeen herons. Alas the herons didn’t know that I was coming to see them and weren’t at home. Couple this with the fact that I was suffering from a deadly combination of Ebola, typhoid, bubonic plague and cholera (BSO says it was in fact a head cold) I went back to the croquet club to find a quiet corner in which I could drown in snot. Somehow news that BSO had made it to the finals penetrated my fever fuelled delirium and I leapt into action to record the event. I was not really equipped to do so as although I had the Panasonic G85 with me that shoots lovely 4K video I only had two lenses. The Panasonic Leica 100-400mm a great lens for birding but a bit long for court side croquet. The Sigma 16mm f1.4 which is another fantastic lens, but being a fixed focal length not as useful as standard zoom for the grip and grin at the presentations at the end of the tournament. All I can say is thank goodness for the magnificent stabilisation which enabled me to get good handheld footage, although it was defeated by my violent sneezing although it wasn’t as bad as that depicted below.
If video is more your thing there is a video review at the bottom of the page.
The Mindshift Rotation 180º Horizon 34L
Photography and bushwalking (hiking, tramping) go together like cheese and Branston Pickle. What I find strange that after all this time that there is still a dearth of bags that are both good for bushwalking and carrying photographic equipment. The average photo backpack is absolutely pants in the bush. First off the straps, harness and if you’re lucky the hip belt are really not up to snuff.They are either too thin and lacking in padding or they are poorly positioned and make no ergonomic sense at all. Then when it comes to carrying stuff the photography side is well taken care of, but there is no room for the things a bushwalker needs such as a fleece, waterproof, water and food. Photo backpacks are also unbelievably heavy. I have a LowePro one that is actually heavier than the camera and three lenses that I put in it. Finally they become instruments of torture when used for anything more than an hour. The alternative has been to use a standard walking pack and then carry your kit in pouches, or wrapped up in something soft (for many years I used a keffiyeh), inside the back pack. The benefits of this approach are you get a bag that is well suited to walking and is comfy to wear, but accessing your photo equipment is a bit of a chore. I like many others tried using camera holsters in conjunction with a back pack, but often felt like a pack-horse with lots of things strapped to me. Recently we have started to see some manufacturers introduce backpacks for the outdoor market.
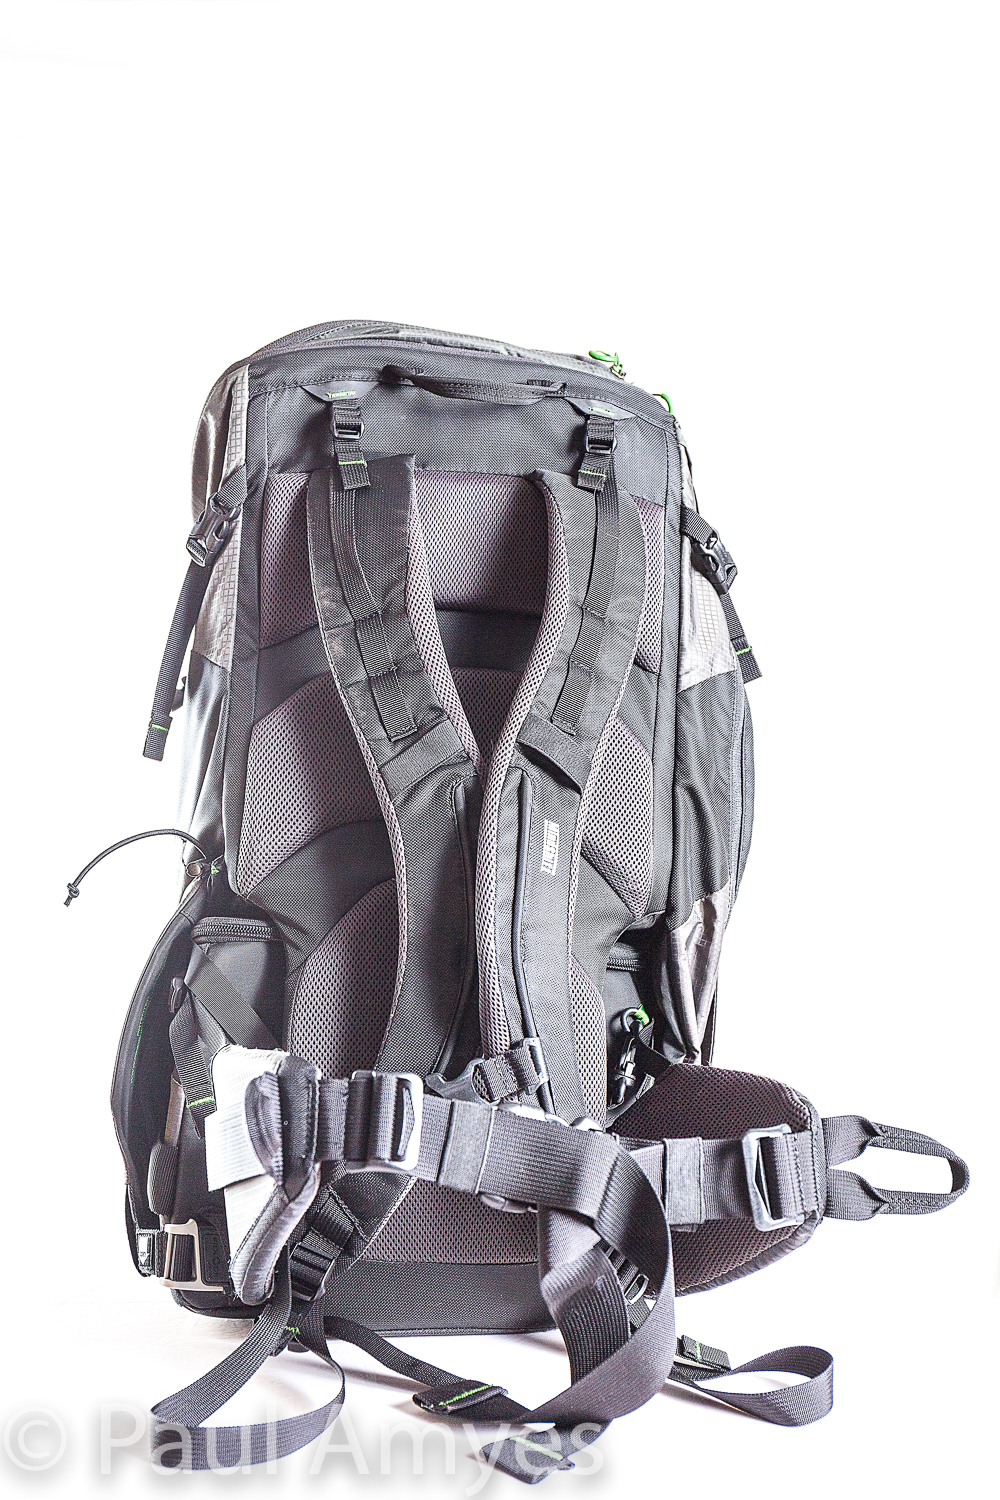
Looking at the harness of the Mindshift Rotation 180º Horizon 34L.
This is where the MindShift Rotation 180º Horizon 34L comes in. Before I start talking about the bag I’ll talk about the manufacturers. MindShift is a subsidiary of Think Tank Photo which are a company founded to produce high quality, innovative carrying solutions for professional photographers. I have been using their belt based carrying system and camera holsters for quite a while now and find them to be well made, well designed and well priced. The customer support is truly excellent – I received a faulty item and upon contacting Think Tank a replacement was quickly sent out from the USA to me in rural Western Australia. MindShift was created to provide photographers carrying systems that are suitable to use off the beaten track. So I had high hopes for this bag.
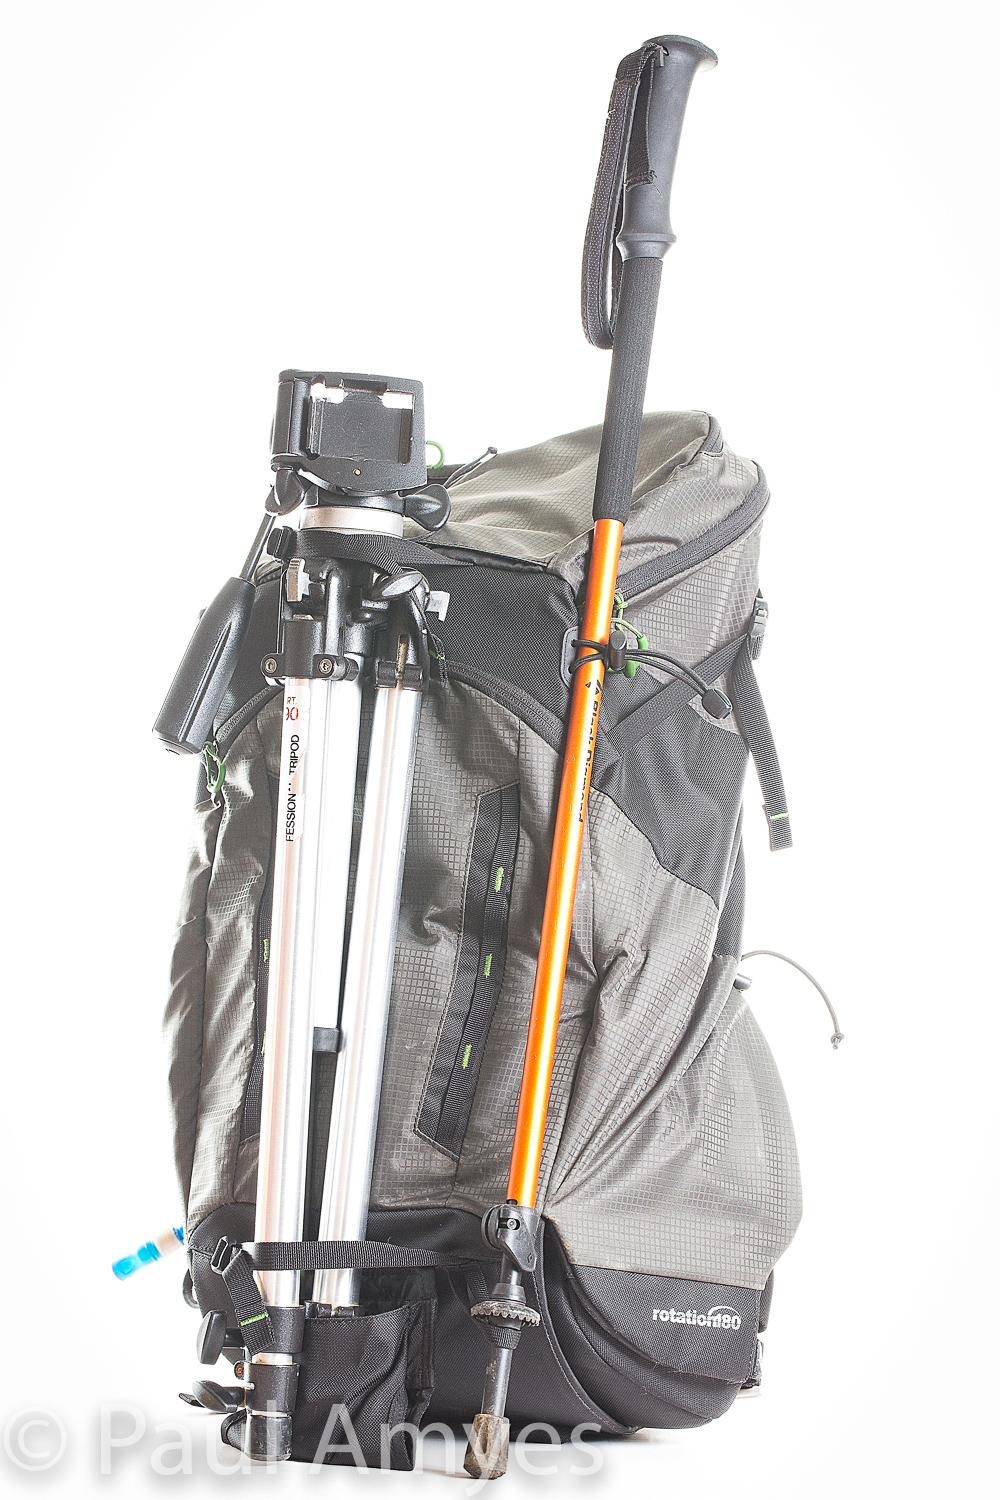
The Horizon 34L has straps on the exterior that allow you to carry a tripod and accessories such as walking poles.Showing the compartment that can hold a 3L hydration bladder and how the hose routs out and down the strap to allow access to it.
The Horizon 34L is a pack that is divided into two sections – a 7L photo section and a 27L pack. Nothing revolutionary here you say, well what sets it apart is that the lower section is affixedto a waist beltthat can rotate from it compartment at the bottom of the pack round to the front. This means you can work from the bag without having to take the pack off. The whole palaver of repeatedly taking a laden pack on and off your back and rummaging around looking for filters, memory cards etc on a long walk can become a big disincentiveto taking photos. Initially I was a little sceptical about how useful this feature would be and how well it would work in practice, but with use I was won over. It is a great idea and I’m surprised nobody thought of it before. The bag comes in blue and grey and retails for $365 AUD or $260 USD which puts it at the more expensive end of the market.
The photo compartment of the Horizon 34L mounts on the backpack’s waist belt which allows it to be rotated round to the wearer’s front to gain access.
On unpacking it I was presented with a fairly large daypack made out of a lightweight ripstop nylon with a polyurethane backing. At various points of anticipated abrasion there are reinforcing panels of Cordura pack cloth. The harness appears well made and is well padded with a good range of adjustment. I’m 1.93 m tall and have a long torso which means I usually find getting a comfortable pack quite difficult but Horizon 34L fitted well and over the last 8 months have clocked up just under 1000Km wearing it. The hip belt has padded wings and adjustable belt and does a grand job of placing the load on your hips in a comfy manner.The back of the pack has three pads with large spaces between them to promote air flow and stop you getting a sweaty back. Here in Australia they are a bit academic, especially in the warmer months, but I imagine they will be of some use in more temperate climates. In terms of exterior pockets there is one on the lid, one on the front-end on the left hand side there is a pocket that will take a 3L water bladder. There is also a pocket for a water bottle on the flap of the bladder pocket. In terms of exterior fixing points there is are straps for a tripod, walking pole and two rows of daisy chains. The top section of the pack eschews the normal walking pack type enclosures of a drawstring mouth with a large lid that buckles down in favour of a large YKK zip. While I appreciate the convenience of a zip for quick and easy access zips allow water ingress especially when they have no storm cover like this. The inside of the top compartment has a stretchy mesh pocket to hold things like maps or guide books. There is ample room to stow a gore-tex, a fleece, lunch and a first aid kit. There is no provision for carrying a laptop, but you could put an iPad in the stretchy pocket. On the lid is an exterior pocket which has a key clip inside. Its big enough to hold gloves, a hat, a personal locator beacon and some snacks. All fairly standard stuff for this type of day pack.
The photo compartment can separate from the backpack to allow it to be used as a waist pack.
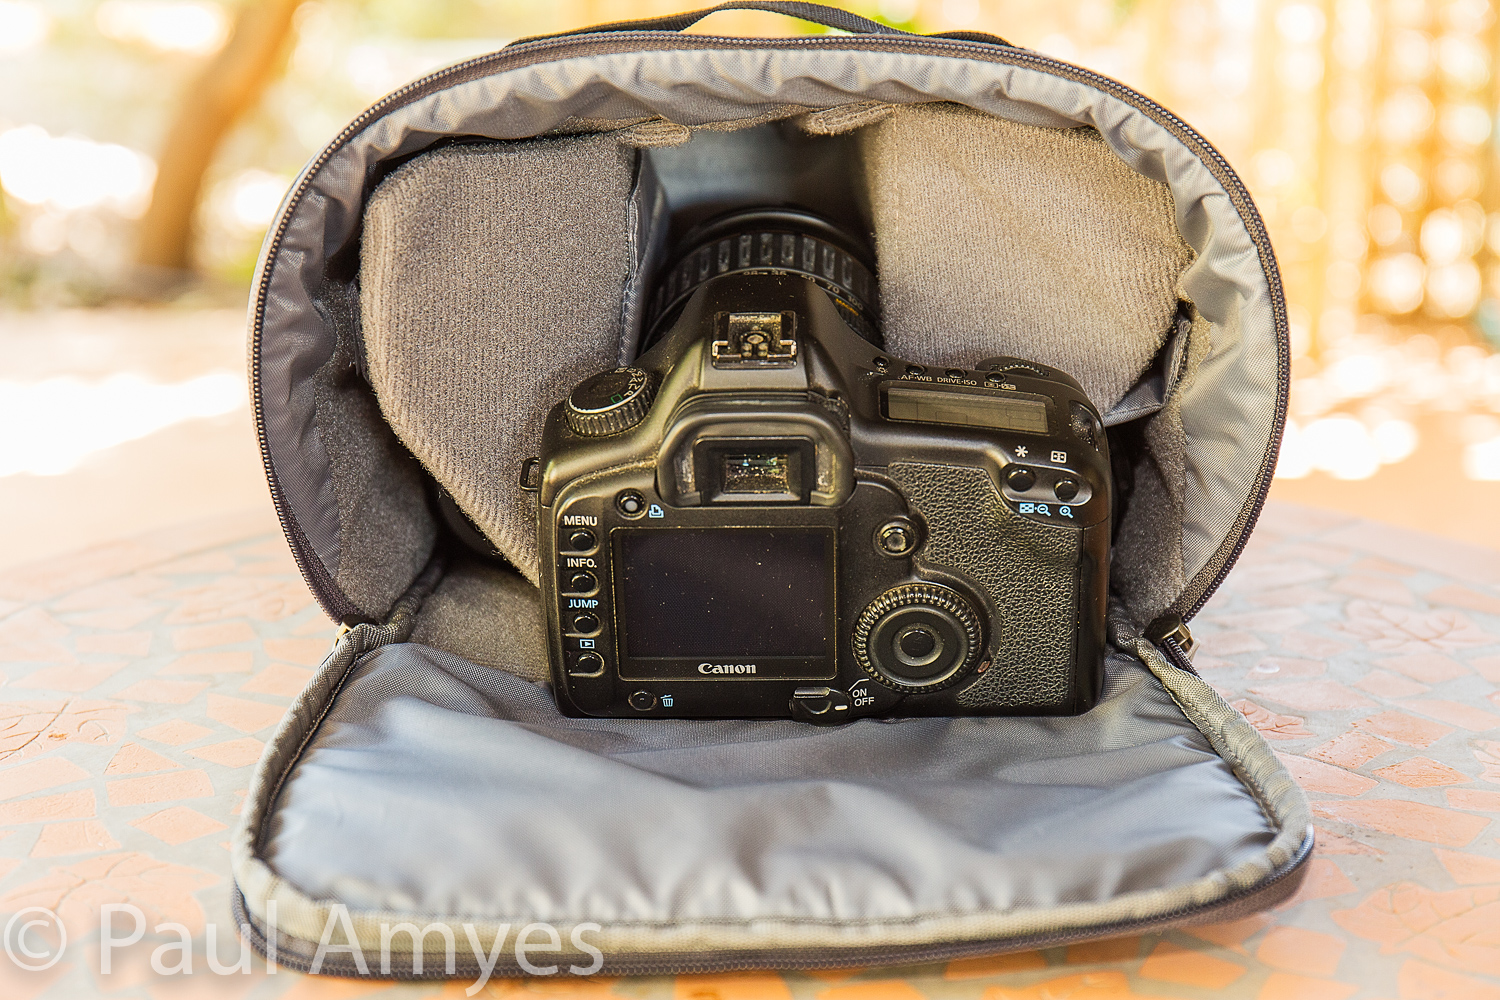
Not standard is the bottom camera compartment. Basically the bottom of the pack has a tube in which a waist pack or as our American cousins call them a ‘Fanny Pack” (snigger!). The left side of the tube (as you wear the pack) is sealed and it has a gap to allow the waist belt to pass through. The right end has a flap which is secured by a magnetic clip and this in conjunction with a leash stops the waist pack from falling out as you walk. This flap has an ingenious pop up system which allows you set the preferred tension. To rotate the waist pack to your front to gain access to it you reach behind you and open the magnetic clip, The flap pops up out of the way and then you pull on the loop on the right side of the belt and the camera compartment rotates around. You then undo the zip and lift the lid away from you. The camera compartment has two dividers that can be repositioned so as to allow you to configure the storage as you wish. I opted for a large central space to hold a camera body and lens with two smaller areas either side to hold two more lenses. The lid has a mesh pocket to allow you to stow small bits and pieces. So what will it hold. Well I used it with two different camera systems. Most commonly I used it to hold a gripped Panasonic Lumix G85 oran Olympus EM1 with grip with a mounted 12-40mm f2.8 lens. Then I would put in the side compartments a Panasonic Leica 8-18mm and an Olympus 75-300mm. Sometimes I’d swap out the wide-angle zoom for the Olympus 60mm macro. The other system I carried was either an ungripped Canon 5 or 6d with a 24-70mm f4 zoom and aCanon 75-300mm and a 100mm macro. Because I was researching a walking guide-book and needed access to a note-book, pen and handheld GPS I mounted a Lowepro Street and Field 100AW utility bag on the righthand fin of the waist belt. This held the afore-mentioned bits and also camera batteries and memory cards. If you don’t want to carry the whole shebang then you can detach the camera compartment and use it as a waist pack/fanny pack (snigger !).
There is enough room to stow a DSLR such as the Canon 5d pictured mounted with a lens, two additional lenses, a notebook, memory cards and batteries.
Showing how the weather resistant PU layer on the inside of the pack is already perishing after 8 months of use.
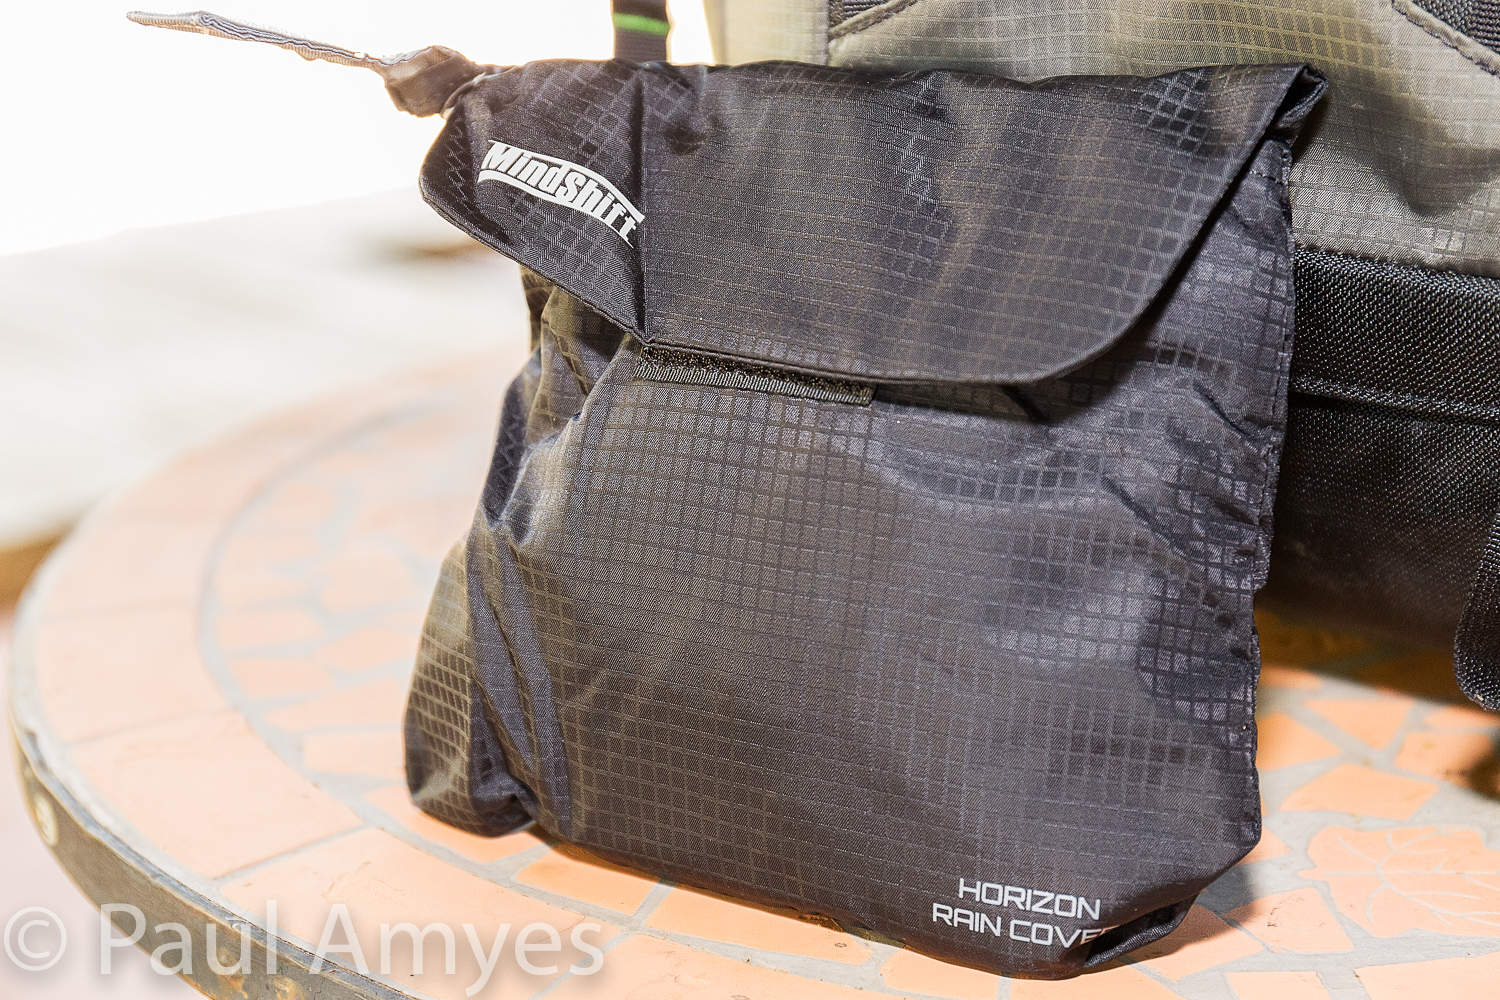
In use. The pack is very comfy and I carried it on a range of hikes for nearly 1000Km. To work from it is great. Most of the time I had my camera on strap slung across my body. If I needed to change lenses then I’d access the camera compartment. The whole thing worked really well. However, if you take the pack off while taking photos then it becomes a right royal pain in the derrière as it becomes quite clumsy to use. Pulling out the camera compartment while the rest of the back rests on the ground feels very clumsy compared to the elegance of using it while it is worn on your back. The pack isn’t very weather resistant and MindShift sell a separate rain cover for $45 AUD or $25 USD. Given the price of the Horizon 34 I think MindShift are being tighter than a fishes eyelid here especially when the Think Tank bags from the same company have them built in. The rain cover is also fiddly to affix which is not what you need when you are cold and tired as a rainstorm breaks. The pack material isn’t very durable and after 8 months of use the polyurethane backing has peeled off in m any places and the lightweight ripstop nylon that makes up most of the pack has started to wear through. I’ve got some camera pouches made by the now defunct Camera Care Systems in England that are over 30 years old and have led a very hard life and they show less wear than the Horizon 34.
The $45 AUD optional rain cover that should come as standard with the pack considering its $365 AUD price. To add insult to injury it is difficult to attach and mine has already started to have it weather resistant PU backing wear through rending it not rain resistant and therefore redundant.
In conclusion The MindShift Rotation 180º Horizon 34L is quite an innovative product that solves carrying camera equipment on day hikes into the wilderness. The concept is quite brilliant and I’m astounded that no-one has done it before. Unfortunately the execution of the product lets it down and it seems very expensive for a bag that I’ll probably end up throwing away in 12-18 months as it has worn out. I think that MindShift should construct the pack from heavier duty Cordura Pack cloth throughout and make sure that the polyurethane backing is more durable. A pack cover should be integral to the main pack body not an optional extra. If they did that it would be an excellent product. Ah well back to a proper walking pack and camera pouches.
I’ve not had access to a proper studio since I left TAFE (college) where I abused, I mean used the excellent facilities. Now working from home I have to make do with whatever is around the house and a few well-chosen bits of photo kit. In the above pic I’m doing a product shot of back pack in the sitting room. I don’t have a white infinity curve on a product table so I use a small Ikea coffee table covered in a white shower curtain and a white double sheet as the background. I want the backpack on a white fore ground and against a white background. Experience has taught me that if a light the background with a flash gun (speed light to our American readers) and over expose by 1 stop it will show as pure white. The subject is lit by two flash guns in brolly boxes arranged at 45º to each other. The camera sits on a tripod and the flashes are triggered wirelessly using a Phottix Odin transmitter. Unlike a lot of photographers I shoot using TTL control and use flash exposure compensation on each flash to control the lighting ratio which in this case is 2:1 or the key light (the black brolly) is set to be twice as powerful as the fill light. All very simple really.
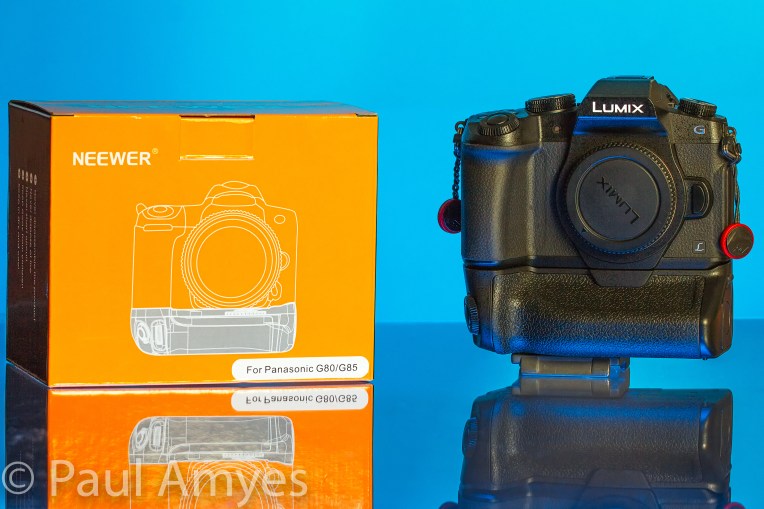
The Neewer DMW-BGG1 battery grip for the Panasonic Lumix G85.
There’s no doubt about it that micro four thirds cameras offer superb performance in a compact body. My favourite cameras have been the EM10 Mki and the EP-5 equipped with one of the excellent prime lenses such as the 25mm f1.8 or the 45mm f1.8. Trouble arises when you slap a bigger lens on such as the truly excellent Olympus M.Zuiko 40-150mm f2.8. It’s possible to use them but it feels unwieldy and uncomfortable for long periods. So the solution was to buy a bigger bodied camera such as the EM1 Mki. I was lucky that I managed to blag a good deal and it included HLD-7 battery grip. In day-to-day usage that grip has never left the camera. When I got the Panasonic Leica 100-400 I started using it primarily on the EM1 and it felt well-balanced, but I wasn’t getting the use of the 5 axis dual image stabilisation. So I thought I’d slap it on front of the G85 that I bought for video. Problem solved for the image stabilisation, but then I felt I needed a bit more real estate for the hands.
The Neewer DMW-BGG1 battery grip for the Panasonic Lumix G85.
Looking online I saw the Panasonic BGG1 Battery Grip was $362 AUD. Now I don’t know about you but lately I think the camera manufacturers have been having a lend of us with camera grips. The new Canon EOS R’s grip retails for $599 AUD and the Fuji X-H1’s is $499 AUD. This is why there is a thriving market in cheap Chinese knock offs, but these tend to be for the best-selling cameras from Canon and Nikon. A lot of people regard these as crap, but back in 2010 I’d bought a Canon 550d and wanted a grip and I ended up buying one by Aputure from eBay for a whopping $40. It is still going strong, in fact it is in better nick than the camera body which I’ve had to superglue together on a couple of occasions. So I was definitely open to the idea of an after market grip, but I was under the impression that there wouldn’t be one as Panasonic don’t command a big enough market share. The other week I was trawling the internet looking for some batteries for my G85 and I found on Amazon Australia for the grand price of $61 AUD the battery grip DMW-BGG1 Battery Grip. So I took the plunge.
The Neewer DMW-BGG1 battery grip for the Panasonic Lumix G85.
The Neewer DMW-BGG1 battery grip for the Panasonic Lumix G85.
Ok first impressions. It’s made of plastic, but so is the body of the G85. It seems to be a pretty faithful copy of the Panasonic version right down to the recessed area for holding the rubber cover for the electrical contacts from the camera. The buttons and dials don’t feel as nice as those on the camera but they work well. The only downsides are that the tripod mount is not under the axis of the lens and it is obviously not weather sealed. For me these weren’t a big deal. In use the grip is comfortable and fits the contours of the camera body well. It helps provide a nice comfy grip, especially in the portrait orientation and the extra battery is a welcome addition when shooting video.I’ve been using it for a couple of months and it has been great. A good buy.
The Neewer DMW-BGG1 battery grip for the Panasonic Lumix G85.
The Neewer DMW-BGG1 battery grip for the Panasonic Lumix G85.
… with the Panasonic Leica DG Vario-Elmarit 8-18mm f2.8-4 micro four thirds lens which will be referred to hence forth as the 8-18 for brevity’s sake. For those who prefer video there is a video review at the bottom of the page.
The 8-18 was introduced as part of Panasonic’s Leica branded f2.8-4 lens range in April 2017. I was immediately interested as I wanted a wide-angle zoom in m4/3. I had discounted the existing Panasonic 7-14mm f4 and the Olympus 7-14mm f2.8 because they wouldn’t accept screw in filters and the Olympus 9-18mm f4-5.6 because the collapsible design means the lens is prone to failure due to the internal ribbon cables breaking. The new 8-18 presented itself with a high quality metal construction that was splash proof and a modest 67mm filter thread. I wanted to use the lens for video work and so the ability to take a variable neutral density filter was a must. So when the lens became available here in Australia I plonked my cash down and got one.
My first impression on opening the box was that it is a quality bit of kit – it feels nice in the hand with a cool metallic feel and satisfying density. The bulbous front element is well recessed and combined with the excellent locking lens hood means that it is protected from stray light and from being physically damaged. The lens barrel has two ring controls – the front being for focus and the rear for zoom – and a switch for selecting auto or manual focus.The focusing ring is of the fly-by-wire type that twiddles endlessly – I wish that Panasonic would follow Olympus’s lead and have the pull back clutch type focusing rings with hard stops. The zoom ring is nicely damped and travels in a smooth 90º rotation. Another gripe is that both Panasonic and Olympus are members of the m4/3 consortium so why oh why can’t they agree on which way the zoom ring turns? Both zoom and focus are internal which is nice as it does not affect the centre of balance while using a gimbal. The lens body is finished in a smooth black satin with the engravings done in the Leica font and colours. The lens mount is metal and looks to be chrome plated brass. So full marks to Panasonic for presentation.
Vital Statistics
lens mount
m4/3
focal length
8-18mm (16-36mm 35mm full frame equivalent)
angle of view
62º – 107º
maximum aperture
f2.8-4
minimum aperture
f22
filter size
67mm
optical stabilisation
no
internal focusing
yes
internal zoom
yes
minimum focusing distance
23cm
maximum magnification
0.12 x
number of lens elements
15
number of lens groups
10
weight
315g
length
88mm
diameter
73.4mm
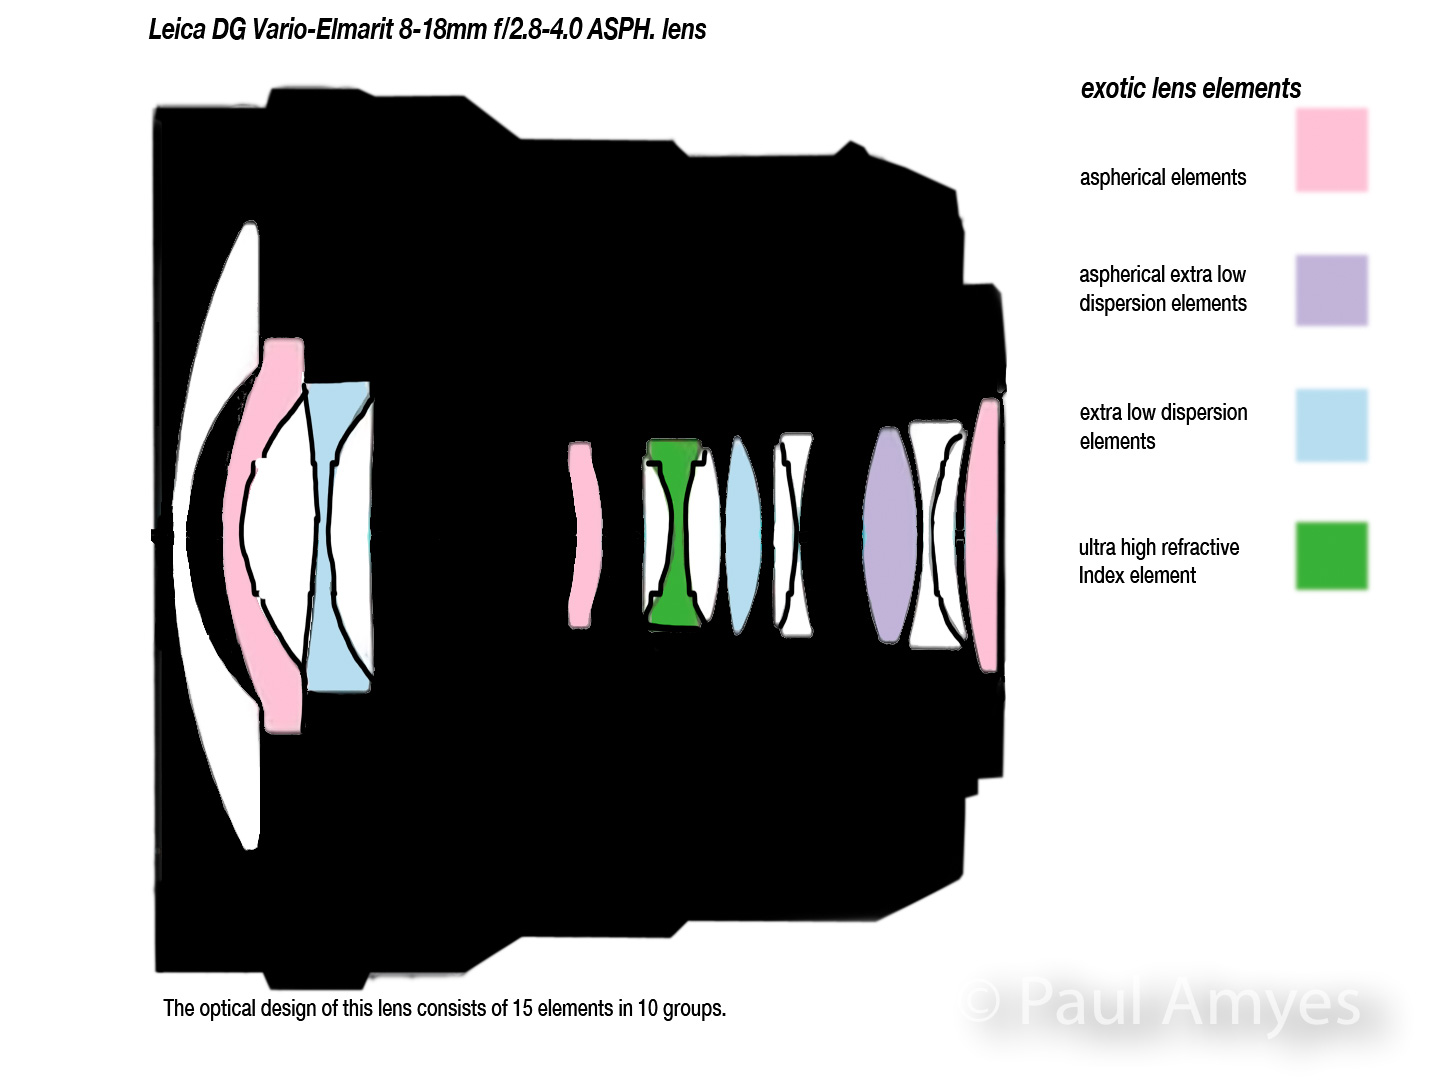
The lens construction is 15 elements in 10 groups with 1 aspherical extra low dispersion element, 2 extra low dispersion elements and 1 ultra high refractive index element. Combined with the nano coatings they should reduce internal flare, distortion and chromatic aberration. Control of distortion and chromatic aberration is also aided by an internal software profile that is baked into the image file. A lot of people don’t like this approach as they feel corrections should be made optically. The main criticism is that there is too much of an image quality hit in the corners with this approach. Hasselblad was the manufacturer to take this approach with their H3 camera and when that was introduced there were few complaints about image quality. The reality is that using lens profiles means lenses can be cheaper, smaller, and lighter than their optically optimised brethren.
The 8-18 has a variable aperture and unfortunately it quickly steps down as you zoom in as can be seen by the chart below.
8mm
f2.8
9mm
f3.1
10mm
f3.2
12mm
f3.4
14mm
f3.6
18mm
f4
Test Results
I’ve done my standard teststo look for distortion, chromatic aberration, and sharpness at 8mm, 12mm and 18mm to give an indication of how the lens does throughout its zoom range. I have just for interest sake posted images with no profile correction to give an idea of what the lens is actually doing. Click on the images to see them at full size.
8mm at f2.8 no lens profile applied
8mm at f2.8 with internal profile applied.
At 8mm without any inbuilt lens profile applied there is very obvious barrel distortion and vignetting at f2.8. With the profile applied there is still a very slight barrel distortion and the vignetting remains until f5.6. In terms of sharpness well at f2.8 the centre of the image is nicely sharp and contrasty and remain so until f16 when diffraction kicks in and softens the image. In the corners the story is different, at f2.8 the corners are significantly softer and less contrasty than the centre, they improve a little as you stop down reaching best performance at f5.6 and then get worse at f16 with diffraction. A small amount of chromatic aberration is present throughout the aperture range and is easily corrected in post.
12mm at f3.4 no lens profile applied
12mm at f3.4 with profile applied.
At 12mm we can see no distortion when the lens profile is applied and the vignetting is about 1/2 stop and is barely discernible. Wide open at f3.4 the centre of the image is sharp and contrasty and the best performance is at f5.6. In the corners the image is softer and has less contrast than the centre. The best performance is at f8. Diffraction starts to set in at f11.
18mm at f4 no lens profile
18mm at f4 with internal profile applied.
At 18mm there is some pincushion distortion in the profile corrected image. There is also a tiny bit of vignetting at f4 but this clears up at f5.6. Sharpness at f4 is very, very good in the centre throughout the aperture range only deteriorating at f16 due to diffraction.The corners are remarkably sharp at f4 but have slightly less contrast than the centre. Peak performance sets in at f5.6 and then again diffraction rears its ugly head at f16 and spoils the party. Chromatic aberration is very well controlled across the whole range and is very, very slight.
Like most ultra wide-angle zooms Panasonic’s 8-18mm f2.8-4 is prone to flare. The recessed front element and tulip lens hood do minimise this, but with the sun in the frame you will see veiling flare. When stopped down you can achieve nice sun stars.
Like most wide-angle zooms the 8-18 is prone to flare. In order to reduce this the engineers recessed the front lens element and then provided a decent lens hood. The Panasonic 7-14mm f4 caused purple blobs on Olympus cameras when there was a specular light source in the frame. Some people pointed the finger at the difference in UV coatings between Panasonic and Olympus cameras. Others said the thickness of the Olympus sensor stack caused the problem. Anyway the 8-18 is thankfully free of those artefacts. Shooting into the sun there is some veiling flare and ghosting.
Auto focus is done via a stepping motor and it is designed to work with Panasonic’s Depth From Defocus technology that is basically a contrast based auto focus system that is enhanced by software profiles for each Panasonic lens. Single point autofocus in single shot drive mode is incredibly fast and accurate. I decided to check the Continuous Auto Focus by continuous shooting at medium speed wide open on the Panasonic G85 with a person walking slowly towards the camera at focal lengths of 8mm and 18mm. All the shots were in focus. Then I tried to see how the lens would perform on a camera without DFD – in this case an Olympus OMD EM1 mk i. At 8mm and f2.8 all the images were in focus. At 18mm shooting a burst of 10 images the camera lost focus on the last 2 images of the burst. So this very limited test shows that the autofocus of the lens does perform better on Panasonic cameras with DFD.
Conclusions
The Panasonic Leica DG Vario-Elmarit 8-18mm f2.8-4 lens with Cokin P system wide-angle lens filter holder attached.
Ok I’ve had the lens a year now and I’ve used it for stills, time lapses and video shooting on the afore-mentioned EM1 and G85 along with an EP5 and EM10 so what can I say. The in camera lens profiles make a huge difference in terms of distortion, but most people won’t see this as they’ll see the corrected images. I did expect this to have some impact on sharpness in the corners but was pleasantly surprised to find that not the case at all. Most zooms perform best at the short end and become softer at the long end. With my copy of the 8-18 this lens is very good at the long end and it is a little softer at the short end. The ability to use filters is a boon for landscape photography and video. The 67mm filter size does not make filter purchases onerous and with the wide-angle filter holder you can use the Cokin P filter system with rectangular filter with an 85mm width. It is really nice not to use filters the size of dinner plates with this lens. I’ve been caught in a couple of downpours while using the 8-18 and have had no problems. I have found the lens immensely satisfying to use and have put it to more uses than I originally thought I would. In all I feel it is a very good lens if you can live without a fixed aperture. I would definitely recommend it.











You must be logged in to post a comment.