The ubiquitous New Holland Honeyeater (Phylidonyris novaehollandiae), New Victoria Dam, Korung National Park, Western Australia.
Over the last few days my FaceBook feed has been seeing some seriously tasty bird photos from one of the groups that I belong to. The photos all come from one area– New Victoria Dam which is 30Km east of Perth on the Darling Range in Korung National Park. So when the Beloved Significant Other (BSO) announced she was competing in a croquet competition at a location just 20 minutes drive away I immediately volunteered myself as driver.
There are two starting points to the walk and which you choose will largely depend upon when you visit. If you visit outside of office hours Monday to Friday or anytime at the weekend then y ou have to use the upper carpark as your start point as the access road is shut. During office hours you can drive down to the lower carpark keeping in mind that if stay till after 5pm then you won’t be able to drive out. I started at the upper carpark which only adds 800m each way to the walk. The walk consists of a 7Km round trip down past the New Victoria Dam to the Old Victoria dam wall and the garden and picnic area. There used to be a path through the trees at the edge of the road but it has become quite overgrown and indistinct so you are best walking along the access road. As you walk down the road on your left is the gravesite of Francis Weston who died in 1876 aged two days, his parents lived in the timber workers settlement at Bickley. When you get to the lower carpark walk through it and then follow the trail markers. After walking through the forest you come to New Victoria Dam. Walk down the steps and at the bottom turn right onto the road and walk down to the remains of the Old Victoria Dam.
The gravesite of Francis Westson who died in 1876 aged two days. His parents lived in the timber workers settlement at Bickley.
The steps down to the New Victoria Dam.
The original dam was built in 1891 and pumped water via pipelines to Kings Park and a reservoir there on Mount Eliza. The dam became the first permanent water source for Perth and was operated by the private City of Perth Waterworks Company. As the water catchment area took in agricultural land and timber settlements there were fears that it would be polluted by raw sewage and excrement from livestock. Between 1895 and 1900 typhoid broke out in Perth and 425 people died. The water was tested and found to be contaminated so the government took control and made changes to prevent re-occurrence. By 1988 the concrete structure was beginning to degrade to such an extent it could no longer be repaired so in 1990 work on the new dam commenced and because of the use of roller compacted concrete it was completed by the following year. It can hold 9.5 million kilo-litres and is used to supply drinking water to Kalamunda and Lesmurdie.
The wall of the old Victoria dam and the garden beside it.
In the lee of the old dam there is a grassed picnic area and toilets. Thickets of ti-tree and one-sided bottlebrush or claw flower have been planted and the thick vegetation along the creek line provides dense cover for a number of bird species. On this trip I used the picnic gazebo as an impromptu bird hide and spent a couple of hours watching the various birds feed and drink. I sawred-eared firetails, mistletoe birds, splendid fairy wrens, western spinebills, new holland honeyeaters, white faced herons and rosellas. The dam spillway feeds water to the pond and creek that provides a year round water supply which means that the birds are always active all here. If you are there at dawn or dusk then kangaroos can be seen feeding on the grass. It is a great little spot and doesn’t require too much effort to get there.
Red-eared Firetail (Stagonopleura oculata), New Victoria Dam, Korung National Park, Western Australia.
White Faced Heron (Egretta novaehollandiae), New Victoria Dam, Korung National Park, Western Australia.
The Eastern Osprey (Pandion cristatus) is known to the Nyoongar people of the south west of Western Australia as yoondoordo. Oyster Bay, Lower King, Western Australia. Olympus OMD EM 1 mk 2 with Panasonic Leica 100-400mm f4-6.3 lens. Exposure: 1/2000 sec, f6.3 at ISO 400.
I’ve got to say of the bird types raptors, or birds of prey, are my favourite. The way they hover above the landscape looking for prey or ride the thermals brings a quickening to my heart. Probably a corny thing to say but I really enthralled by their power and majesty – they are the epitome of an apex predator. It’s not just the large raptors like wedge tailed eagles that do this but the smaller species such as falcons and kites as well. I’m lucky that where I live I often see birds of prey hunting and I’ve shared some photos on the blog of collared sparrowhawks, nankeen kestrels, and brown goshawks over the years.
Look at the talons on that! Eastern Osprey (Pandion cristatus), Oyster Bay, Lower King, Western Australia. Olympus OMD EM1 mk 2 with Panasonic Leica 100-400mm f4-6.3 lens. Exposure: 1/1000 sec, f6.3 at ISO 400.
When we started making plans to spend Christmas in Albany I was excited because it would mean that I’d be able to photograph Eastern Ospreys at a nest site near where we staying. So when we set out I made sure I had the necessary kit to take advantage of the opportunity. I spent a very happy Christmas Day filming these wonderful animals.
The video is the short version of this article with a slide show of the best of this year’s orchids at the end.
It’s not for nothing that Western Australia is referred to as the “Wildflower State”. There are over 13,000 species of plant to be found, with new discoveries added every year. If we narrow it down to my particular area of interest – orchids – there are 394 species of terrestrial orchids in the South West Corner of the state. Some of these species are so specialised that are confined to very small areas and found nowhere else. Some species will not bloom unless there has been a bush fire the summer before, others if the winter rains are delayed or are insufficient will not put a show on either. This means that no two years are the same. An example of this is my favourite spot near where I live is prolific with the number of orchid species found there. When I first went I was simply amazed by the number of fringed mantis and white spider orchids that were flowering. Over the ensuing ten years I’ve seen such a display of those species since. This year there was a carpet of purple and pink enamels like I’ve never seen before. So this not knowing quite what you are going to find adds to the whole experience. On a few occasions I may be lucky enough to be able to access the flowers by car and a short walk, but most of the time I end up walking through the bush for anything up to four hours.
Pink enamel orchid, Elythranthera emarginata. Mokine, Western Australia. Olympus OMD EM 1 mk ii with Olympus 60mm f2.8 macro lens. Aperture priority, exposure: 1/800 sec, f5.6 at ISO 400.
Purple Enamel Orchid, Elythranthera brunonis. Mokine, Western Australia. Olympus OMD EM 1 mk ii with Olympus 60mm f2.8 macro lens and Metz 64AF-1 flash. Exposure: Aperture priority mode, 1/40 sec, f8 at ISO 200 with -1 stop exposure compensation.
The Canon EOS 6d camera with 100mm f2.8 macro lens that I used to use for photographing orchids alongside the Olympus EM 1 mk ii with 60mm f2.8 macro lens that I use now.
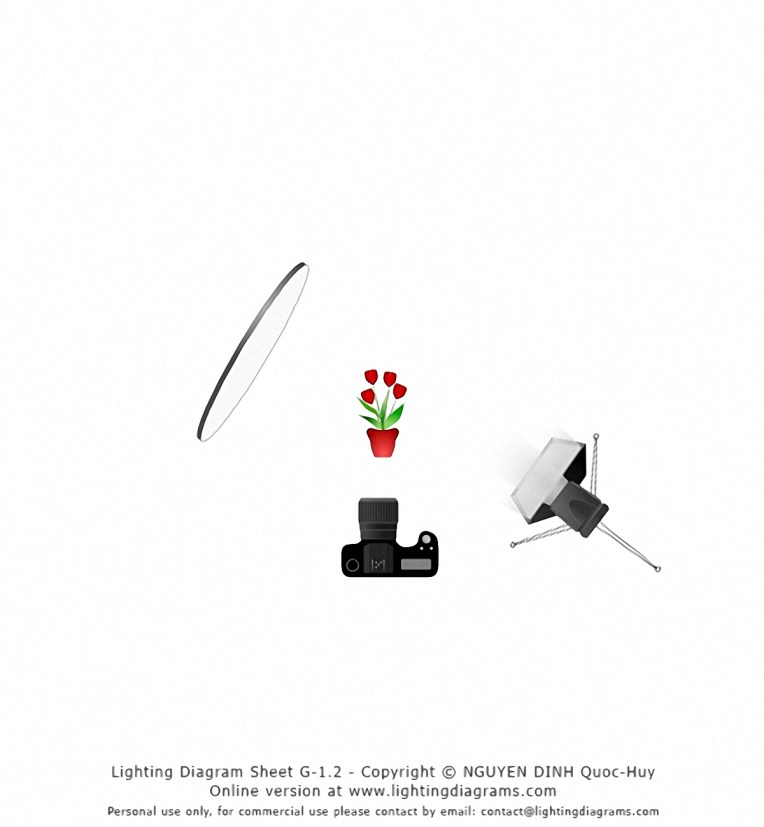
I approach photographing orchids as I would shooting a person’s portrait – using off camera flash and reflectors to fill shadows, separate from the background, bring out the shape and textures. Too many botanic studies show indistinct photos where the subject does not fill the frame and the background is intrusive. To that end I use a macro lens of around 100 -120mm (35mm equivalent). It’s not because I’m necessarily shooting at a 1:1 ratio, it’s just because I’ve found there are very few zoom lens that focus close enough and have a fast aperture to allow control of depth of field.I used to use a Canon DSLR with a Canon EF 100mm f2.8 IS L lens and carry around a Manfrotto 143 Magic Arm Kit to support the lights. I made a video about using that setup some 7 years ago and that can be seen just below. Since making that video I added a full frame 6d, the Canon macro lens, and extra light and a set of TTL wireless flash triggers and consequently found myself schlepping 10-12Kg of kit into the bush on longer and longer forays. Something had to give – and my back did! So fast forward 7 years and I’m now using an Olympus OMD EM1 mk ii with Olympus 60mm f2.8 macro lens. I’ve not given anything up in terms of image quality with this change because I’m generally working at a base ISO of 200 with lighting which means all the usual objections to m4/3 about excessive noise and poor dynamic range have been taken out of the equation. The Olympus 60mm f2.8 is easily the optical equal of Canon’s EF 100mm f2.8 IS macro L lens at less than 1/2 the price and about 1/3 of the weight. The Manfrotto Magic Arm got binned as it was very heavy at 2.7 Kg and replaced with a Manfrotto Table Top Tripod Kit 209, 492 Long which weighs 454g. As far as lighting goes I’m using a Metz 64AF – 1 and an Olympus FL-600R flash with small soft box, snoot and honeycomb grid. The only thing that I have given up is radio TTL triggers for the flash, I’m using a TTL flash sync cable at the moment. I prefer to use the Metz unit when doing a lot of high speed sync work as it is the more powerful of the two. This may change in the New Year, it may not.
Lighting diagram for my basic lighting of an orchid.
The FL-600R is a flash with a guide number of of 50 (ISO200/m). In addition, it comes with a LED lightt for use when shooting video.
Other things in the bag include an 80cm 5 in 1 reflector – I only use the white reflector as the silver is too strong, the gold too garish. Some times I use the diffuser over a plant to cut down on ambient light levels. A Vittorinox CyberTool L is there. It has a good selection of small screwdriver bits that can most screws on a camera body, a set of pliers, wood saw, metal saw and file and a host of other doodads. I once re-assembled my Voigtländer 35mm f2.5 Color-Skopar with it while in on holiday in Beijing. Water – this can be in a 1L bottle for shorter expeditions or a 3L water bladder for longer ones. Extra clothing if needed, sunscreen and insect repellent to avoid nasty encounters. Batteries for camera and flash. Wallet of memory cards. That’s it. The whole process is very simple.
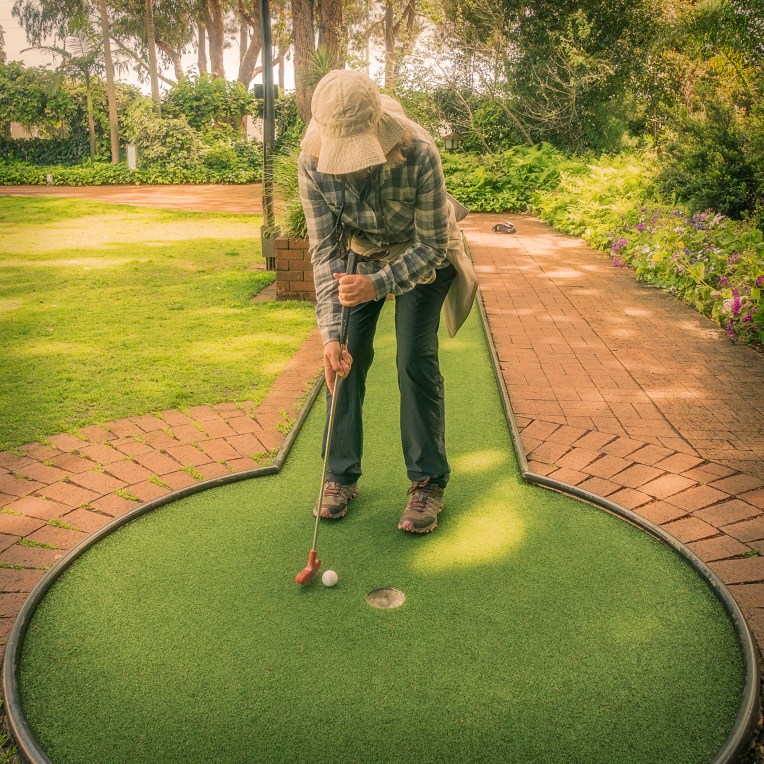
It’s not all beer and skittles at the huge multinational media empire that is Paul Amyes Photography (PAP), but it comes close when we get out to play crazy golf. Last week we managed to sneak off for a game at Wanneroo Botanic Gardens. The aim of the game is to have fun and I took along my Leica D-Lux Type 109 to record the proceedings. It was well suited being small and light and shooting 4K video meant I had some freedom to play around in the edit.
Green Pool, Wilson’s Bay National Park Denmark Western Australia. Apple iPhone SE camera in panorama mode. Exposure: 1/1400s, f/2.2, at ISO 25.
Denmark the town in Western Australia not the country. There is a lot of opportunity for trail riding in the area with several long distance trails converging on the town. So after a few days of goofing around on some of them to get the lie of the land I then put together a loop ride that would make for an epic birthday bash.
By combining the Denmark – Nornalup Heritage Trail , the Munda Biddi and some cycle path along Ocean Beach Road I ended up with a 42Km loop ride that would take me through some beautiful country.
Elephant Rocks, Wilson Bay, Denmark Western Australia. Apple iPhone SE camera in panorama mode. Exposure: 1/1600s, f2.2 at ISO 25.
On the Nornalup Heritage trail which is a rail to trails project. Denmark, Western Australia. Leica DLux Type 109. Exposure; 1/1000s, f4 at ISO 200.
Lights Beach on the Munda Biddi Trail, Denmark, Western Australia. Apple iPhone SE. Exposure: 1/10s, f2, ISO 25.
Time to promote the achievements of Beloved Significant Other (BSO) via the wonderful medium of video. I didn’t intend to shoot a croquet video. No. I was enlisted as a logistical consultant (alright driver!) to take aforementioned personage and a friend to a croquet competition at the Cambridge Croquet Club. While the event was happening I was going bird watching at the nearby ornithological Mecca of Herdsman Lake with the hope of photographing nankeen herons. Alas the herons didn’t know that I was coming to see them and weren’t at home. Couple this with the fact that I was suffering from a deadly combination of Ebola, typhoid, bubonic plague and cholera (BSO says it was in fact a head cold) I went back to the croquet club to find a quiet corner in which I could drown in snot. Somehow news that BSO had made it to the finals penetrated my fever fuelled delirium and I leapt into action to record the event. I was not really equipped to do so as although I had the Panasonic G85 with me that shoots lovely 4K video I only had two lenses. The Panasonic Leica 100-400mm a great lens for birding but a bit long for court side croquet. The Sigma 16mm f1.4 which is another fantastic lens, but being a fixed focal length not as useful as standard zoom for the grip and grin at the presentations at the end of the tournament. All I can say is thank goodness for the magnificent stabilisation which enabled me to get good handheld footage, although it was defeated by my violent sneezing although it wasn’t as bad as that depicted below.
… with the Panasonic Leica DG Vario-Elmarit 8-18mm f2.8-4 micro four thirds lens which will be referred to hence forth as the 8-18 for brevity’s sake. For those who prefer video there is a video review at the bottom of the page.
The 8-18 was introduced as part of Panasonic’s Leica branded f2.8-4 lens range in April 2017. I was immediately interested as I wanted a wide-angle zoom in m4/3. I had discounted the existing Panasonic 7-14mm f4 and the Olympus 7-14mm f2.8 because they wouldn’t accept screw in filters and the Olympus 9-18mm f4-5.6 because the collapsible design means the lens is prone to failure due to the internal ribbon cables breaking. The new 8-18 presented itself with a high quality metal construction that was splash proof and a modest 67mm filter thread. I wanted to use the lens for video work and so the ability to take a variable neutral density filter was a must. So when the lens became available here in Australia I plonked my cash down and got one.
My first impression on opening the box was that it is a quality bit of kit – it feels nice in the hand with a cool metallic feel and satisfying density. The bulbous front element is well recessed and combined with the excellent locking lens hood means that it is protected from stray light and from being physically damaged. The lens barrel has two ring controls – the front being for focus and the rear for zoom – and a switch for selecting auto or manual focus.The focusing ring is of the fly-by-wire type that twiddles endlessly – I wish that Panasonic would follow Olympus’s lead and have the pull back clutch type focusing rings with hard stops. The zoom ring is nicely damped and travels in a smooth 90º rotation. Another gripe is that both Panasonic and Olympus are members of the m4/3 consortium so why oh why can’t they agree on which way the zoom ring turns? Both zoom and focus are internal which is nice as it does not affect the centre of balance while using a gimbal. The lens body is finished in a smooth black satin with the engravings done in the Leica font and colours. The lens mount is metal and looks to be chrome plated brass. So full marks to Panasonic for presentation.
Vital Statistics
lens mount
m4/3
focal length
8-18mm (16-36mm 35mm full frame equivalent)
angle of view
62º – 107º
maximum aperture
f2.8-4
minimum aperture
f22
filter size
67mm
optical stabilisation
no
internal focusing
yes
internal zoom
yes
minimum focusing distance
23cm
maximum magnification
0.12 x
number of lens elements
15
number of lens groups
10
weight
315g
length
88mm
diameter
73.4mm
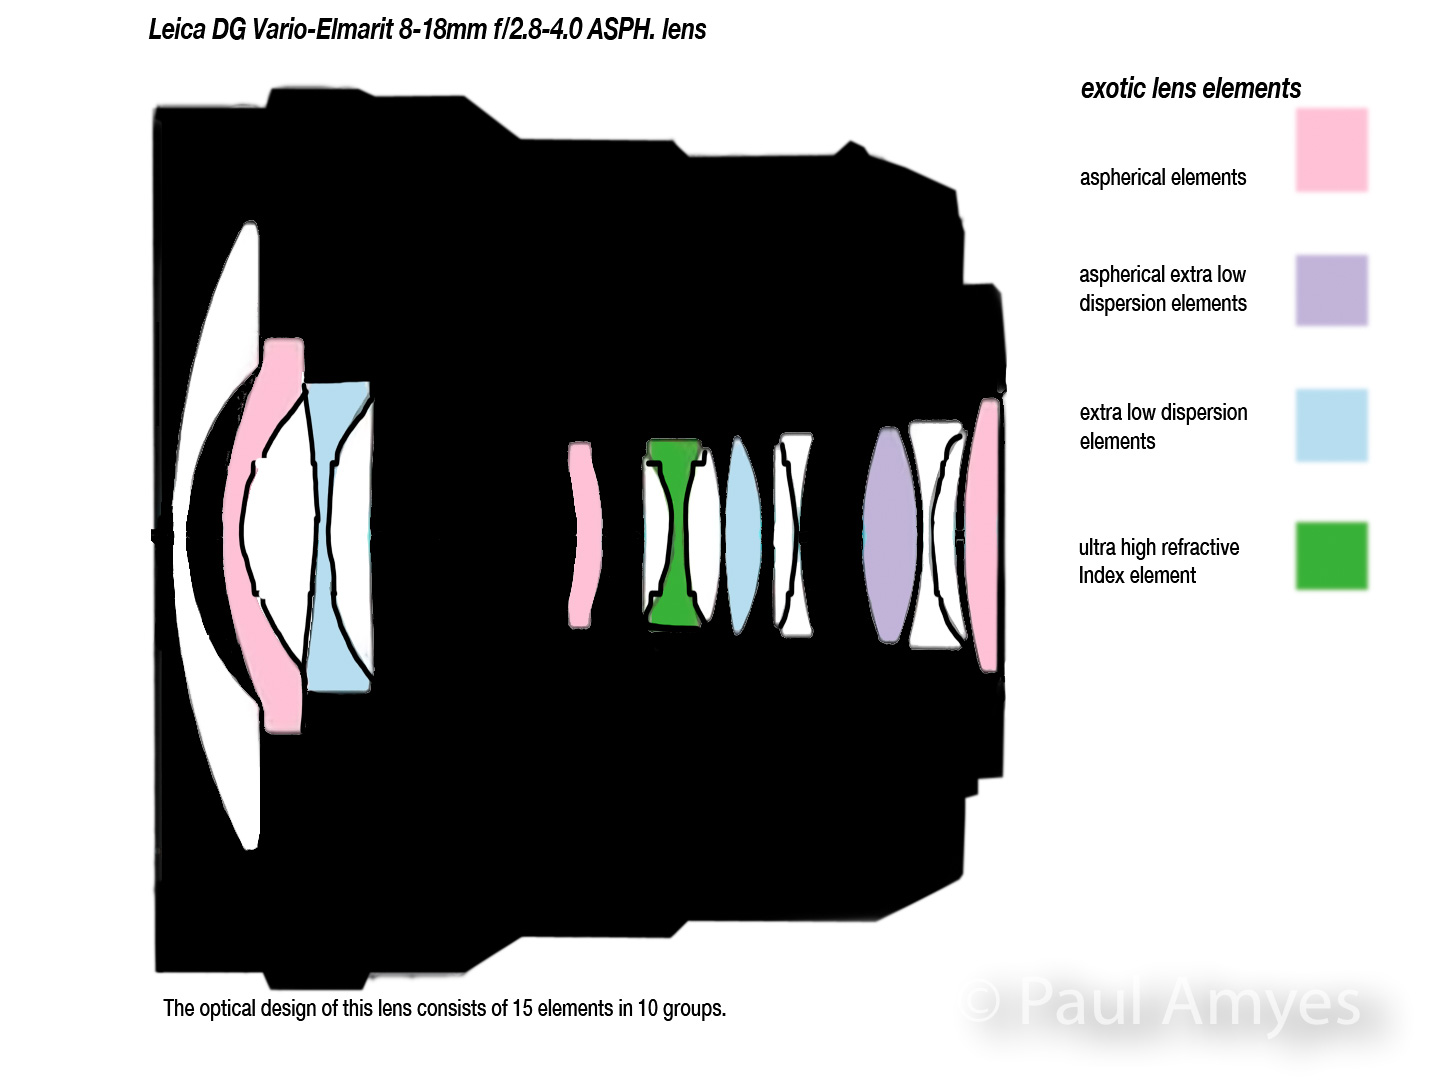
The lens construction is 15 elements in 10 groups with 1 aspherical extra low dispersion element, 2 extra low dispersion elements and 1 ultra high refractive index element. Combined with the nano coatings they should reduce internal flare, distortion and chromatic aberration. Control of distortion and chromatic aberration is also aided by an internal software profile that is baked into the image file. A lot of people don’t like this approach as they feel corrections should be made optically. The main criticism is that there is too much of an image quality hit in the corners with this approach. Hasselblad was the manufacturer to take this approach with their H3 camera and when that was introduced there were few complaints about image quality. The reality is that using lens profiles means lenses can be cheaper, smaller, and lighter than their optically optimised brethren.
The 8-18 has a variable aperture and unfortunately it quickly steps down as you zoom in as can be seen by the chart below.
8mm
f2.8
9mm
f3.1
10mm
f3.2
12mm
f3.4
14mm
f3.6
18mm
f4
Test Results
I’ve done my standard teststo look for distortion, chromatic aberration, and sharpness at 8mm, 12mm and 18mm to give an indication of how the lens does throughout its zoom range. I have just for interest sake posted images with no profile correction to give an idea of what the lens is actually doing. Click on the images to see them at full size.
8mm at f2.8 no lens profile applied
8mm at f2.8 with internal profile applied.
At 8mm without any inbuilt lens profile applied there is very obvious barrel distortion and vignetting at f2.8. With the profile applied there is still a very slight barrel distortion and the vignetting remains until f5.6. In terms of sharpness well at f2.8 the centre of the image is nicely sharp and contrasty and remain so until f16 when diffraction kicks in and softens the image. In the corners the story is different, at f2.8 the corners are significantly softer and less contrasty than the centre, they improve a little as you stop down reaching best performance at f5.6 and then get worse at f16 with diffraction. A small amount of chromatic aberration is present throughout the aperture range and is easily corrected in post.
12mm at f3.4 no lens profile applied
12mm at f3.4 with profile applied.
At 12mm we can see no distortion when the lens profile is applied and the vignetting is about 1/2 stop and is barely discernible. Wide open at f3.4 the centre of the image is sharp and contrasty and the best performance is at f5.6. In the corners the image is softer and has less contrast than the centre. The best performance is at f8. Diffraction starts to set in at f11.
18mm at f4 no lens profile
18mm at f4 with internal profile applied.
At 18mm there is some pincushion distortion in the profile corrected image. There is also a tiny bit of vignetting at f4 but this clears up at f5.6. Sharpness at f4 is very, very good in the centre throughout the aperture range only deteriorating at f16 due to diffraction.The corners are remarkably sharp at f4 but have slightly less contrast than the centre. Peak performance sets in at f5.6 and then again diffraction rears its ugly head at f16 and spoils the party. Chromatic aberration is very well controlled across the whole range and is very, very slight.
Like most ultra wide-angle zooms Panasonic’s 8-18mm f2.8-4 is prone to flare. The recessed front element and tulip lens hood do minimise this, but with the sun in the frame you will see veiling flare. When stopped down you can achieve nice sun stars.
Like most wide-angle zooms the 8-18 is prone to flare. In order to reduce this the engineers recessed the front lens element and then provided a decent lens hood. The Panasonic 7-14mm f4 caused purple blobs on Olympus cameras when there was a specular light source in the frame. Some people pointed the finger at the difference in UV coatings between Panasonic and Olympus cameras. Others said the thickness of the Olympus sensor stack caused the problem. Anyway the 8-18 is thankfully free of those artefacts. Shooting into the sun there is some veiling flare and ghosting.
Auto focus is done via a stepping motor and it is designed to work with Panasonic’s Depth From Defocus technology that is basically a contrast based auto focus system that is enhanced by software profiles for each Panasonic lens. Single point autofocus in single shot drive mode is incredibly fast and accurate. I decided to check the Continuous Auto Focus by continuous shooting at medium speed wide open on the Panasonic G85 with a person walking slowly towards the camera at focal lengths of 8mm and 18mm. All the shots were in focus. Then I tried to see how the lens would perform on a camera without DFD – in this case an Olympus OMD EM1 mk i. At 8mm and f2.8 all the images were in focus. At 18mm shooting a burst of 10 images the camera lost focus on the last 2 images of the burst. So this very limited test shows that the autofocus of the lens does perform better on Panasonic cameras with DFD.
Conclusions
The Panasonic Leica DG Vario-Elmarit 8-18mm f2.8-4 lens with Cokin P system wide-angle lens filter holder attached.
Ok I’ve had the lens a year now and I’ve used it for stills, time lapses and video shooting on the afore-mentioned EM1 and G85 along with an EP5 and EM10 so what can I say. The in camera lens profiles make a huge difference in terms of distortion, but most people won’t see this as they’ll see the corrected images. I did expect this to have some impact on sharpness in the corners but was pleasantly surprised to find that not the case at all. Most zooms perform best at the short end and become softer at the long end. With my copy of the 8-18 this lens is very good at the long end and it is a little softer at the short end. The ability to use filters is a boon for landscape photography and video. The 67mm filter size does not make filter purchases onerous and with the wide-angle filter holder you can use the Cokin P filter system with rectangular filter with an 85mm width. It is really nice not to use filters the size of dinner plates with this lens. I’ve been caught in a couple of downpours while using the 8-18 and have had no problems. I have found the lens immensely satisfying to use and have put it to more uses than I originally thought I would. In all I feel it is a very good lens if you can live without a fixed aperture. I would definitely recommend it.
My latest pootle took me to Woodman Point south of Fremantle. It’s a very pleasant walk around an area with important Aboriginal, historic and environmental significance. Well worth a visit.
Woodman Point, Western Australia. Panasonic G85 with Panasonic LEICA DG 8-18/F2.8-4.0 lens with a Cokin Harmony variable neutral density filter. Exposure:: 1/3 sec, f16 at ISO 200.
Woodman Point Jetty. Panasonic G85 with Panasonic LEICA DG 8-18/F2.8-4.0 lens with a Cokin Harmony variable neutral density filter. Exposure: 1/3 sec, f16 at ISO 200.
This walk was also from my book Perth’s Best Bush, Coast, and City Walks, published by Woodslane (ISBN 9781921606793 ) in 2010. It’s available from all good bookstores.
Hell or high water is the new motto for the Avon Descent and was adopted because recent years have seen decreasing amounts of rainfall falling and competitors have had to carry their craft where there was insufficient water. This year, 2017 and the 45th occasion of the race, the water levels were high which meant potentially new records could be set. The Avon Descent was first held in 1973, and there were only forty-nine competitors. This year there were 370 competitors with many coming from interstate and overseas. In more ways than one it deserves the title the “world’s greatest white water event”. The 124 km or 77 mile two day event starts at Northam and finishes at the Riverside Garden in Bayswater with an over night stop at the Boral Campsite just outside Toodyay. For the majority of entrants the aim is just to complete the course, but for the elite athletes it is a chance of competing in a unique endurance race.
The beauty of this race is that you can pick out a few vantage points from a list put out by the race organisers on their website and follow the whole event documenting the whole story rather than just getting an isolated snap shot. In previous years I’d covered the race for magazines shooting stills and then writing the story. This year I had intended to cover the entire event from start to finish and it was to be first time I’d covered it shooting video. Having planned my weekend around the race it was time to check the maps and the approximate timings for each stage. For instance there was no point heading to the first stage after the start as I would not have had time to get there by car, park, and then walk along the river to find a good location to set up. Also I had to think about the weather conditions, because at some of the viewing points you are bussed in and that would mean I’d have to carry everything with me. As the forecast for the weekend was a cold start it was thermals, and fleece. he key was light layers that could be added or taken off as conditions permitted. Camera and lens choice was hard, and I found it difficult to make a decision. For the Friday shots I could work from the back of the car and it was all to be people shots around Northam and for the sake of mobility using either a monopod or a gimbal. In the end I decided to use the Sony A7r and with Olympus OM Zuiko lenses – the 20mm, 50mm and 135mm. This and the gimbal went in a belt pack. Saturday involved shooting at three sites and I wanted to shoot some time-lapse as well as video footage. So I chose the Olympus OMD EM 1 with 40-150mm f2.8 lens for the video work and the EM10 with 12-40mm f2.8 for the time-lapse. I couldn’t set up a tripod at the start as I was going to shoot on the swing bridge so I used a monopod for the video and for the time-lapse I clamped the Syrp Genie Mini to the bridge safety barrier with a Manfrotto super clamp. All this went into my photo back pack. Sunday was the biggest problem with no car access to Bells Rapids everything had to be carried. So I took the Canon EOS6d with 24-70mm, 70-200 and a x2 converter. I’d also need plenty of batteries and memory cards as there would be no nipping back to the car. I decided to carry all this in pouches on a belt as I needed to be able to scramble up some rocks to get a good vantage point. At Bells I mounted the camera on a tripod but at the finish line I shot just using a monopod.
The race happens on the first weekend of August every year. It kicked off on the Friday with the competitor registration at the Northam Swimming Pool and then their craft were taken down to the race marshalling area on the banks of the river. Late in afternoon and into the evening was the Avon River Festival with a huge fireworks display on the Avon River, stage shows featuring a variety of local talent, a family fun zone, rides for all the family, sideshow alley and roving entertainment, a community street parade, markets for avid shoppers, and food. On Saturday morning the event kicked off proper. As I arrived I could see hot air balloons drifting lazily above the river. The power craft were away quickly and smoothly and then it was the turn of the paddle craft. I was surprised to see that someone was competing for the first time on a Stand Up Paddleboard (SUP). Barely had half the paddle craft left than the news came through that the first power craft had reached Toodyay. It was going to be a very fast race with little hope of getting shots of the power craft. I spent a total of an hour and half standing on the swing bridge -it is a wire suspension bridge that bounces a lot, the police constable standing next to me complained of feeling seasick from the constant motion. It didn’t effect me but it really made me glad that I had the in body stabilisation activated on the cameras. After the start I went to Williamson Weir stayed there for an hour and a half. The Weir is man-made and its concrete lip and rock wall are hazardous to boat and paddler alike so around half the competitors choose to portage around it. Thankfully the other half run it and you get the thrills and spills with plenty of encouragement from the watching crowd. Finishing up in Toodyay for the day is great. There is always a great vibe with a tremendous crowd and a party like atmosphere. When I got there the town was packed and in full on carnival mode. It took an age to find some parking and get down to the river. Here there was a team change over area, and along the riverside were lots of anxious looking paddlers all staring up river for any sign of their team mates. As the first canoes started to come round the corner and pass under the timing gate they got their first sight of their team mates and their faces would burst into a huge grin of relief. The spectators would burst into rapturous cheers as the fresh team-mate paddled away heading for the Boral Campsite that marked the halfway point and the end of day one.
I couldn’t face getting up at 4;30am in the dark and freezing cold to get to the start at Boral Camp for day two so I just headed out a bit later and went straight to Bells Rapids in Walyunga National Park. You have to leave the car at the nearby state equestrian centre and then you taken in by bus. From there it was a quick walk to what I call the media rock. It’s a nice big rock that juts out into the river which gives a good view of the competitors coming under the bridge and through the rapids. I got there just as the TV crews were claiming their spots and setting up. I squeezed onto the end closest to the bank and put my tripod up to mark my territory. When the press photographers arrived they gave us a filthy look, but as they were shooting hand-held they didn’t need as much space. A little while later a hopeful photo enthusiast asked if could join us on the rock, one of the guys I know from the papers said it was OK if he didn’t talk about equipment – his or ours – and if he did he’d get thrown in the river. He decided that he couldn’t not talk about kit and took himself off somewhere else. After a couple of hours I knew that I’d have to get my skates on if I was to get to the finish line.
The finish line is in Bayswater a suburb of Perth. A huge screen had been put up and there was a live commentary being given. I positioned myself by the finish line as I find that the images taken as the paddlers beach their boats and walk ashore tells a very powerful story. It does not seem to matter whether they are newbie’s in their first race or veterans each face has a similar look etched upon it. It is a mixture of pain from the sheer physical effort, relief from finishing, and disbelief that it is all over. Some will swear that they will never do it again, but most know that even as they hit the finish line that they will be back next year.
So now a week later, I’ve edited the 50Gb of footage and made a 7 minute clip. As I write this I’m thinking about how things went and what I would change if I were to do it again. Well to start with I wouldn’t bother with the Sony. It produces very nice images, but the screen is terrible. It is winter here and the days aren’t as bright as they can be, but the Sony’s rear LCD panel is virtually unusable. The other thing that puts me off is that the user interface isn’t very intuitive and so adjusting some settings in a hurry is a pain in the nethers. The OMD EM1 mk i is constantly a surprise when shooting video. The touch screen is a pleasure to use and the phase detect auto focus does very well. It is tempting to run off and get a mk ii for the 4K and the improved focusing. The Canon EOS 6d was the surprise, the autofocus is crap, but Technicolor’s CineStyle Profile and Canon’s superb lenses produce gorgeous images. All it needs is a flippy flappy touch screen and dual pixel auto focus and it would be perfect. “The 6d mk ii has that!” I hear you say, but (and there is always a but) the mk ii’s video compression is worse than the mk i. What Canon give they take away! There is always the EOS 80d. I might try to hire one for the next project I shoot. I wish I’d used the gimbal more instead of the monopod, accepting the fact that I couldn’t use it for the long lens shots. Sound could be a lot better – it is the aspect of video I always struggle with. I’m also beginning to think that I’ve out grown iMovie – a better editor would give me some more options. I’ve downloaded DaVinci Resolve to give that a whirl on my next project. In many ways I’m no different to the competitors in the race – I’m already starting to plan for next year!








You must be logged in to post a comment.